Entering, Validating, and Approving Data
Last updated on 2026-04-24
Overview
Once a data collection process has been started, assigned collectors can view, edit, validate, and submit data through forms. This chapter covers the complete workflow from entering data to final approval.
This article contains the following sections:
Viewing the Data Collection Processes
Users can view and browse the forms within data collection processes they are authorized to access:
- Administrators can view all forms in the system.
- Collectors can view forms for reporting entities they are assigned to (all statuses).
- Approvers can only view forms for reporting entities they are assigned to with status Submitted, Approved, or Cancelled.
To view the forms, navigate to Data Collection | Data collection.
The following columns are available:
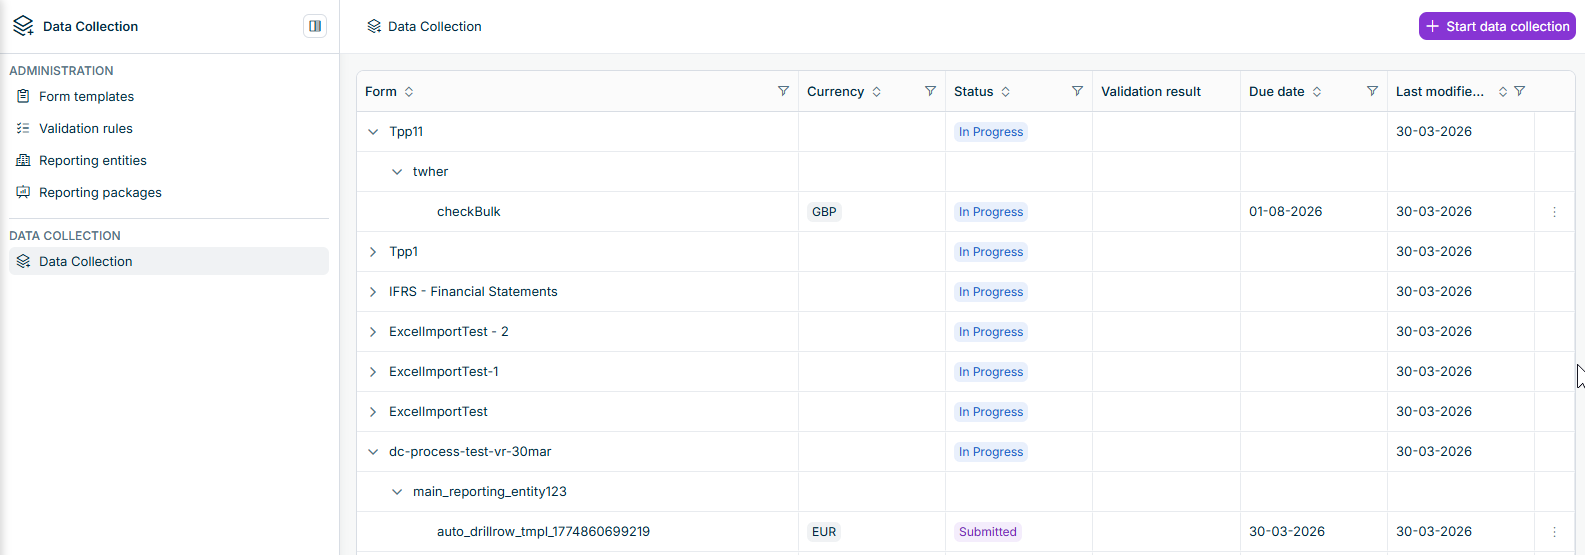 Forms list
Column
Description
Form
Hierarchical view showing data collection process name, reporting entity name, and form name
Currency
Default currency of the reporting entity, which is also the currency of each of its forms
Status
Current status of the form or data collection process.
Forms can have the following statuses:
- New: The form exists, but no Collector has started editing yet.
- In Progress: A Collector has started work on this form. Data entry, import, or validation can continue until the form is submitted.
- Submitted: The form was submitted and is awaiting approval.
- Approved: An Approver approved this form.
Data collection processes can have the following statuses:
- New: The process exists; collection has not yet effectively started.
- In Progress: Data collection is in progress for this process as a whole: at least one form still needs work before the process can finish.
- Finalized: The process is complete.
Validation results
Indicator showing the result of validation rule execution if validation rules have been executed
Due date
Deadline for form completion
Last modified on
Date of the most recent modification
Editing Forms
To view a form, click on the form name in the data collection list. The form detail view displays all sections and elements defined in the form template, along with any data already collected.
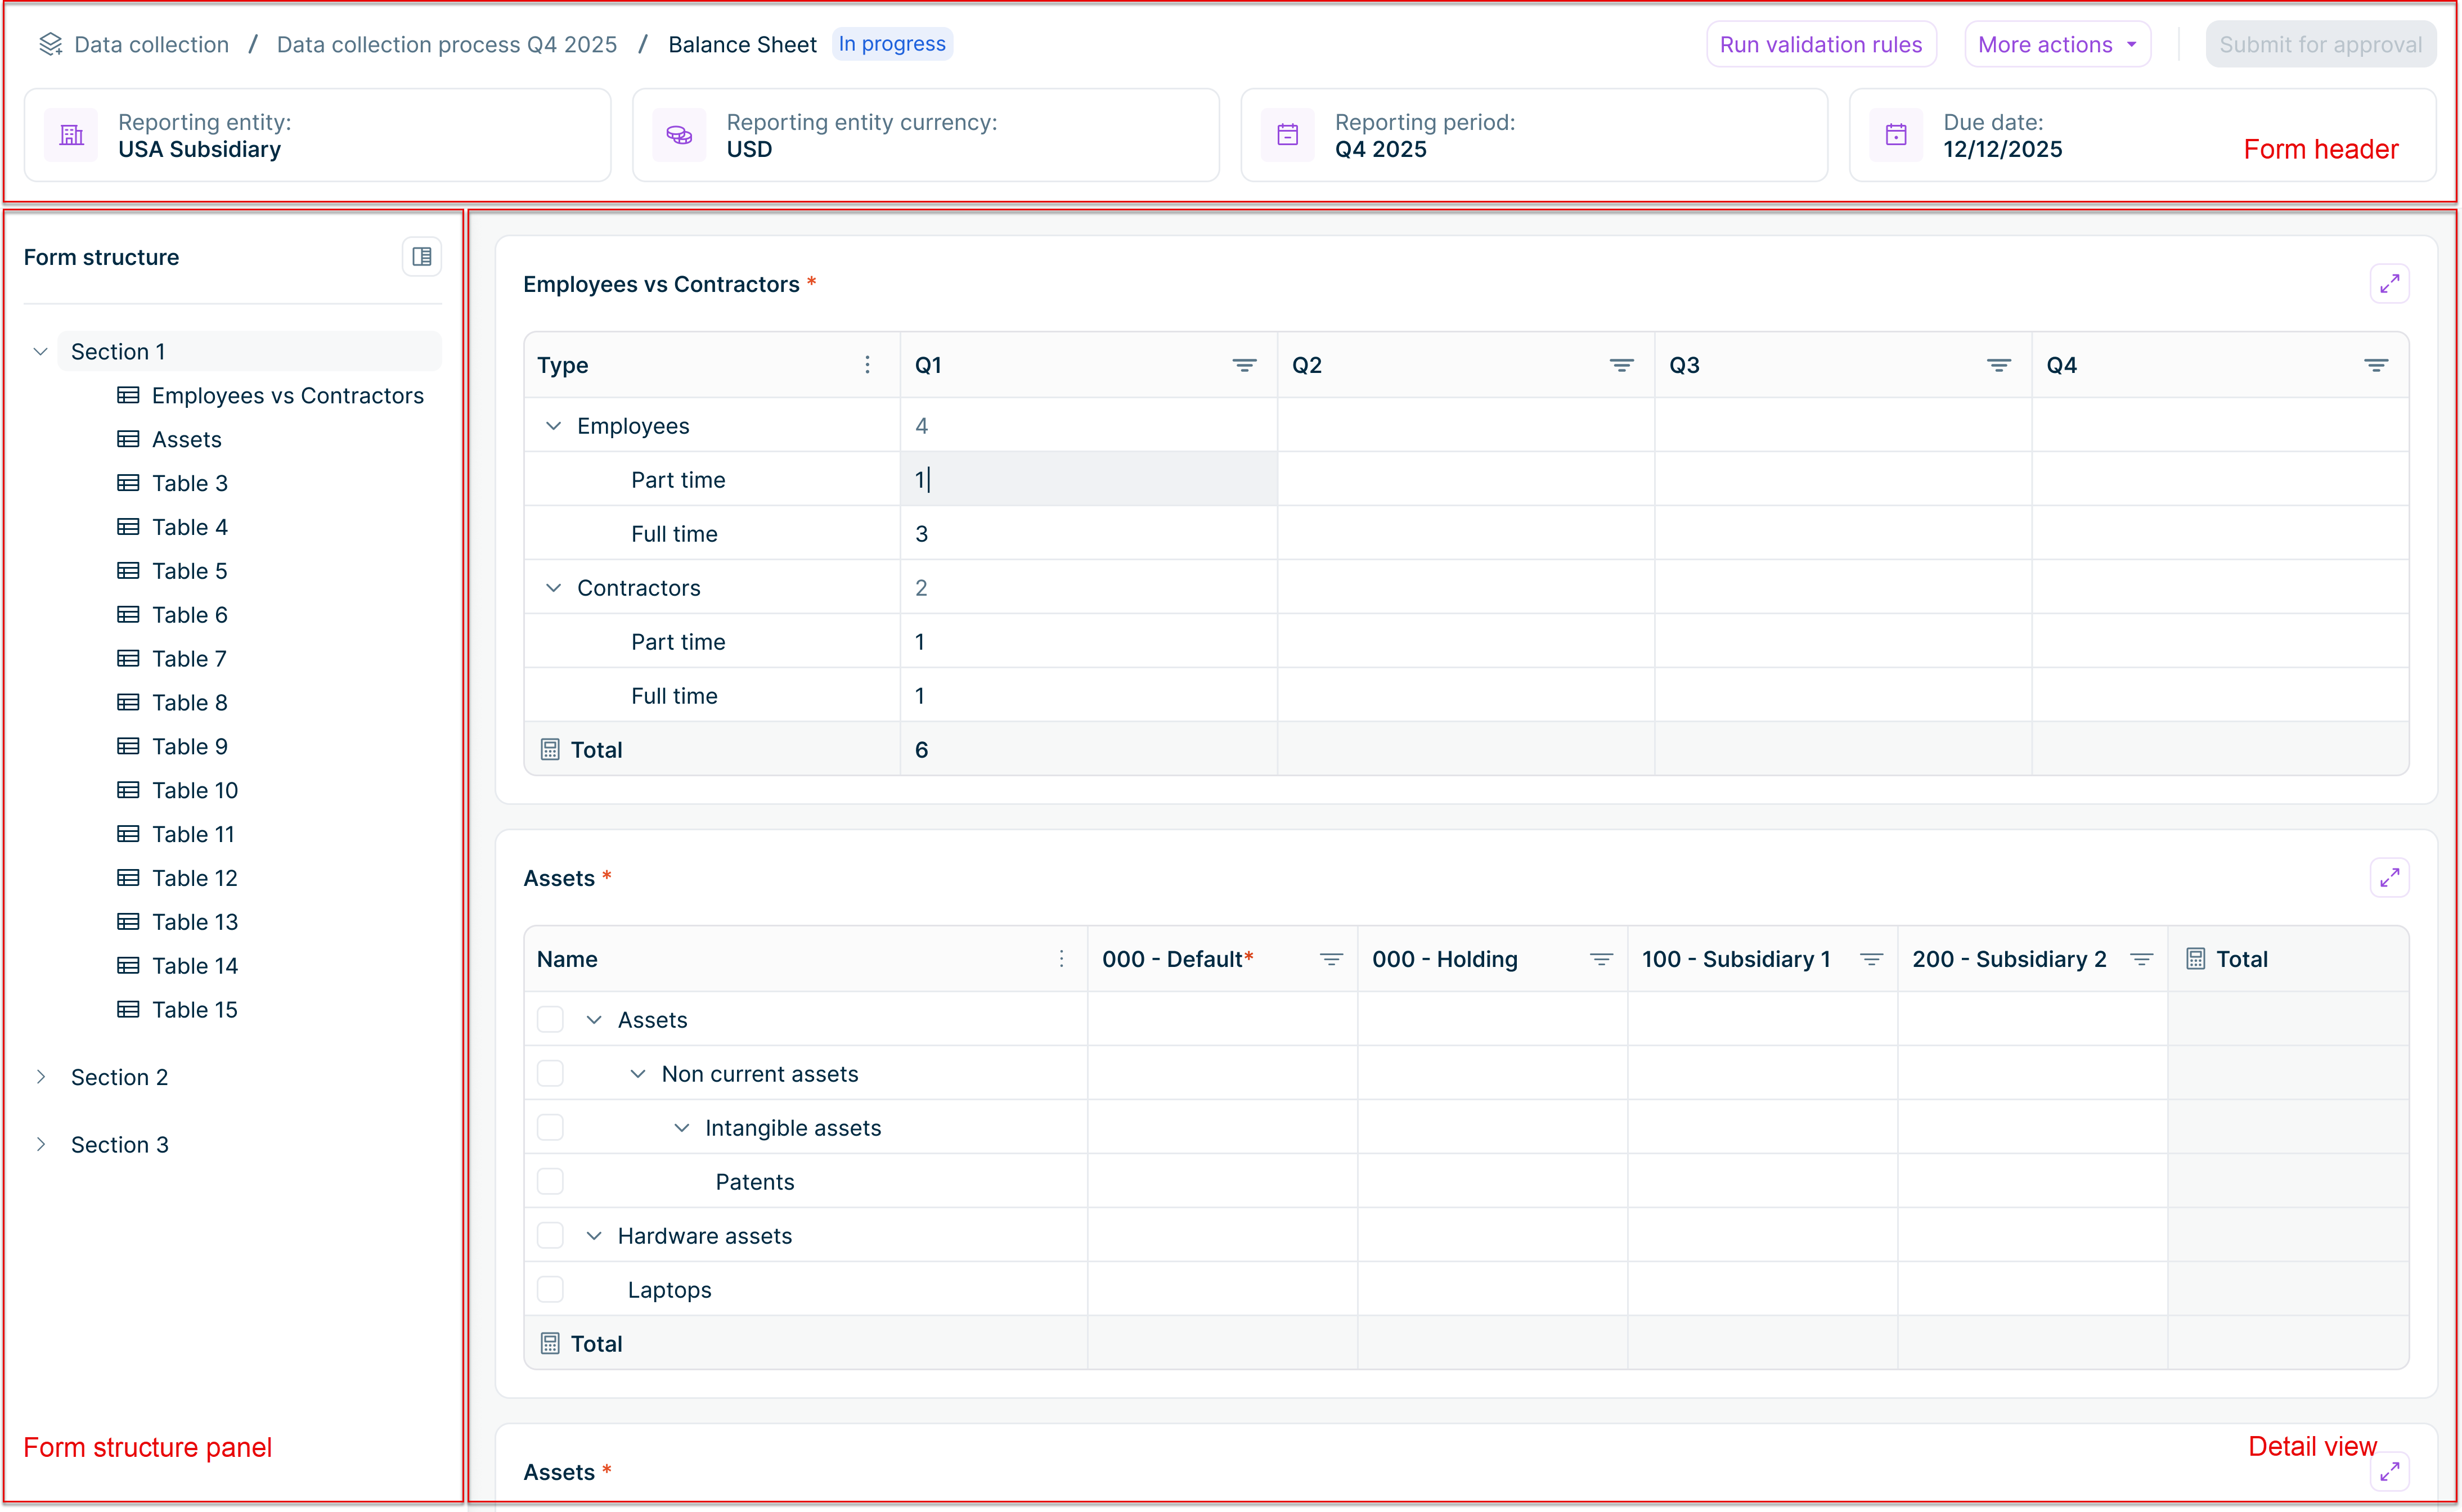 The detail view of a form
Forms consist of the following sections:
Form section
Description
Form header
Displays the key details of the form at a glance: data collection process name, form name, form status, reporting entity, default currency, reporting period, due date, and validation status (once validation rules have been run).
The header also contains action buttons. The buttons available depend on your role and the current form status:
- Start editing: Available when the form status is New. Click to unlock the form for data entry. The form status changes to In Progress.
- Run validation rules: Available when the form is In Progress. Executes the validation rules configured for this form.
- More actions: Contains the Import data option. Use this to import data from:
- Consolidation & Financial Planning
- Excel (upload a file)
- Submit for approval: Available when the form is In Progress. Submits the form to the assigned Approvers. The form status changes to Submitted.
- Approve: Available to Approvers when the form status is Submitted. Approves the form. The form status changes to Approved.
- Send back: Available to Approvers when the form status is Submitted. Returns the form to the Collector for corrections. The form status changes to In Progress.
Form structure panel
Left sidebar showing all form sections and their subordinate elements. Click on a section or element to navigate directly to it. Sections can be expanded or collapsed.
Element detail view
Displays all form sections and elements with the data collected so far. Tables with hierarchical rows allow drill down to any level of detail. Failed validations are indicated next to the affected elements. If the form is in status New, Submitted, or Approved, elements are displayed in read-only mode.
Starting to Edit a Form
When a form is first created, it has the status New and is displayed in read-only mode.
To start editing a form:
Open the form by clicking on its name in the forms list.
Click Start editing in the top right. The form status changes to In Progress and the form becomes editable.
Only Collectors assigned to a reporting entity in a reporting package can edit that reporting entity's forms. Administrators can edit any form regardless of reporting entity assignments.
Entering Data
Once a form is in In Progress status, Collectors can enter data manually or import it from an external source.
To import data instead of entering it manually, click More actions | Import data and choose from Excel or Consolidation & Financial Planning. See Importing Data for details.
To enter data manually:
- Click on a cell to enter or edit values
- Data is saved automatically as you type
- For tables with hierarchical rows, only lowest-level rows are editable. Superordinate rows aggregate values automatically.
- If drill-down is configured for a row or column, enter data at the drill-down level
Multiple Collectors assigned to the same reporting entity can edit the form concurrently. If two users modify the same cell at the same time, a conflict dialog appears. You can resolve the conflict by keeping your value, accepting the other user's value, or entering a different value.
Entering Data in Drill Down Cells
When drill down is configured for a row or column, the cell in the main table is read-only. Its value is automatically calculated as the sum of all drill down entries. To enter or edit values, click the drill down icon (![]() ) in the cell.
) in the cell.
Drill down can be configured at row level or column level, but not both on the same pivot table. Each level can have one or two drill down levels. The following sections describe what happens when you click the drill down icon, depending on how many levels are configured.
Single-level drill down
A dialog with a table opens, showing one row per dimension element. The table contains the following columns:
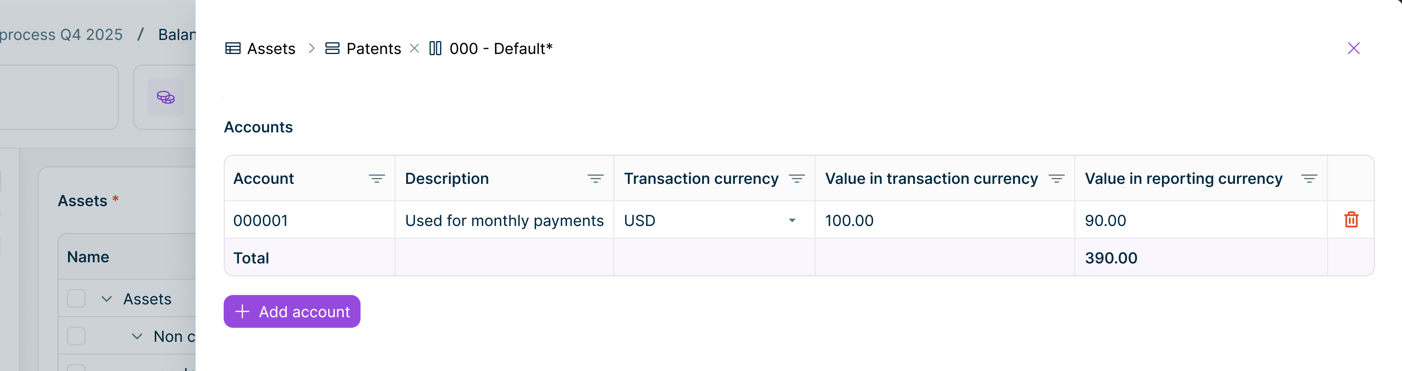 Drill-down dialog – single level
| Column | Description |
|---|---|
| [Dimension name] | Identifier of the dimension element (read-only) |
| Description | Description of the dimension element (read-only) |
| Transaction Currency | Drop-down list for selecting the transaction currency |
| Value in transaction currency | Editable value in transaction currency |
| Value in reporting currency | Editable value in reporting currency |
Two-level drill down
A dialog with two tables stacked vertically opens:
Level 1 (top): One row per Level 1 dimension element. The Value in reporting currency column is read-only and shows the aggregated sum of all Level 2 entries for that element. Click a Level 1 row to select it and load its Level 2 entries in the grid below.
Level 2 (bottom): The detailed entries for the selected Level 1 element. Transaction currency and values are editable here. The section title shows the name of the selected Level 1 element.
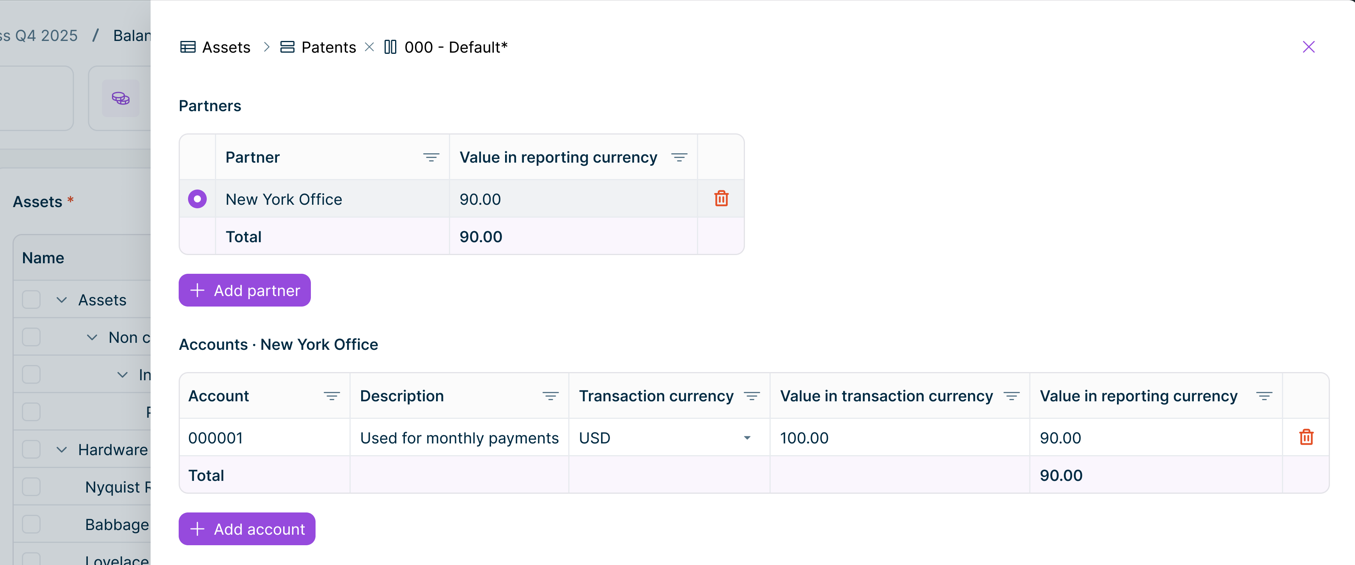 Drill down dialog – two levels
Adding entries
Click + Add [dimension type] to open a dimension selector and add a new entry.
Deleting entries
Click the delete icon at the end of a row and confirm the deletion. When all entries are deleted, the parent cell value becomes empty.
Saving changes
Changes in the drill down modal are saved automatically when you leave a cell, for example by pressing Enter, or Tab, or by clicking elsewhere. Pressing Escape while editing a cell cancels that edit without saving. There is no Save button – close the dialog using the X button, by pressing Escape when no cell is active, or by clicking outside the dialog.
Validating Data
Data Collection provides validation rules that can be executed during a data collection process. These rules check data quality within the forms of a single reporting entity and are executed from within a form.
Executing Validation Rules
To execute validation rules, click Execute validation rules in the top right of a form. The system executes all active validation rules that apply to the form and displays a summary when complete.
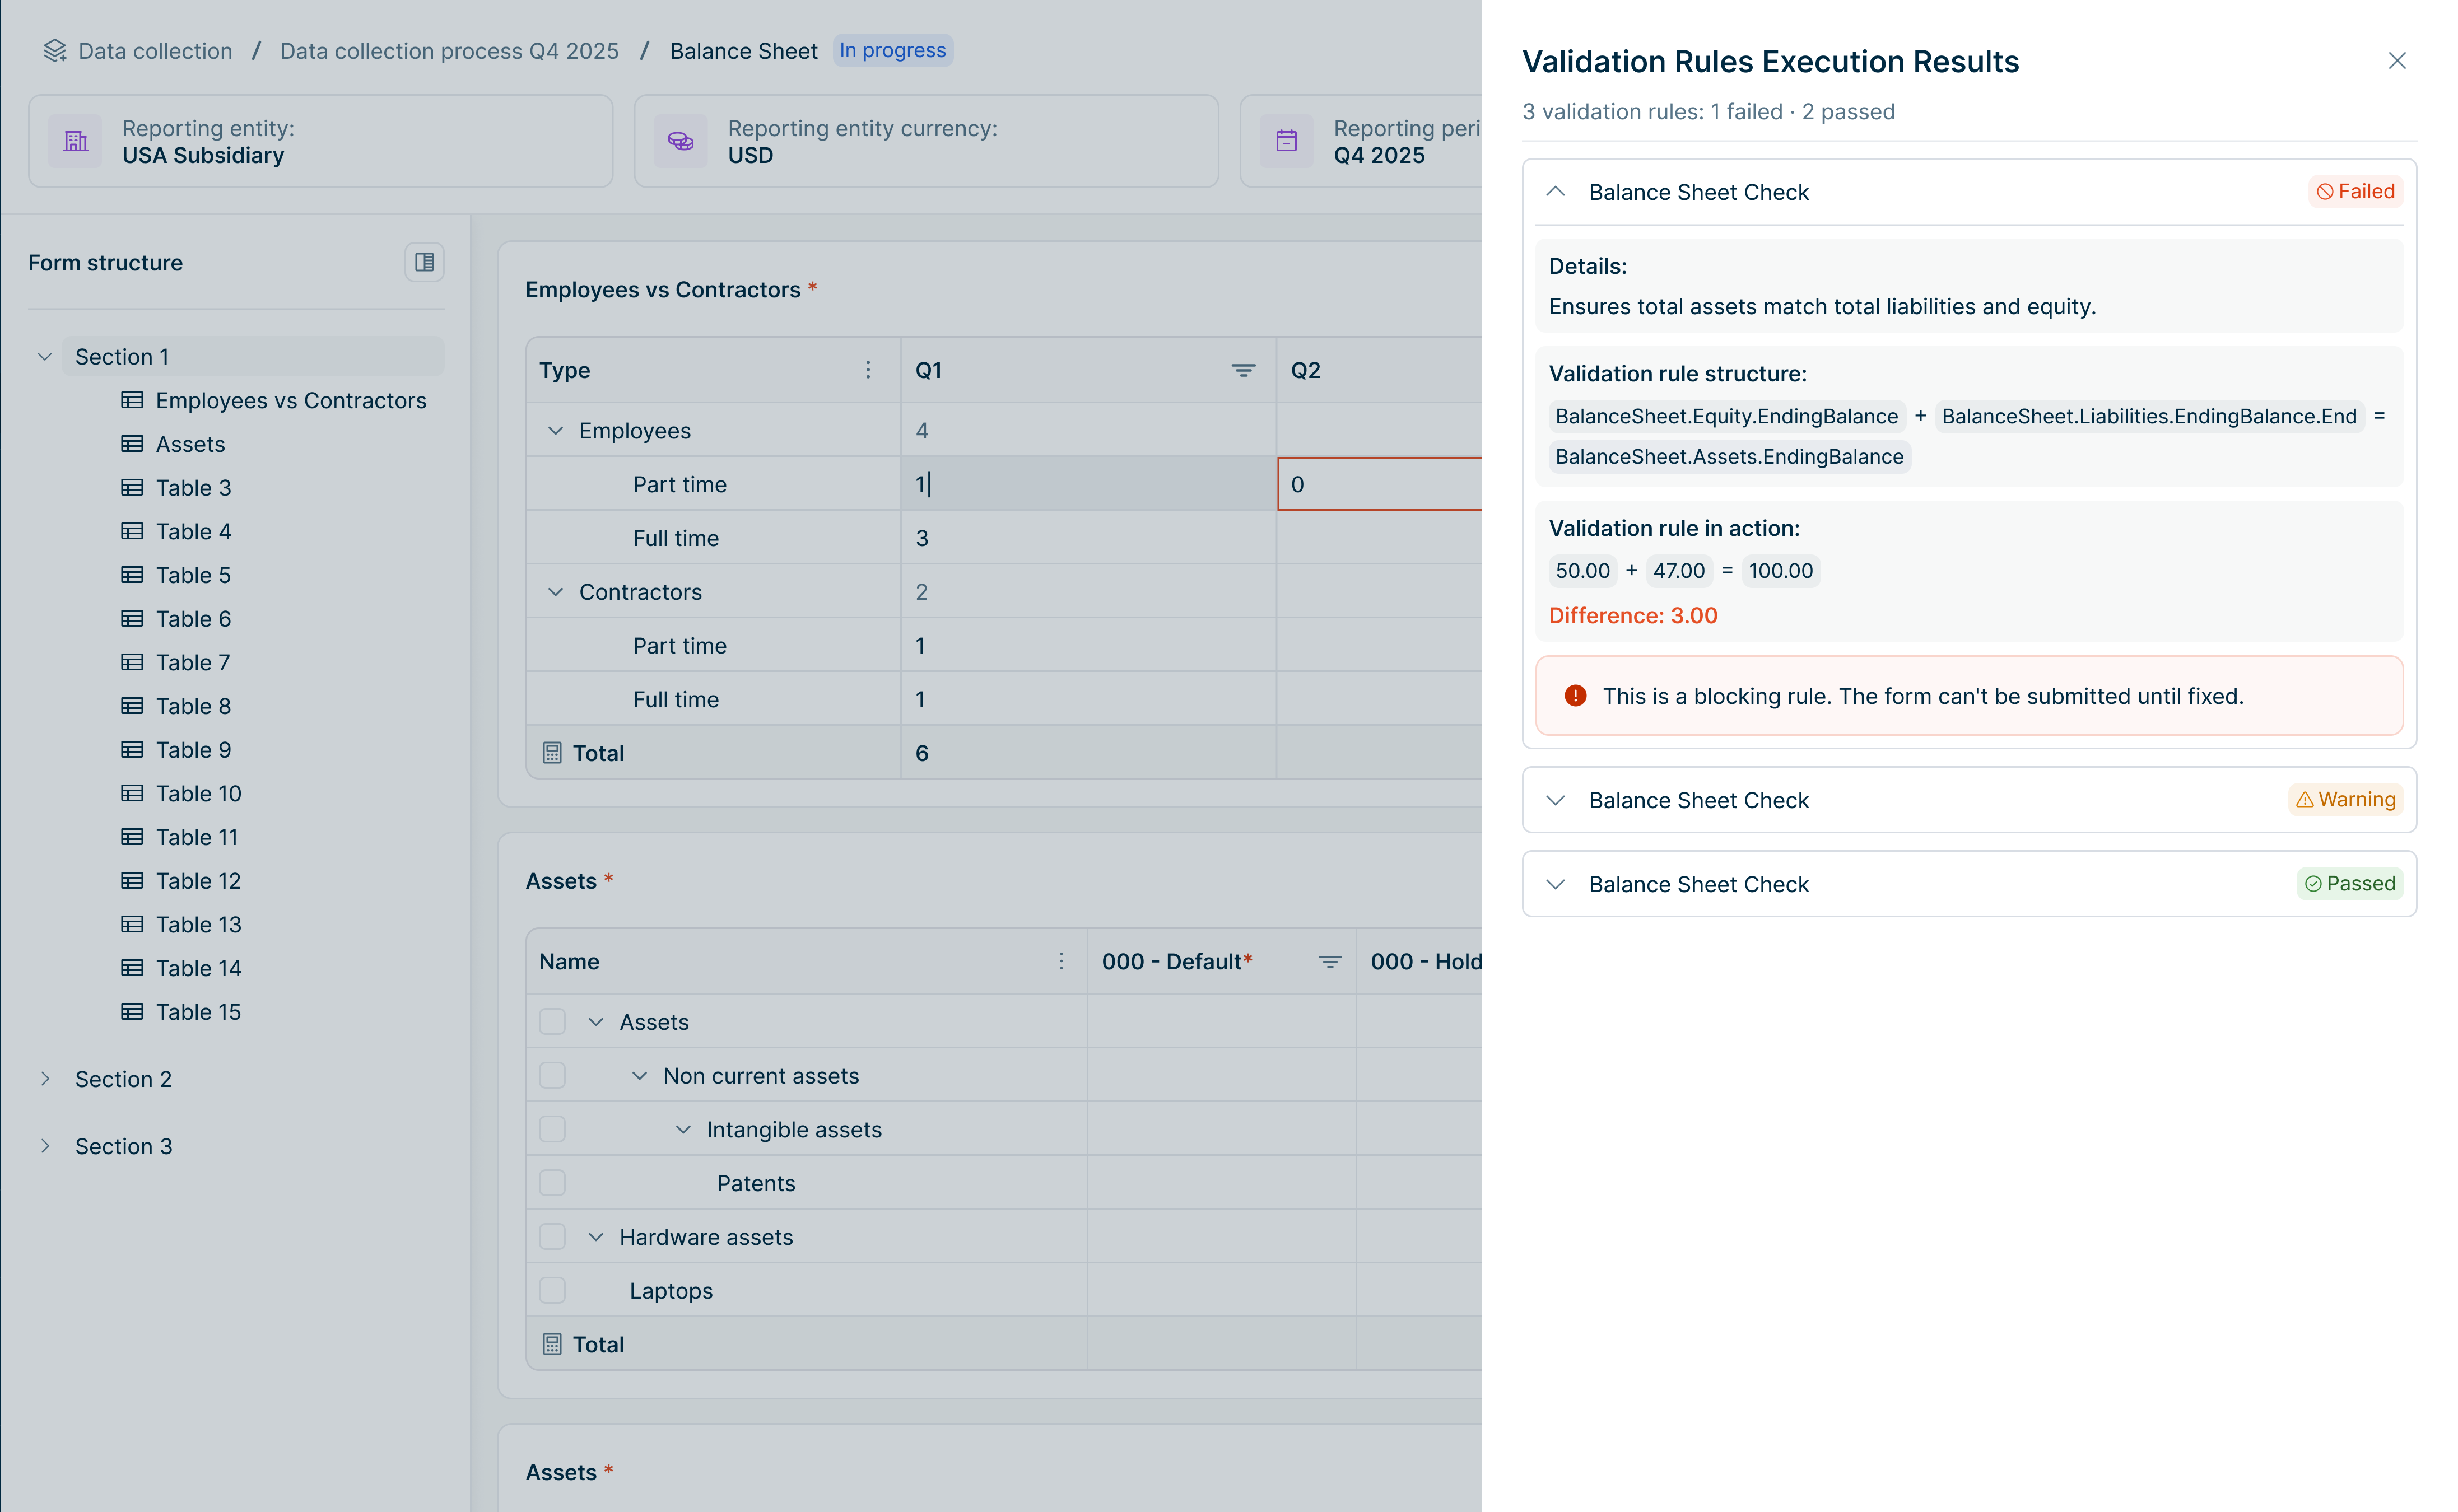 Summary of all validation rules executed on a form
Viewing Validation Results
After validation rules are executed, a results panel displays:
- Blocking – Critical errors that must be resolved before submission
- Warning – Issues that should be reviewed but do not prevent submission
- Passed – Rules that completed successfully
To view details for a specific rule, expand the rule row.
The expanded view can include:
- Details: Business context of the rule
- Validation rule structure: The configured formula or logical expression
- Validation rule in execution: Values used during execution and the calculated difference (if applicable)
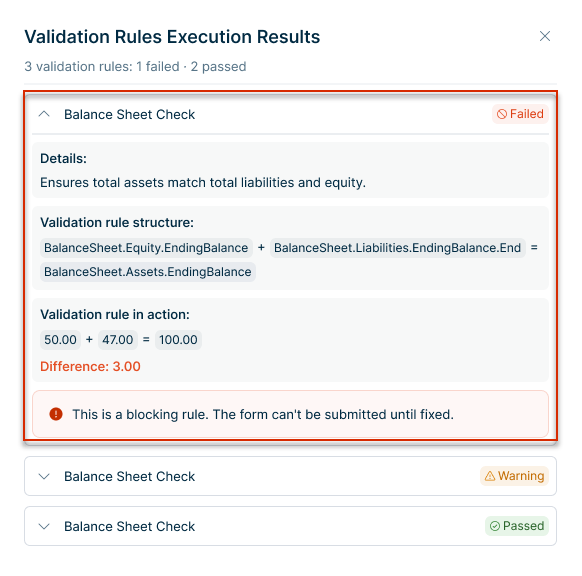 Viewing validation rule details
Form elements referenced by failed validation rules are highlighted directly in the form.
Outdated Validation Results
If data is changed after the last validation execution, the existing validation results are no longer up to date. In this case, a Validation outdated warning is displayed below the form header. For users who can execute validation rules i.e. Collectors, the warning includes an Execute validation rules action so they can immediately start a new validation execution.
The warning is removed automatically when:
- validation is completed successfully and results are up to date, or
- the form status changes from In Progress to another status.
Submitting Forms
After entering data and executing validation, Collectors submit forms for approval.
To submit a form:
Navigate to the form to be submitted and click Submit for approval in the top right. The Submit for Approval dialog is displayed:
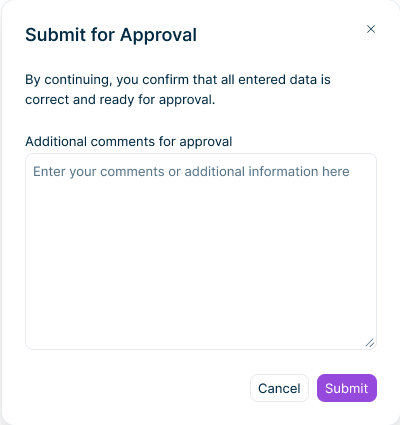 'Submit for Approval' dialog
Optionally, add comments to provide context for the Approver.
Click Submit. The form status changes to Submitted and the form becomes read-only. A notification is sent to the assigned Approvers.
Forms cannot be submitted if:
- Mandatory fields are not filled in
- Validation rules have not been executed
- Blocking validation errors exist
Approving and Sending Back Forms
Approvers review submitted forms and either approve them or send them back for corrections.
Approving a Form
To approve a form:
Open a form with status Submitted.
Review the data and any validation of type Warning.
Click Approve in the top right. The Approve dialog is displayed.
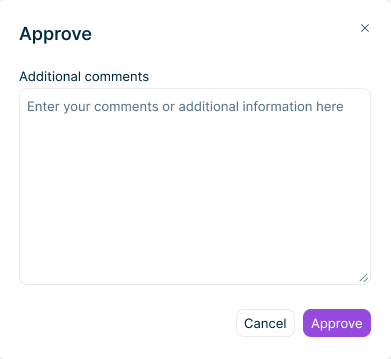 'Approve' dialog
Optionally, add comments. Click Approve to confirm.
The form status changes to Approved and a notification is sent to the Collector. When all forms in a data collection process are approved, the process status changes to Finalized.
Sending Back a Form
If the data requires corrections, Approvers can send the form back to the Collector.
To send back a form:
Open a form with status Submitted.
Click Send back in the top right. The Send Back dialog is displayed.
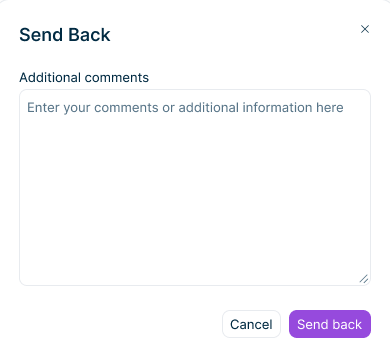 'Send Back' dialog
Add comments explaining what needs to be corrected.
Click Send back to confirm.
The form status returns to In Progress and the Collector can edit and resubmit the form. The Collector can view the rejection comments to understand what needs to be corrected.