Creating and Configuring Postings in Journals
Last updated on 2026-05-04
Overview
In Consolidation & Financial Planning, manual postings can be created for all reporting entities or consolidation areas in the Journals workspace, for periods that are not locked for editing.
In addition, manually cretaed postings can be reversed by means of cancellation.
To analyze, review, or share posting data, you can generate a report of all postings. For instructions on how to do this, see Creating a Posting Report.
This article contains the following sections:
Creating a Posting
To create a posting for a reporting entity or consolidation area:
- In the dimension bar, select the combination of data level and reporting entity or consolidation area for which a posting should be created.
- Right-click any folder and choose Create | Posting.
The Create Posting section is displayed:
 Creating of a posting for a reporting entity
 - Specify the name of the element.
- If applicable, change the currency in which the posting is to be made.
- If applicable, change the period for the posting.
- If applicable, change the adjustment level.
- Click Continue and follow the steps below to configure the posting.
Configuring a Posting
To configure a posting, click the name of the desired posting in the tree view, and then click Edit in the top right.

General Properties
The following properties can be edited in the header:
Property
Description
Name
Name of the posting
Currency
Currency in which the postings are to be made
Adjustment level
Adjustment level in which the postings are carried out
Values Tab
The following options are available on the Values tab:

The following options are available in the toolbar of the Values tab:
Option
Description
Show and hide account hierarchies
Allows showing or hiding additional account hierarchies for account selection
The ledgers specified here are displayed in the table below. By default, the general ledger is available for account selection which is assigned to the reporting entity or consolidation area for which the posting is created. When creating a new posting, the general ledger account hierarchy (including all subledgers) is automatically selected if the user has the necessary permissions.
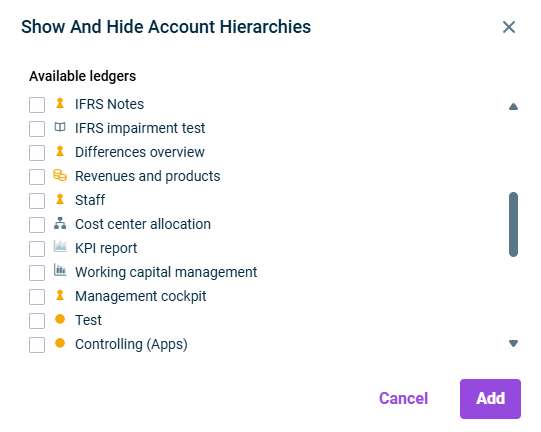
'Show and Hide Account Hierarchies' dialog
Edit value columns
Allows editing the value columns of the posting mask. A dialog is opened, in which you can add or remove value columns, and store a comment such as the specific posting date for each value column
Show cumulated
Displays cumulated values in the posting columns, i.e. the total for all posting entries.
If this button is not activated, all values of the posting entries of a posting are listed separately.
Resolve difference
Resolves differences (values) within the posting
D/C recording
Switches the view from plus and minus recording to the entry of accounting values in debit and credit.
Historical exchange rate translation
Activates the historical exchange rate translation for this posting. Check Historical Exchange Rate Translation to see how to configure the section.
Cost center/Partner/Transaction type
Toggles visibility of the respective columns in the table
Hiding these columns does not affect the data stored in them — the system retains the information and uses it when generating the posting.
Option
Description
Account
Selection of an account or item for creating a posting
You can display only those accounts that contain postings for selection by clicking the drop-down list in the Account column and selecting the Show only accounts with postings option:

Notes on the D/C recording button:
- When the D/C recording button is deactivated, the general ledger account hierarchy (including all subledgers) is split into two blocks representing the debit and credit sides of the same posting:
In the Debit posting block, only debit accounts that can be debited are shown.
In the Credit posting block, only credit accounts that can be credited are shown.
When the D/C recording button is activated, all entries are shown in a single table. You can select D (debit) or C (credit) for each line, and the account list includes all valid accounts.
Cost center/ Partner/ Transaction type
Allows selection of a cost center/partner/transaction type from the respective drop-down lists
Value columns
Allows entering values that should be posted
Value columns are identified by the periods to which the postings should be made.
Posting text
Description for the posting
- Select the cell with the posting value that you wish to define a historical exchange rate translation for.
- Click the Historical exchange rate translation button above the table. A Historical exchange rate translation section is displayed under the table.
- Activate the option Activate historical exchange rate translation for the selected posting value.
- In the table, specify the desired exchange rate for each of the displayed currencies.
Note: For undefined exchange rates, the exchange rate 1.0 is fixed by default.
Notes on historical exchange rate translations:
- The Historical exchange rate translation button is only displayed if at least one currency translation has been configured in a reporting entity or consolidation area. To configure currencies and currency translations in reporting entities or consolidation areas, see Creating and Configuring Reporting Entities and Creating And Configuring Consolidation Areas.
- Historical exchange rate translations can only be defined for accounts of type Currency amount.
- When copying the posting document to another journal, the fixed exchange rates are retained, provided the same currency translations have been configured in the target journal.
- When historical exchange rate translation is defined for a cell's posting value, a purple chat symbol appears to the left of the posting value in that cell.
Cancelling postings
You can use the Cancel posting function to reverse a manually created posting. The cancellation can be cumulative after the last month or after each month.
Canceling a posting does not create a new, separate posting, but rather “reverses” the posting values defined in the posting within the defined period.
To cancel a posting:
In the journal, select the desired posting and click Edit to open the edit mode.
Activate the Cancel posting option and select one of the following options:
- Cumulative after the last month, if the cancellation is to be carried out cumulatively after the last month of the defined period that contains values
- After every month, if the cancellation of the posting values is to be carried out individually in each subsequent month

Click Save.
The posted values are cancelled by the system.
Finalizing Postings
Postings in the actual data level can be finalized, as a result of which they can neither be deleted nor changed. Finalized postings can only be undone using cancellation postings.
To finalize a posting, right-click the name of the desired posting in the Journal and choose Finalize posting from the context menu. Confirm the displayed message:

As soon as the posting has been finalized, a lock icon ![]() is displayed next to it in the tree view:
is displayed next to it in the tree view:
