Creating and Configuring Transfer Actual Balance to Plan Wizards
Last updated on 2025-12-05
Overview
The wizard can be used to transfer existing account balances from actual to planning periods for reporting entities.
The wizard can be created for all reporting entities for values of ledgers and schedules in planning data levels, either within a journal or from a ledger.
This article contains the following sections:
Creating a Transfer Actual Balance to Plan Wizard Within a Journal
To create a transfer actual balance to plan wizard within a journal:
- Open the Journals workspace.
- In the dimension bar, select the combination of a planning data level and reporting entity for which a transfer actual balance to plan wizard should be created.
- Right-click the root folder and choose Create | Transfer actual balance to plan from the context menu.
- The system checks whether the selected planning data level is synchronized with the actual data level. If it is not, the Edit Transfer Actual Balance to Plan dialog is displayed:
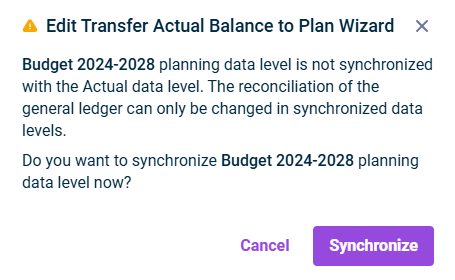
Synchronizing the planning data level with the Actual data level - Click Synchronize.
- The Create Transfer Actual Balance to Plan Wizard dialog is displayed:
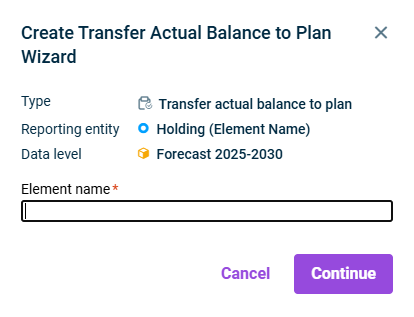
Creating a transfer actual balance to plan wizard - Specify the Element name and click Continue.
Creating a Transfer Actual Balance to Plan Wizard From a Ledger
To create a transfer actual balance to plan wizard from a ledger:
- Open the Reporting and analyzing workspace.
- Select the desired ledger (general ledger, sub-ledger or statistical ledger).
- In the dimension bar, select the combination of planning data level and reporting entity for which the wizard should be created.
- Right-click in the row of the ledger hierarchy for which a sheet should be created and choose Create | Transfer actual balance to plan.

Creating a wizard from a ledger. - The system checks whether the selected planning data level is synchronized with the actual data level. If it is not, the Edit Transfer Actual Balance to Plan dialog is displayed:

Synchronizing the planning data level with the actual data level - Click Synchronize.
- The Create Transfer Actual Balance to Plan Wizard dialog is displayed:

Creating a transfer actual balance to plan wizard - Specify the Element name and click Continue.
Configuring a Transfer Actual Balance to Plan Wizard
To configure a transfer actual balance to plan wizard, click the name of the desired element in the tree view, and then click Edit in the top right. The configuration is divided into general properties in the header and two configuration steps in the main section of the editing mode.
The following properties can be configured in the header:
Property
Description
Element name
Name of the wizard
Cost center
Cost center in which the posting is to be performed by the planning wizard
Currency
Currency in which the posting is to be performed by the planning wizard
Adjustment level
Adjustment level in which the posting is to be performed by the planning wizard
Basis
Adjustment level (group) used as the planning basis
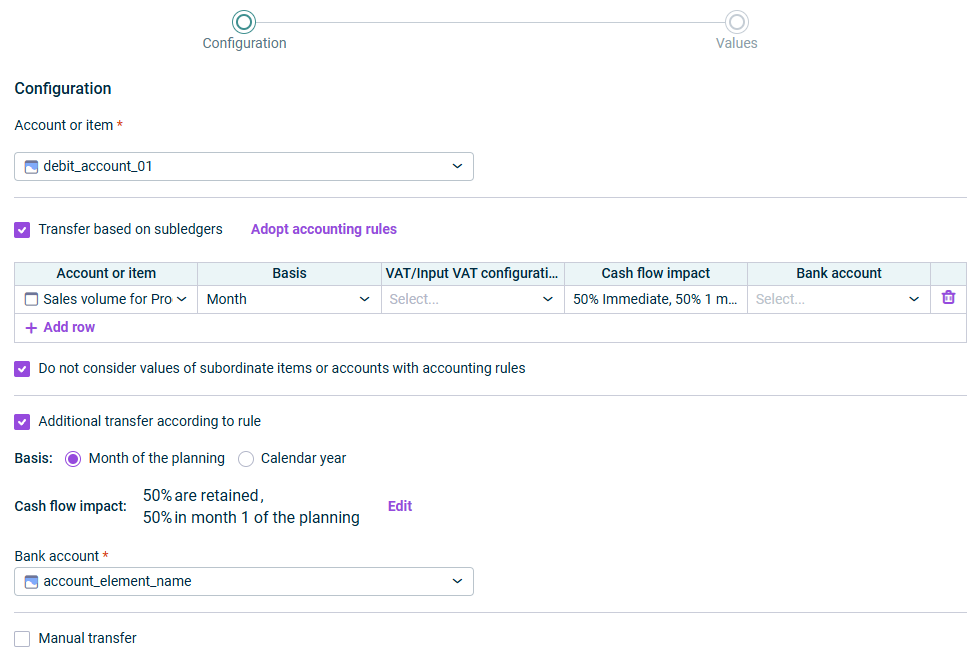
The following options can be configured in the Configuration step:
Option
Description
Account or item
An account or item that should be transferred
Transfer based on subledgers
In the subledger-based configuration, you can either define rules for items and accounts that differ from the existing accounting rules manually or adopt the accounting rules that have already been defined.

Transfer based on subledgers
Defining accounting rules manually
The following needs to be specified:
- Account or item: Select an account or item to be transferred from the drop-down list.
- Basis: Select the value that corresponds to the period to which the transfer should apply.
- VAT/input tax configuration
- Cash flow impact
- Bank account: Select the account to which the transfer amount is to be posted.
- Do not consider values of subordinate items or accounts with accounting rules: This option determines whether the accounting rules of subordinate items and accounts are considered. The checkbox is activated by default. Deactivate the checkbox to reconcile only the difference between the selected item or account and its subordinate items or accounts with their own accounting rules, instead of the entire value.
Adopting accounting rules
Click the Adopt accounting rules to automatically add all accounting rules of type Payment with a time offset (Time-delayed payment or Down payment transaction) to the table, provided the receivables or liabilities account matches the one being configured. Any existing accounts in the table will be removed.
Transfer according to rule
In the rule-based reconciliation, it is possible to specify a user-defined rule for the reconciliation of the general ledger. This option should be used if an accounting rule from the planning data level must be corrected, for example because a different payment modality was assumed in the original planning.
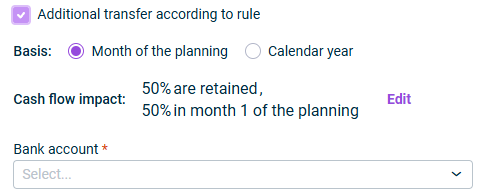
Transfer according to rule
The following needs to be specified:
- Basis:
Choose Month of the planning to enter the number of calendar months from the beginning of the planning data level.
Choose Calendar year to enter certain calendar months for the cash flow impact. - Cash flow impact:
If Month of the planning was previously selected, enter the number of calendar months to calculate the cash flow impact from the beginning of the planning data level to the entered number of calendar months.
If Calendar year was previously selected, enter the calendar month to calculate the cash flow impact of the calendar months you entered (see Cash flow impact). - Bank account: Select the account to which the transfer amount is to be posted.
Manual transfer
It is possible to adapt individual accounts using the manual transfer.
Select the Bank account to which the transfer amount is to be posted.
The Tranfer according to rule and Manual transfer options are mutually exclusive.
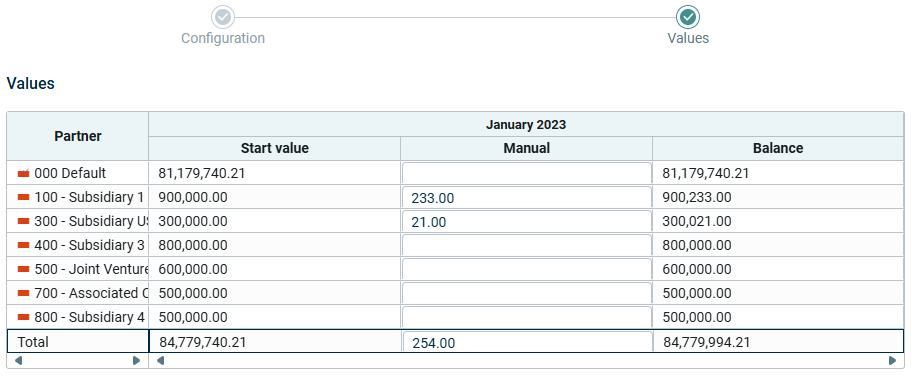 'Values' step in 'Transfer actual balance to plan' wizard
Option
Description
Add/remove period
- Only available if you have activated the Manual transfer option in the Configuration step
- Can be used to add or remove additional periods
Eliminate residual values
- Only available if you have activated the Manual transfer option in the Configuration step
- Can be used to clear any remaining balance from the selected period
Partner
The partner(s) used for the postings that create the balance that is to be transferred. If multiple partners were used, they are shown in separate rows in the table.
Start value
- Added only to the first month column and corresponds to the first month at the planning data level.
- It displays the balance of the account or item whose balance is to be transferred using the wizard. The displayed value represents the balance from the last month of the actual data level.
P&L
- Added to all displayed months
- Calculates the amount to be transferred from the account or item selected in the Account or item field to the account selected in the Bank account field within the Transfer based on subledgers table. The calculation is based on the rules configured in the Accounting rules workspace using the items selected in the configuration table.
- If you hover over a cell in this column, a tooltip displays a breakdown of the calculation based on the different accounting rules selected during the configuration step.
This column is visible only if you selected the Transfer based on subledgers option during the Configuration step.
Balance
- Added to all displayed months
- For the first month, it calculates the difference between the Start value and the amount in the P&L column for that group.
- For subsequent months, it calculates the difference between the Balance column from the previous month and the P&L amount for the current month.
Manual
- Added to all displayed months
- Manually enter the amount to be transferred for the selected month. You can enter numbers with up to two decimal places; values are rounded from the third decimal (e.g. 0.044 rounds down to 0.04, while 0.045 rounds up to 0.05). You can also use basic mathematical operations: +, -, *, /, parentheses (), the equals sign =, and decimal separators.
This column is visible only if you selected the Manual transfer option during the Configuration step.
Rule
- Added to all displayed months
- Calculates the amount to be transferred from the account or item selected in the Account or item field to the account selected in the Bank account field within the Transfer according to rule table. The calculation is based on the rules defined in the Transfer according to rule section, using the items selected in the configuration table.
This column is visible only if you selected the Transfer according to rule option during the Configuration step.

