Linking Variables to Integrated Data
Last updated on 2025-04-29
Overview
To use the data you integrated via a connection to a source system in your variables, you can link the variables to the integrated data.
You can use this function to perform forecasts based on historicals, for example.
When a variable is linked to integrated data, it will take its value from the data if data exists, and will fall back to its formula if data does not exist (usually only beyond the Last actual date).
You have different options to link variables to integrated data:
- You can link a new variable while creating it.
- You can link existing variables.
- You can link a variable from the data preview.
- You can create a model from a data source in one click.
You can see which data items (from which data sources) are being used at a glance in the Data column and the top bar of spreadsheet:

This article contains the following sections:
Linking a New Variable to Integrated Data
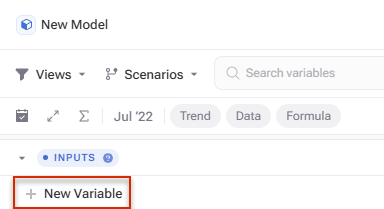
To create a new variable linked to integrated data:
- Click New Variable at the end of a section.
Creating a new variable - The following drop-down menu is displayed:
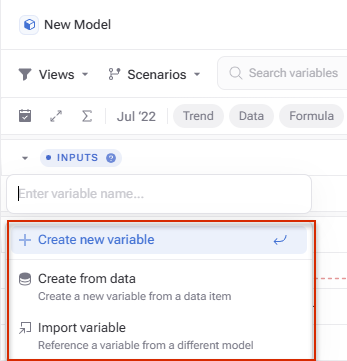
Dropdown menu for a new variable - Click Create from data and select or search for the data source for which you want to integrate data.
- Select from the dropdown list or search for the data item you want to use in the new variable.
The data is integrated into the variable. - If necessary, modify the variable's format type by clicking on the
 icon or the icon to the left of the variable name.
Linking an Existing Variable to Integrated Data
To link an existing variable to a data item, click in the Data column of the variable and choose the data source and data item you would like to connect:

Linking a Variable from the Data Preview
To link a variable to the data item of a data source from the data preview:
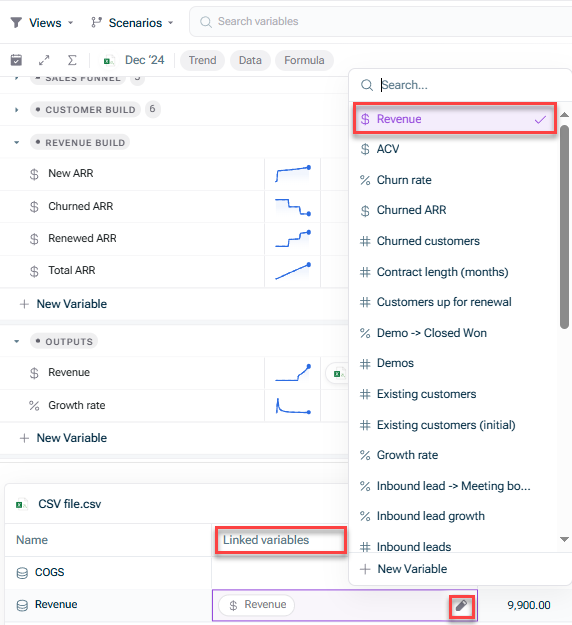
- Click the name of the data source in the overview of the model to open the data preview.
- In the row of the desired data item, click the pen icon
 in the Linked variables column.
 - Choose the variable you want to link the data item to from the dropdown list that appears. (If the variable does not yet exist, you can create it from here by clicking New variable.)

Removing Links From a Variable to Integrated Data
To remove a link from a variable to the data item of a data source, choose one of the following options:
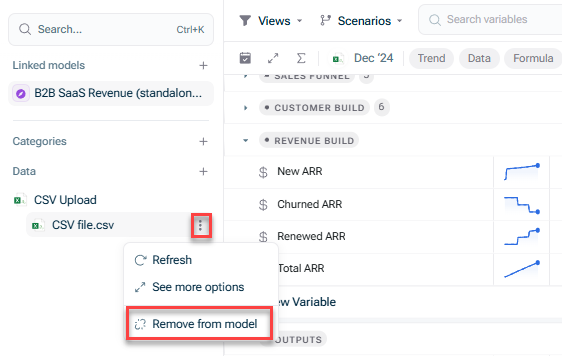
- To remove all links from all variables to a data source within a model, open the three-dot menu behind the name of the data source in the overview of the model and choose Remove from model:
Removing link from all variables - To remove the link from individual variables to a data source within a model, open the data preview of the model, click the pen icon and then on the variable you want to remove:
Removing a link from individual variables
Creating a Model From a Data Source With One Click
If you want to build a model based on underlying integrated data, you can create the model structure in one click. You can use this feature, e.g. to quickly generate a skeleton for a model, such as a P&L model based on a P&L in Xero/QuickBooks.
Each variable is automatically named according to the line items, and is automatically connected to the line item in the data source.
To do so, open the Data workspace and choose Create model from data source from the three-dot menu of the desired data source:

Blanks in Integrated Data
If you have blank values in integrated data that are used in variables, xP&A will treat them as 0 by default, unless you change the data settings to have blanks treated as blanks.
This is useful if you want to exclude the blank values in data from calculations like averages, min/max etc.
Example:
avg(5,10,blank) with the setting Treat as blank will result in avg(5,10) = 7.5.
To change the settings how blanks are treated in an integrated data item, click the data icon in the Data column of a model and choose Advanced settings:

Under Blanks in data, select if you want to treat blanks as zero (default) or if you want to treat them as blanks.
