Creating and Configuring Sheets
Last updated on 2026-05-04
Overview
Sheets offer a flexible way to perform calculations required in the financial planning process in Consolidation & Financial Planning. They can be created for all reporting entities for values of ledgers and schedules in planning data levels, either within a journal or from a ledger.
Information for customers who used the planning function in Lucanet.Financial Client
Sheets are replacing the forms used in the Lucanet Financial Client. In the CFO Solution Platform, Sheets can be created within the Import and Journals workspace.
To ensure transparency and traceability, all the existing forms from the Lucanet Financial Client will still be accessible in the Lucanet CFO Solution Platform under Journals in read-only mode.
This article contains the following sections:
Creating a Sheet Within a Journal
To create a sheet within a journal:
- Open the Journals workspace.
- In the dimension bar, select the combination of a planning data level and reporting entity for which a sheet should be created.
- Right-click the root folder and choose Create | Sheet. The Create Sheet dialog is displayed:
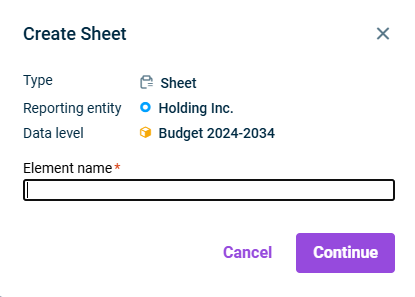
Creating a sheet - Specify the name of the element and click Continue.
Creating a Sheet From a Ledger
To create a sheet from a ledger:
- Open the Reporting and analyzing workspace.
- Select the desired ledger (general ledger, sub-ledger or statistical ledger).
- In the dimension bar, select the combination of planning data level and reporting entity for which a sheet should be created.
- Right-click in the row of the ledger hierarchy for which a sheet should be created and choose Create | Sheet.
 Creating a sheet from a ledger
 - The Create Sheet dialog is displayed:
'Create sheet' dialog - Specify the name of the element and click Continue.
Configuring Sheets
To configure a sheet, click the name of the desired sheet in the tree view, and then click Edit in the top right.

General Properties
The following properties can be edited in the header:
Property
Description
Element name
Name of the sheet
Currency
Currency in which the postings are to be carried out
Adjustment level
Adjustment level in which the postings are to be carried out
Basis
Adjustment level (group) used as the planning basis
Values Tab

The following options are available on the Values tab:
Option
Description
Time period
Used for moving, shortening or extending the planning period. It is possible to change the view to:
- Month, quarter, trimester, semester, or year
- Calendar or fiscal year
- Total period view – when selected, the system automatically adds columns for all previous years with actual data for the respective reporting entity and displays the actual amounts.
Default
Used for restoring the default view of the sheet. In the default view, Year is used as the period. The last year of the actual data level and all years of the selected planning data level are displayed.

The following menu is displayed when clicking the  icon:
icon:
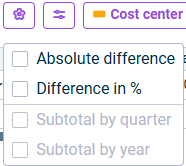
Configuration menu
Choosing one of these options will extend the planning area by the corresponding columns.
The selected configuration is not stored at a system level nor shared between different sheets.

The following menu is displayed when clicking the  icon:
icon:
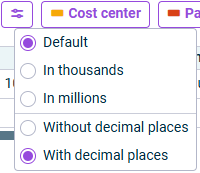
'Change number format' menu
Choosing one of these options will adapt the number format accordingly in the planning area.
Cost center/ Partner/ Transaction type
Clicking the Cost center, Partner, or Transaction type buttons in the toolbar toggles the visibility of the respective columns in the table.
Hiding these columns does not affect the data stored in them — the system retains the information and uses it when generating the posting.
The following options are available in the planning area:
Option
Description
Account or item
An account or an item for which planning should be undertaken. It is also possible to activate the following options:
Create independent variable
If this option is activated:
- The actual period column linked to the actual data level is cleared (if previously populated) and locked for editing.
- The planning period columns linked to the selected planning data level are cleared and the fields can be edited (numbers and basic mathematical operations are allowed). If a formula has been applied that generates results in the planning period column, the corresponding fields are not editable.
- The Cost center, Partner and Transaction Type columns are locked for editing.
Aggregation method
For indpeendent variables, you can configure how values are aggregated: Right-click an independent variable in the Account or item column and select Aggregation | Sum/No aggregation from the context menu.
- When Sum is selected, entering values at the monthly level and changing the view to quarter, trimester, semester, or year will automatically display the sum of the corresponding months in the period columns. If values are entered on a yearly level, the values are split evenly across all months.
- When No aggregation is selected, enter values only at the monthly level. If you switch to a higher time period view, the period columns will show '...' and a tooltip indicating that values are displayed only on the monthly level because no aggregation is selected.
Query values from selected account/item
If this option is activated:
- The columns Cost center/Partner/Transaction Type, and Variable name are enabled and can be edited.
- The actual and planning period columns are automatically filled with values from the database by the system. Fields are locked for editing.
- The Formula field is locked for editing.
Cost center/ partner/ transaction type
Allows selection of a cost center/partner/transaction type from the respective drop-down lists
Variable name
Auto-filled with the selected item or account name. You can modify this field with text, numbers, or special characters.
If you add a variable name that already exists within the same sheet, the system will automatically append “(1)” to it. If you add more variables with the same name, the number will increase incrementally.
Formula
Used for entering variables and basic mathematical operations (addition, subtraction, multiplication, division and brackets) to perform calculations during the financial planning process.
Key points include:
- It is only possible to enter fixed values with up to two decimals.
- Formulas can be added to planning and independent variable rows, but not to querying rows.
- Time offset: When a variable is added, a time offset is automatically displayed, with this month as the default value. Time offset defines the period from which values are retrieved and used in the calculations of the amount shown in the time period column.
To change it, click the offset value and select one of the available options or click Custom to enter a custom offset.
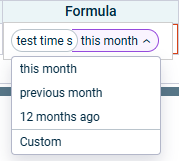
Example formula with a variable and time offset
- When using formulas, changes in one calculation can affect other dependent business transactions. The system can recalculate these dependencies automatically or on demand (see Dependent Business Transactions).
- Formulas that create dependencies between transactions may lead to circular references. The system detects and manages these cases (see Dependent Business Transactions).
Period columns
The actual period column, linked with the actual data level, is populated with the amounts retrieved from the database for the selected account or item.
The planning period columns linked to the selected planning data level are blank and values can be added using numbers with decimals and basic mathematical operations, unless Query values from selected account/item is activated or a formula has been applied that generates results in the planning period column.
To easily distinguish between the different period columns, the actual period column is highlighted in gray, whereas the planning period columns remain white.
Posting text
Used for entering a user-defined posting text to be added to the Sheet posting.
To analyze, review, or share posting data, you can generate a report of all postings, including postings created by Sheets. For instructions on how to do this, see Creating a Posting Report.