Transferring and Proportioning Data
Last updated on 2025-12-17
Overview
The first step in configuring consolidated financial statements is the provision of the data basis in the consolidation areas.
With the app for Data transfer and proportioning, the values of the general, sub, and statistical ledgers of the single-entity financial statements are transferred from the organization elements to the consolidation areas. In doing so, all dimensions (e.g. transaction types, partners and currencies) are taken into account based on transaction figures.
Additionally, the values transferred from the individual financial statements are prepared for consolidation according to the consolidation method defined in the master data. This includes:
- For all investments, the addition to and disposal from the respective consolidation area are recognized using the corresponding transaction types.
- Investments are transferred proportionally according to their group shares
- For associated companies consolidated using the equity method, the transferred balances and transaction figures are first canceled so that they can subsequently be recognized and updated by the app for equity elimination at the equity value.
This article contains the following sections:
Creating Data Transfer and Proportioning
Proceed as follows to create the app for data transfer and proportioning:
- Open the Consolidated financial statements workspace.
- Select the combination group and data level from the dimension bar for which you want to transfer and proportion the data.
- Select the desired Consolidated financial statements element or folder and choose Create | App from the context menu.
- In the displayed dialog, choose the app type Data transfer and proportioning.
- Optionally, enter an individual name for the element.
- Save the element.
The app will then be displayed below the Consolidated financial statements element.
Configuring Data Transfer and Proportioning
To configure the app for data transfer and proportiining, click the app in the structure view and click Edit in the displayed dialog.
Configure the steps as described below.
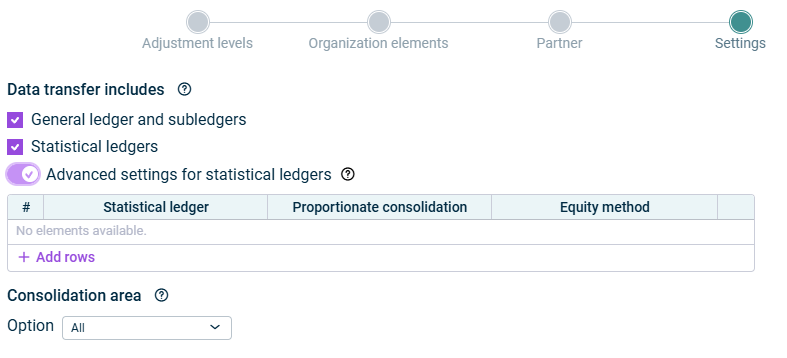
In the Settings step, you configure general settings for the data transfer.
Option
Description
Data transfer includes
In this area, specify whether you want to include the general ledger and subledgers and/or statistical ledgers in the data transfer and proportioning.
Advanced settings for statistical ledgers
By default, the app includes all statistical ledgers and applies proportioning according to the respective consolidation method of the consolidation unit:
- Full consolidation: 100% data transfer
- Proportionate consolidation: Data transfer and proportioning according to the group share in the consolidation unit
- Equity method: Data transfer and 100% proportioning of data (cancellation)
If necessary, activate the option Advanced settings for statistical ledgers if you want to configure an individual proportioning for statistical ledgers and/or if you only want to include part of the statistical ledgers. After that, configure the displayed table:
Consolidation area
Consolidation areas to be included in the data transfer and proportioning:
By default, all consolidation areas within the group are included in the data transfer and proportioning.
If you only want to include certain consolidation areas in the data transfer and proportioning, activate the Individual selection check box and select one of the following options:
- Include
In the table, select individual consolidation areas to be included in the app execution. - Exclude
In the table, select the consolidation areas that are to be excluded from the app execution.
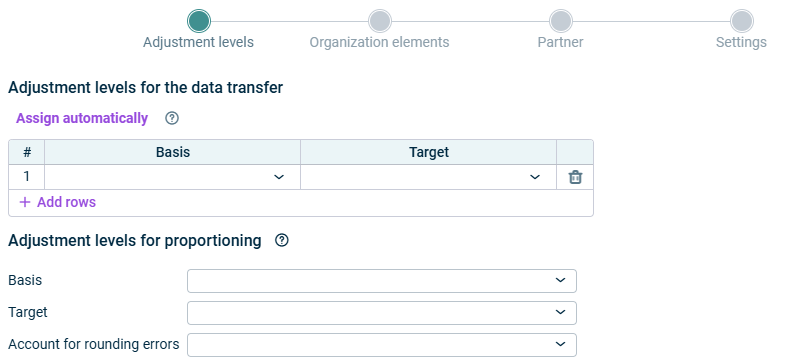
In the Adjustment levels step,you specify the adjustment levels for the data transfer and proportioning.
Option
Description
Adjustment levels for the data transfer
In this table, assign the adjustment levels for the data transfer:
Basis
Adjustment level group(s) from which the data is to be transferred
Target
Target adjustment levels to which the data is to be transferred
You can either manually select the elements in the Target column or click Assign automatically to assign the adjustment levels automatically based on similar names.
Adjustment levels for the proportioning
In this table, assign the adjustment levels for the proportioning:
Basis
Adjustment level group without proportioning or consolidation adjustment levels as the basis for the consolidation process.
The basis for proportioning selected here must contain the target adjustment levels from the previous step.
Target
Target adjustment level for posting the adjustment to the consolidation method (proportional adjustment)
Account for rounding errors
Account for the balancing of rounding errors from proportioning
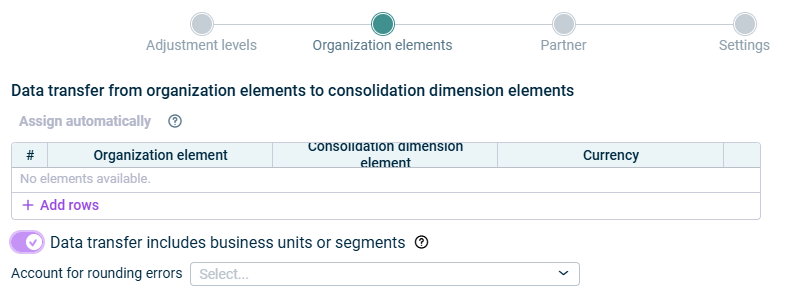
In the Organization elements step, you configure the data basis, i.e. the underlying organization element of the consolidation dimension elements.
It can also be defined which currency is to be taken into account for the data transfer.
Column
Description
Data transfer from organization elements to consolidation dimension elements
In this table, assign the organization elements to the consolidation dimension elements for the data transfer:
Organization element(s) from which the data is to be transferred
Consolidation dimension element to which the data is to be transferred
For each entry, choose the currency that the values are to be transferred in.
- You can either manually select the elements in the Consolidation dimension elements column or click Assign automatically to assign the consolidation dimension elements automatically based on similar names.
- The selected consolidation dimension elements must have been defined in the Investor or Investment column on the Investments tab in the master data administration (see Administrating Master Data).
The data transfer includes business units or segments
Activate this check box in case of a data transfer of business units or segments (segment consolidation).
As these do not necessarily have the same debit and credit balances, you must then choose a balancing account. Any debit-credit differences in the consolidation unit will be recognized on this balancing account.
By default, consolidation units use the same partner as the base organization element.
In the Partner step, you can configure the following deviations from the default:
- Define partners that will be replaced by another partner during data transfer
- Assign several partners to another partner

To do so, activate the option Specify individual partner assignments and configure the assignments in the table.
You can either select the elements manually or click Assign partner of a partner group automatically to replace all partners of a partner group in the consolidation units with a partner with the name of the partner group.
- As long as a step has not been fully configured and/or configuration errors exist, it is displayed with a red exclamation mark
 .
. - Once a step is configured completely and without any errors, it is displayed with a green check mark
 .
. - You can close the configuration dialog by clicking the arrow icon
 at the top left.
 - To change the name of the app, select the app in the tree view and choose Properties from the context menu.
Executing the Data Transfer and Proportioning
You can execute the app for data transfer and proportioning either separately, together with other apps in an executable folder or as part of consolidated financial statements.
How to proceed in each case is described under Execute consolidation.
Displaying and Deleting Created Elements
On the Created elements tab, the postings that were created during the app execution are shown.
The table provides the following information:
- Type of the element
- Path under which the element was created When you click on the link, you are taken directly to the posting in the relevant journal.
- Date of the last execution that created the element

Note: Once all elements have been deleted, the state of the wizard is Not executed again.
Displaying the App Properties
The App properties are displayed on the tab of the same name :
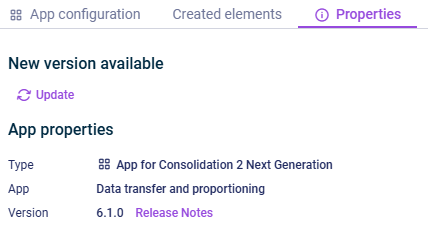
- Type of the element
- Function of the App
- Version of the element.
New available version
As soon as a new version of the app is available that contains changes to the app configuration and/or the calculation logic of the app, the Refresh command is displayed, allowing you to update the app to the latest version.
Information about the changes to each version can be found in the Release Notes, which can be accessed via the link of the same name.
We strongly recommend to update all apps to the new version as soon as possible because it cannot be guaranteed how long an app with an obsolete version can be executed.