In the Format data as section, select JSON — Simple, Inline.
Connecting to Looker
Last updated on 2026-01-07
Overview
You can establish a connection to Looker to pull in data into xP&A.
To set up the connection, a Webhook data source is required.
The following steps are necessary, which are explained in this article:
- Create a Look containing the data you want to have in your xP&A data source.
- Create a Webhook data source in xP&A.
- Set up the scheduled export in Looker.
The fields that are pulled in must be defined during the set-up process using a database query. For a detailed instruction on how to structure such a query, see Defining Database Queries.
This article contains the following sections:
Creating a Look Containing the Data
The first step in setting up a connection to Looker is to create a Look containing the data that you would like to have in your data source. The following must be considered for the Look:
- First column must contain the date (supported date formats: YYYY-MM-DD and YYYY-MM)
- Second column can contain the cohort (optional)
- The following columns can contain the dimensions (strings) (optional)
- The following columns must contain at least one variable (numbers)
- Make sure missing dates are not filled (expand the Visualisation section, click on the gear icon of the date column header, and click Remove filled in dates, if necessary)
Creating a Webhook Data Source in xP&A
The Looker data is pulled in using a Webhook connection. A detailed instruction on how to set up this connection can be found under Connecting to Webhook.
Setting Up the Scheduled Export in Looker
To pull in the exported data from Looker via the configured Webhook connection, you need to set up the scheduled export in Looker as a last step. Proceed as follows in Looker:
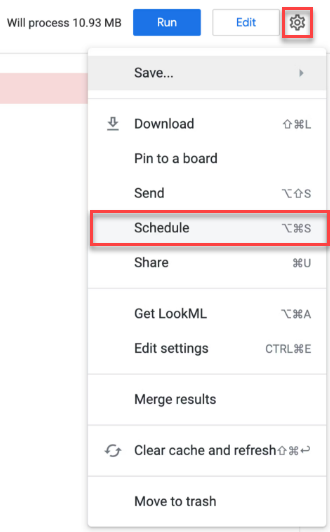
Click the gear icon at the top right and select Schedule.
In the Where should this data go section, select Webhook.
Enter the Webhook URL of your data source you created in the previous step.
Configure the trigger, i.e. when the data will be sent to xP&A. Choose one of the following options:
- Repeating interval, e.g. once every day
- Datagroup update, i.e. every time something in your database changes.
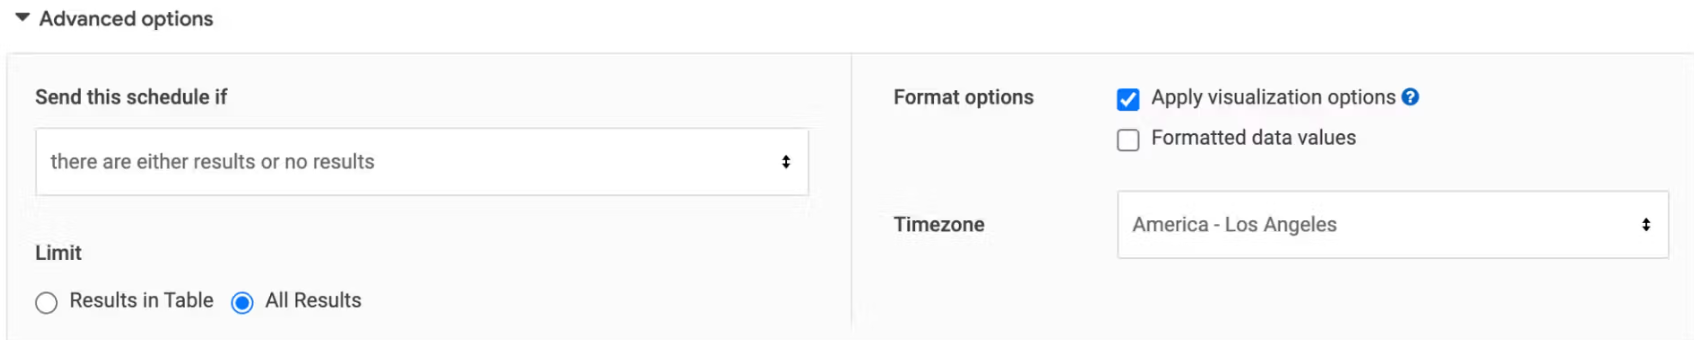
Open the Advanced options and do the following:
- Select All results
- Enable Apply visualization options
- Disable Formatted data values
Click Save all.
You still have to manually refresh the Webhook data source in xP&A in order to pull the updated numbers into models that use the data source.
Troubleshooting
In case the data cannot be pulled in from the data source, you can try the following troubleshooting options:
- Check if the Look has the right format (see Transactions). For every dimension you need one column in the Look.
- Make sure the date format is correct, e.g. 2022-04-20 for April 20th 2022 or 2021-12 for December 2021.
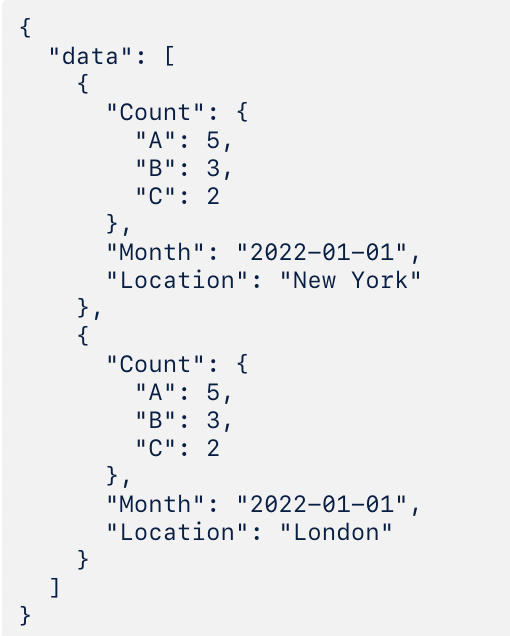
- There might be a nested JSON. In this case, you can try the following:
- Depending on the Look, the values might be nested in the JSON. Go to the Data workspace in xP&A, click on the three dots at the top right of the data source card, then click Edit. Now click the View last uploaded data button at the bottom of the modal to see the received JSON object.
- In the example below, the variables A, B and C are nested in the Count field. To access them in the data source, you have to enter the whole path to the object as the variable keys: Count.A, Count.B and Count.C