Working with Layers

Overview

In XBRL Tagger, layers allow you to apply different tags to the same text block more than once. Because tags within one layer must not overlap, you can add another layer for overlapping tagging ranges. This is useful when, for example, a paragraph has to be tagged with two different taxonomy elements.

Each document in XBRL Tagger has two predefined layers by default: a default layer for text and a default layer for tables.

In the editor, only the tags of the active layer are displayed. You can create and manage additional layers in the Layer Manager.

Default Layers in XBRL Tagger

In the XBRL Document workspace, two tabs at the top of the document area allow you switch between layers for text tagging and table tagging:

  • Text tagging: Activates the layer for text tagging. Table tags are hidden and only text tags are displayed.
  • Table tagging: Activates the layer for table tagging. Text tags are hidden and only table tags are displayed.
'Text tagging' and 'Table tagging' tabs in XBRL Tagger
Creating and Editing Layers

Layers can be added, edited, or removed in the Layer Manager. To add a layer:

Click Layers.

Opening the 'Layers' dialog

The Layers dialog is displayed:

'Layers' dialog in XBRL Tagger

Click + to create a layer.

Enter a name for the new layer and click Save.

Saving a new layer
Saving a new layer
Switching Layers

To switch to another layer:

Click Layers to open the Layers dialog.

Click the desired layer.

Switching to layer 1

The selected layer is displayed in the editor.

Additional Options in the 'Layers' Dialog

Additionally, the following options are available in the Layers dialog:


Option

Description


Deletes the layer

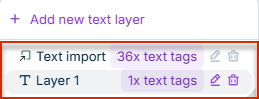
  • If the layer already contains tags, a warning appears that all associated tags will also be deleted.
  • The default layers cannot be removed.

Opens editing mode for the selected layer. Change the name and click Save to change the layer name.


Contact Us