Lucanet's XBRL Tagger allows individual words or sentences, values, and entire chapters and tables of a document to be tagged.

The XBRL Tagger allows the following elements of a document to be tagged:

  • Texts
  • Tables
  • Values in tables

Elements can be tagged manually by drag and drop, or with AI assistance using the Tagger Agent. For more information on AI-assisted tagging, see Tagging a Document with AI.

To tag elements manually:

1

Select the element you want to tag in the Document area.

2

Search for the desired tag in the taxonomy.

3

Drag and drop the tag onto the chosen element.

4

If necessary, edit the properties of the tag (see Displaying and Editing Properties of a Tag).

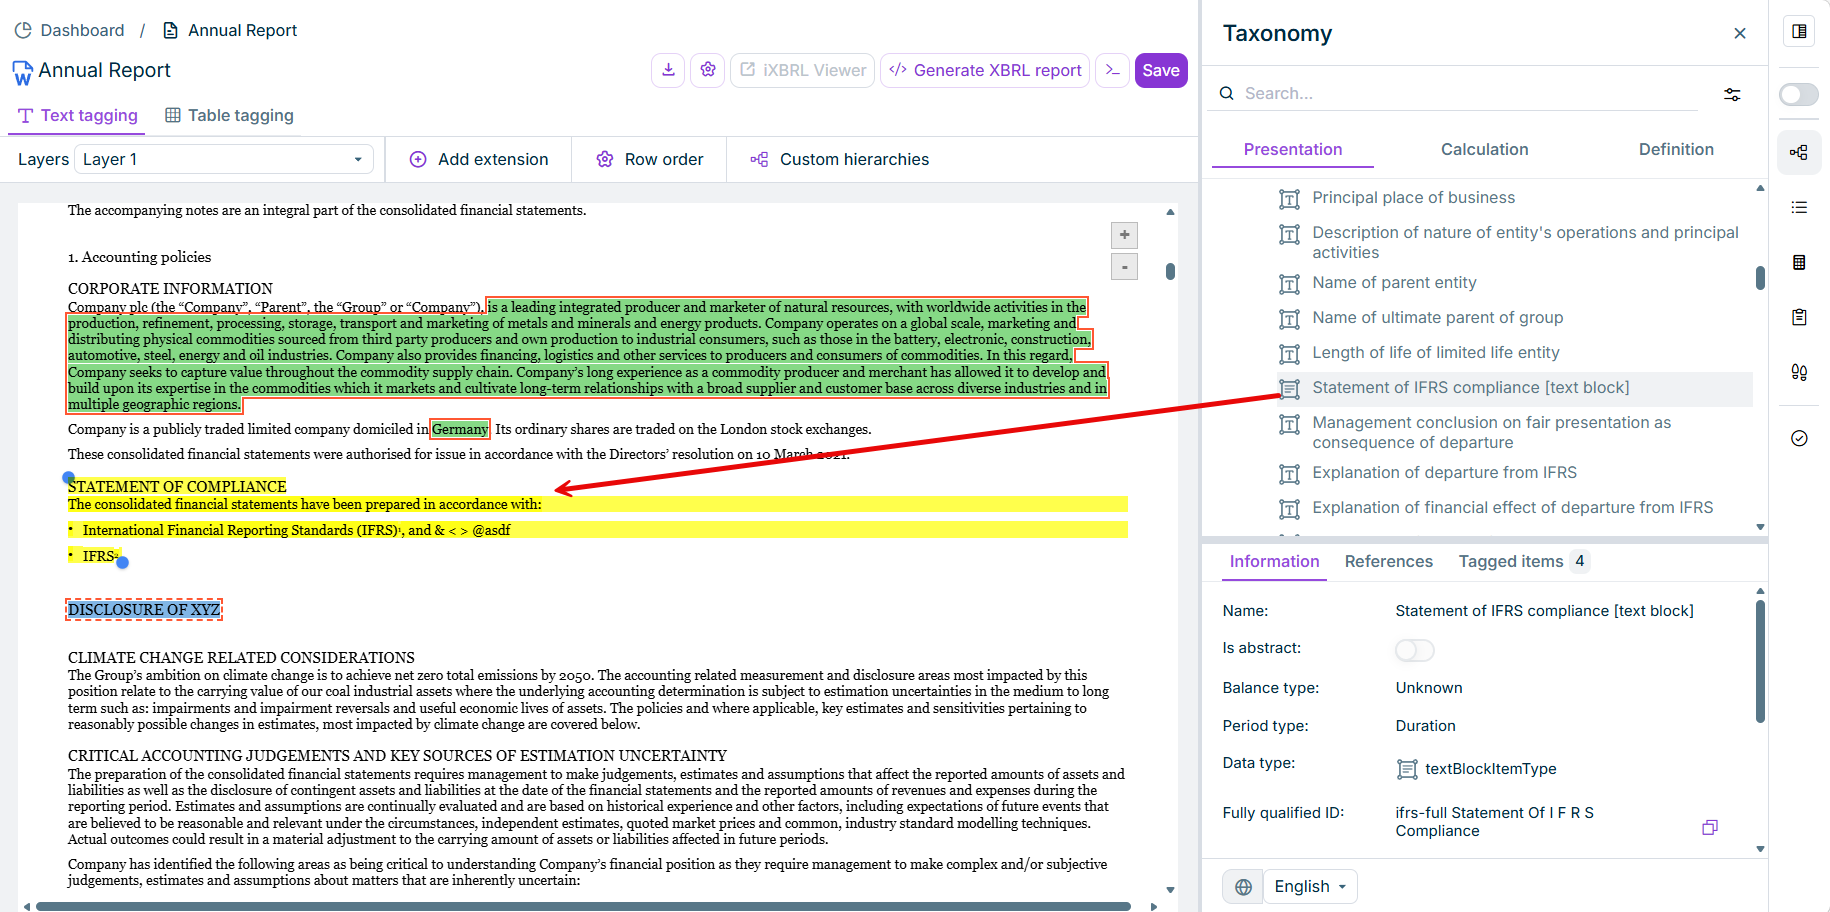
Part of the 'XBRL document' workspace. A red arrow from a taxonomy element to a text block in the Word document visualizes the drag-and-drop of tags.
Tagging a text block

After successfully tagging, the tagged element is highlighted in color (see Status of Tags).

In-tool validations: In addition to the properties of tags, the results of in-tool validations–validations performed while editing a document – are displayed in the Properties area. This feature allows you to respond and correct any tagging errors immediately.

More information can be found under Validations.

Tags and placeholders for tags that you have created in the Lucanet Disclosure Management solution are transferred to the XBRL Tagger and can be further edited there. You can find information on tagging Word documents in our Disclosure Management solution in Using the XBRL Tagger.

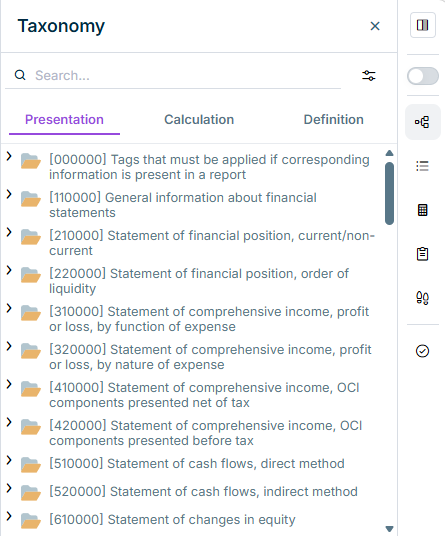
The three tabs in the Search options area contain what are referred to as linkbases. Linkbases contain all tags defined in the chosen taxonomy and show, in particular, the relationships between the tags.

Part of the 'XBRL document' workspace. The 'Taxonomy' area is displayed. The three Linbases 'Presentation', 'Calculation' and 'Definition' are outlined in red.
Linkbases in the 'Taxonomy' area

Which linkbases are displayed depends on the chosen taxonomy. The following linkbases, for example, are displayed in the ESEF taxonomy:

  • Presentation: contains the structure of the elements of the chosen taxonomy that you can use to tag the document currently loaded.
  • Calculation: shows how the elements of the taxonomy are calculated. Summands used in other tables of the report are highlighted and can be opened directly (see the following section Cross-Table Tag Navigation in the Calculation View).
  • Definition: contains the logical relationships between elements of the taxonomy.

When you open a calculation in the Calculation linkbase, the XBRL Tagger shows which summands are also used in other tables of the same report. This makes cross-table tag relationships visible at a glance and helps you spot potential tagging errors or inconsistencies quickly.

Summands that are used in another table of the report are highlighted with a light red background and a red info icon next to the label. Summands that are used only in the current table are not highlighted.

The highlighting applies only to summands. Superordinate calculation items and totals are not highlighted, even if they are used in other tables.

Click the info icon or the highlighted summand label to navigate directly to the first other table where the same tag is used. The following steps are performed:

  • The calculation view of the target table is opened.
  • The corresponding cell is selected.
  • If the Properties area is open, it shows the properties of the selected cell.

Tagging text and text blocks is done in the text content layer. Before tagging text and text blocks, switch to the Text Tagging tab at the top of the document area. For more information, see Working with Layers.

Open the text tagging layer

Taxonomies (e. g. IFRS, ESEF) may require the marking of individual words or sentences (referred to as text in the following) (e. g. headquarters of the company = DomicileOfEntity) and the marking of text blocks (e. g. specification of liabilities [text block] = DisclosureOfBorrowingsExplanatory). The tags are of different types: text and text block. Whether words or sentences are tagged as text or text block is predefined by the taxonomy. These tags have different icons in the XBRL Tagger:

ElementDescription
TextText tags (strings) are used to tag brief information, for example something like Country of Incorporation or Name of Reporting Entity.
Text blockText block tags are used to mark large quantities of information, such as notes and accounting guidelines including tables. Text blocks are intended for paragraphs or areas that cover several pages.
  • To tag texts or text blocks from Disclosure Management, they must be defined as so-called content controls. You can define content controls in MS Word on the Developer tab.
  • If the Developer tab is not displayed in MS Word, you need to activate the tab. In MS Word, select File | Options | Customize Ribbon, and activate the checkbox of the Developer tab under Main Tabs.

To tag text or text blocks, you have to mark the desired content control in the Word document and then drag the desired tag from the taxonomy and drop it onto the selected part.

In all other documents – including PDF documents, which cannot contain content controls in principle – select the desired text section directly in the document and then drag and drop the desired tag from the taxonomy onto the selected area.

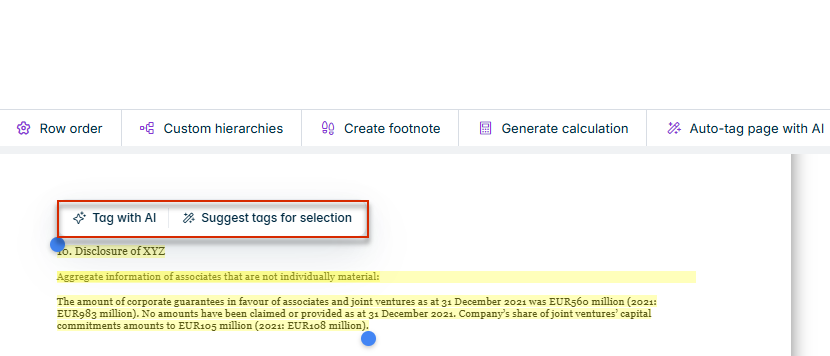
AI alternative: You can also tag individual text areas using the context menu — right-click a text area and select Tag with AI or Suggest tags for selection. To AI-tag all narratives on the current page at once, use the Tag page with AI button in the function bar. For more information, see Tagging a Document with AI.

Context menu showing the AI options 'Tag with AI' and 'Suggest tags for selection'.
AI options in the context menu

A text block tag can span several sections of a document. If the tagged text is distributed across different pages or chapters, the individual sections are linked in what is referred to as a continuation chain. Each section in the chain is a continuation element. Continuation elements are managed in a dedicated dialog (see Managing Continuation Chains).

You can tag all text content in the entire document in a single step, without having to select each text block individually.

To tag all text content in the document:

1

Open the document in the XBRL Document workspace and switch to the Text tagging tab.

2

Click Tag all text content in the function bar.

All text content in the document is tagged automatically.

Tables are tagged at the table level. Before tagging tables, switch to the Table Tagging tab at the top of the document area. For more information, see Working with Layers.

Open the table tagging layer

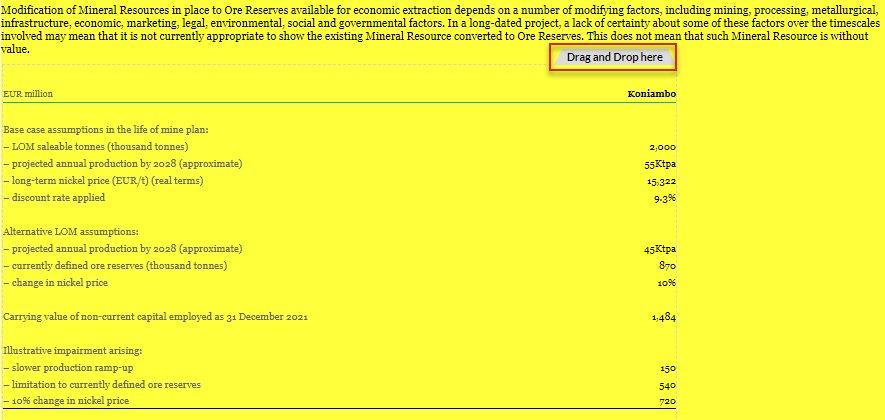
Tables are tagged by dragging the desired tag onto the placeholder for the table tag. In all tables, the placeholder can be found in the top, right corner and shows the entry Drag and Drop here:

Shows a table with a yellow background that has not yet been tagged. In the top right-hand corner, the placeholder for the table tag (drag and drop here) is outlined in red.
Placeholder for the table tag

PDF documents: For PDF documents, a table must first be detected using Auto select before it can be tagged (see Detecting Tables Manually (PDF Documents) below). There, the placeholder for the table tag also shows the entry No taxonomy element assigned instead of Drag and Drop here.

Tables are tagged with what is referred to as an abstract.

AI alternative: Numerical cells in a table can also be tagged with AI assistance. Select a cell in the table and click Auto-tag table with AI in the function bar. For more information, see Tagging a Document with AI.

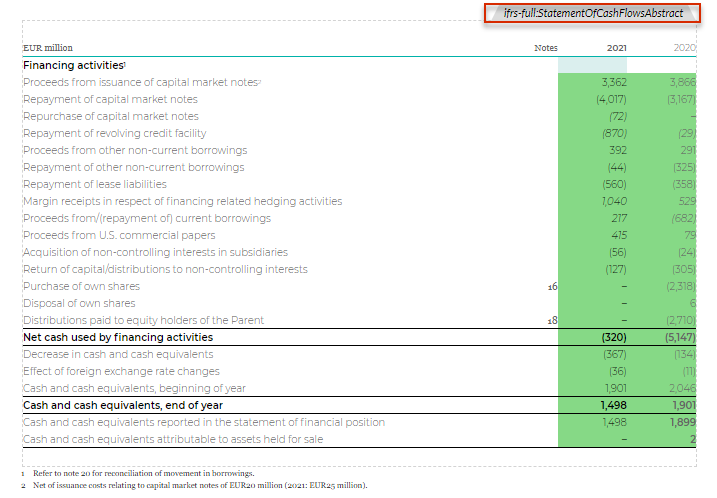
Example: A table that displays the cash flow statement is tagged with the tag ifrs-full:StatementofCashFlowsAbstract.

Table with cash flow statement. The table tag (StatementOFCashFlowAbstract) is outlined in red.
Table with the cash flow statement and the corresponding tag

Changing the Row Order of a Table

You can adjust the order of the table rows as follows:

1

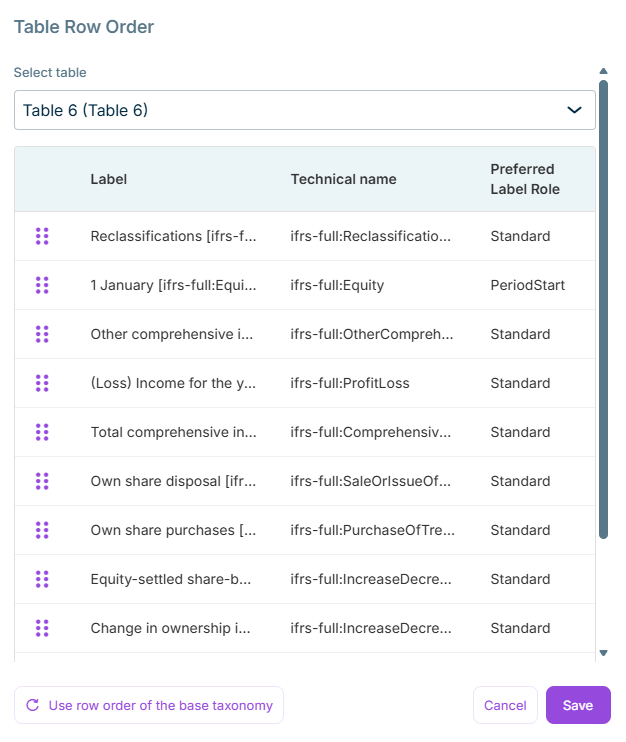
Click the Row Order button above the document. The following dialog is displayed:

Dialog 'Table Row Order'
2

In the Select Table drop-down list, select the table in which you want to change the row order.

3

Change the row order in the Table Row Order dialog using drag and drop.

4

Click Save.

PDF documents: For PDF documents, open the dialog instead via the Row order button in the Table actions toolbar of the respective table (see Detecting Tables Manually (PDF Documents)). The dialog then opens directly for that table, without having to additionally select it from the Select Table drop-down list. The table must already contain at least one tagged cell — no row order is available for a table that has only been detected using Auto select but not yet tagged.

You can also reset the row order to the base taxonomy by clicking the button Use Row Order of the Base Taxonomy.

To apply the changes to the row order when generating a document, please make sure to save the document by clicking Save document before generating.

If you need an already tagged table with identical content on another layer — for example, to run additional calculations on the same cells — you can copy the table together with all its existing tags to another layer instead of tagging every cell manually again.

1

Right-click the table tag of the already tagged table.

This option is only available for already tagged tables and only for Word documents.

2

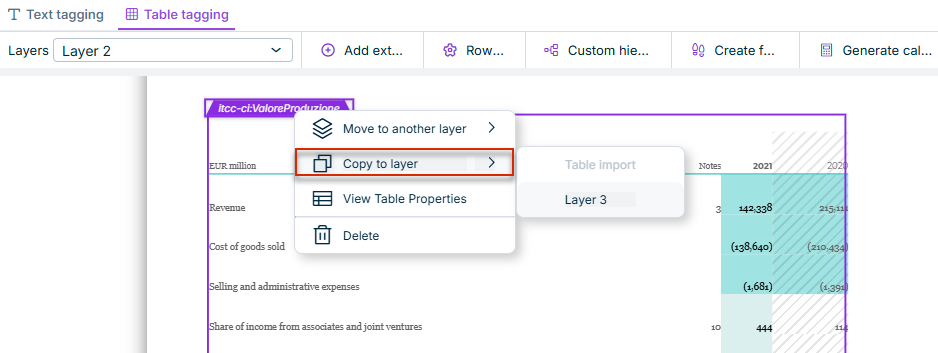
Select Copy to layer from the context menu.

A submenu shows the available target layers.

Context menu of a tagged table with the highlighted option 'Copy to layer' and the submenu of target layers
Context menu of a tagged table with the option 'Copy to layer'
3

Select the desired target layer.

The table structure and all existing tags are copied to the selected layer. The source layer remains unchanged.

Layers that already contain a tagged copy of this table are shown greyed out in the submenu and cannot be selected. Hovering over such a layer shows a tooltip indicating that it already contains a mapping for this table.

If the target layer already contains an untagged copy of the table structure — for example, on the import layer right after the document was uploaded — that copy is populated with the source table's tags instead of creating another structure.

After copying, you receive a confirmation that all tags were copied to the target layer. If the operation fails, you are also notified.

Unlike Word documents, where the table structure comes directly from the document format, the XBRL Tagger does not detect tables in PDF documents automatically. A table must first be detected using the Auto select function before it can be tagged. Detection always applies only to the page currently displayed: once a page contains at least one detected table, Auto select is no longer available for that page, and the function must be run again on every further page that contains tables.

To detect and tag a table in a PDF document:

1

Open the PDF document in the XBRL Document workspace and switch to the Table tagging tab.

2

Navigate to the page containing the table to be detected.

3

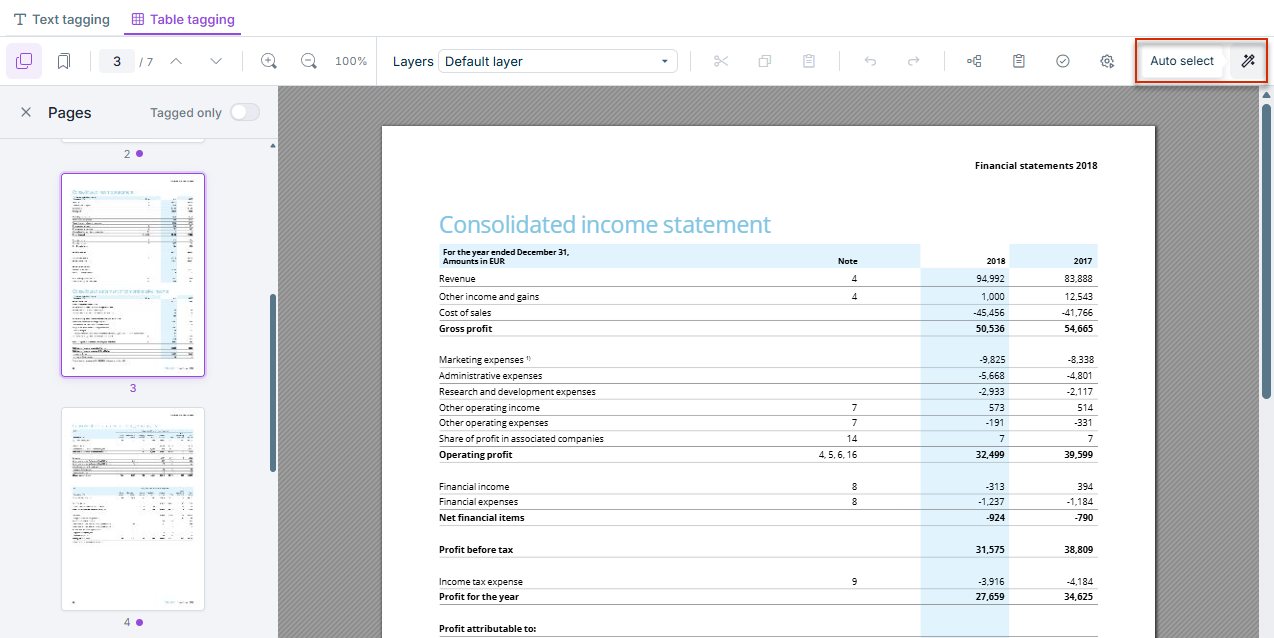
Click the Auto select button at the top right of the function bar.

The Tagger Agent analyses the current page and detects the table areas it contains. Progress is shown in the AI background tasks panel under the Detect tables task.

The 'Auto select' button in the function bar of the table tagging
The 'Auto select' button in the function bar
4

Once a table has been detected, the Table actions toolbar appears above it. The table itself still shows the placeholder No taxonomy element assigned until it has been tagged.

5

Tag the detected table in one of the following ways:

  • Drag the desired tag from the taxonomy and drop it onto the No taxonomy element assigned placeholder in the Table actions toolbar, as described in Tagging Tables, or
  • Click Tag table with AI in the Table actions toolbar to have the table tagged with AI assistance (see Tagging a Document with AI).

This function is only available for PDF documents. Auto select attempts to detect all table areas on the current page in a single pass. The Auto select button is always displayed in English, regardless of the selected language.

Adjusting the Boundaries of a Table (PDF Documents)

This function is only available for PDF documents.

After a table has been detected using Auto select, you can adjust its boundaries afterwards.

1

Select the table whose boundaries you want to adjust.

The floating table toolbar is displayed above the table.

2

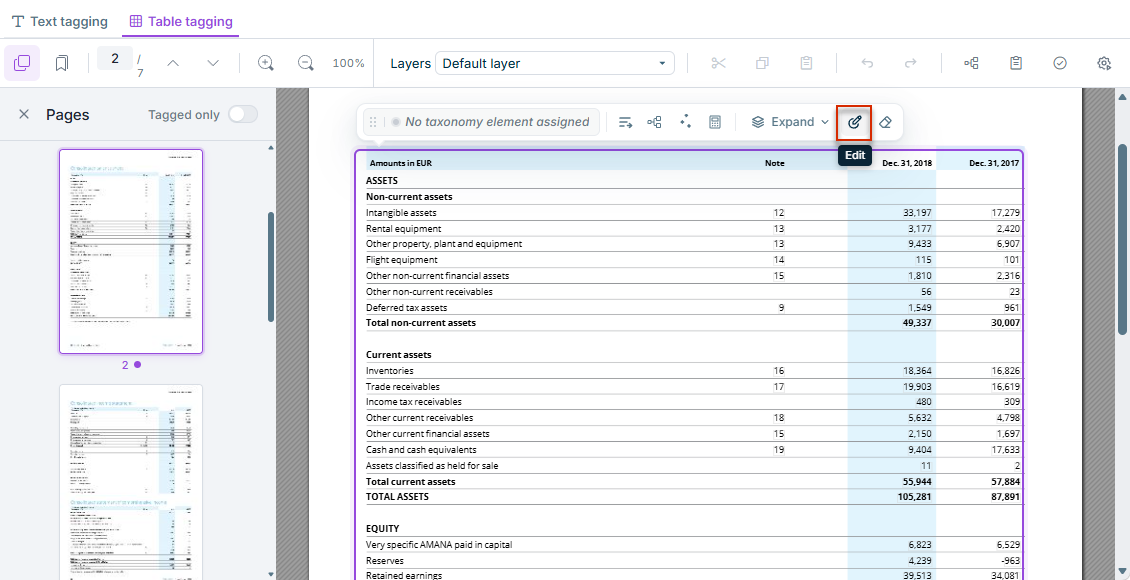
Click Edit in the table toolbar.

The floating table toolbar with the highlighted 'Edit' button
The 'Edit' button in the floating table toolbar

Edit mode is activated: the table is displayed as a selection with drag handles at its boundaries, and an Edit mode notice is shown.

3

Drag the selection pins to adjust the boundaries of the table.

4

Click Accept to apply the change, or Cancel to discard it.

Alternatively, press Enter to accept or Escape to cancel.

If the adjusted table overlaps another already tagged element, the change cannot be applied. Adjust the pins so the areas no longer overlap, or cancel the edit.

If existing cell tags cannot be fully transferred to the new table shape, you are asked whether the affected tags should be placed on the clipboard instead.

An applied boundary change can be undone with Ctrl+Z. While edit mode is active, undo is not available.

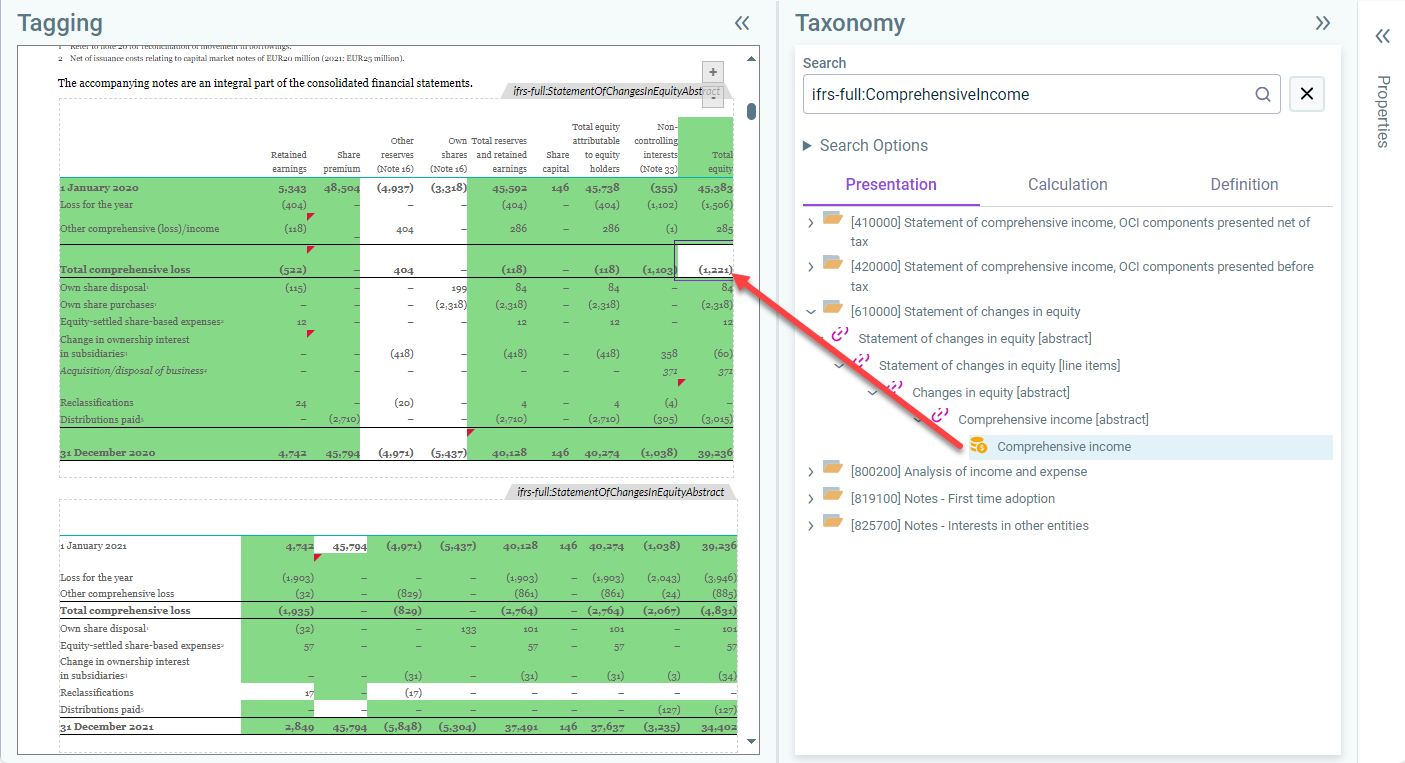
A value or several values in a table can be tagged also simply by means of drag-and-drop. As soon as a tag from the XBRL taxonomy has been identified that is suitable for the table cell or table cells chosen in the document, the tag can be dragged from the Taxonomy area and dropped onto the value selected in the table.

Part of the 'XBRL document' workspace. From the taxonomy, an arrow is displayed from a tag to a value in the table of a Word document.
Tagging a value

The cells are marked in green as soon as the tagging was successful.

The tagging details of values can be checked and/or changed by clicking a cell in the Properties area (see Displaying and Editing Properties of Tags).

Tip: In tables, you can define properties for all values at once by selecting the table completely and defining the desired configuration under Properties. The configuration of the properties will then apply to all values of the table.

Tables for which the items are broken down into columns and rows require both line item tags to tag the row and tags for columns (= member tags). Member tags are displayed in the ESEF taxonomy by a special icon and contain the label in the suffix [Member].

Proceed as follows:

1

Specifying a line-item element: First select the rows, choose the desired element from the XBRL taxonomy, and drag it into the selected column.

2

Specifying member elements: Then select the column to be tagged, choose the desired element from the XBRL taxonomy and drag it into the selected column.

You can tag a single cell in a table or several cells at the same time. The following options are available for tagging several cells in a document at the same time:

  • Select the desired cells while holding down the left mouse button.
  • Use the arrow keys on your keyboard while holding down the SHIFT key to choose several cells.
  • Select non-adjacent cells: Hold down the CTRL key and left click on each cell to be included in the selection.
  • Select adjacent cells: Select the first cell to be included in the selection and then hold down the SHIFT key. While holding down the SHIFT key, click the last cell to be included in the selection.

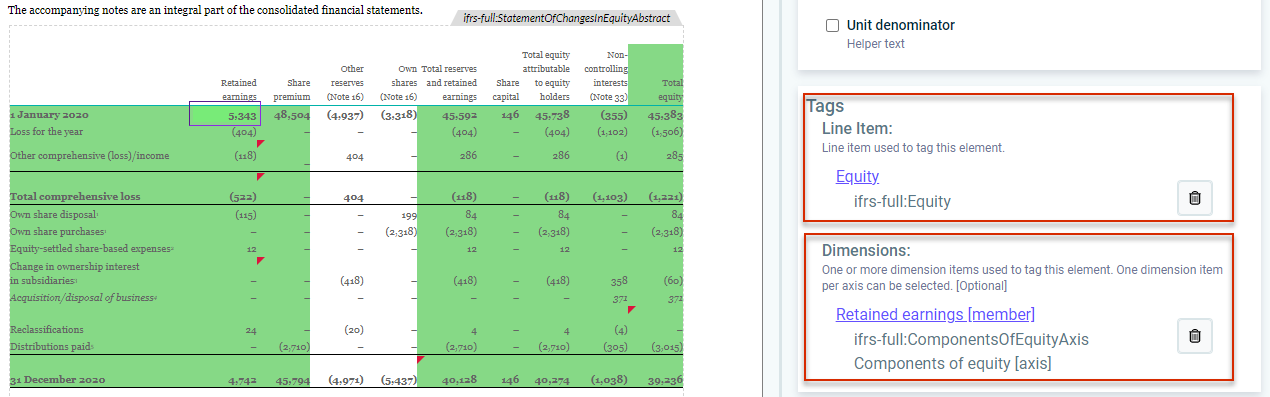
With the ESEF, the only use case for member tagging is the tagging of the table Statement of changes in equity. After successfully tagging, the element receives two tags (one line item tag and one dimension tag).

Part of the 'XBR document' workspace. The 'Change in equity' table is displayed. A value in the table is highlighted. In the 'Properties' area, the Line_Item tag and the Dimensions tag are outlined in red.
Line item tag and dimension tag for a value in the statement of changes in equity

In contrast, tables in which the column headers contain a period (e. g. 2022 and 2024) are each tagged with the same tag, which then varies only in terms of the period.

Facts that belong to a table, but are not physically part of it, (e. g. if a number that belongs to a table is used in continuous text) can be marked as what are referred to as additions in parentheses, i. e. as additional information appended to the table. This information must also be disclosed.

To tag an element (e. g. a value) as an addition in parentheses:

1

Select the desired value with a content control element when preparing the Word document before loading it to the XBRL Tagger.

2

Select the desired value in the document.

3

Tag the value by means of drag-and-drop with the desired tag.

4

The tagged element must then also be tagged to the table to which it belongs. To do so, tag the value with the table tag, i. e. with the Abstract tag of the table to which the value belongs.

PDF documents: Since PDF documents cannot contain content control elements, the first step does not apply to them. Select the desired value directly in the PDF document (step 2) and continue with tagging (steps 3–4).

Tags can be copied in the document and inserted else where. Proceed as follows:

1

Select a tagged element in the document.

2

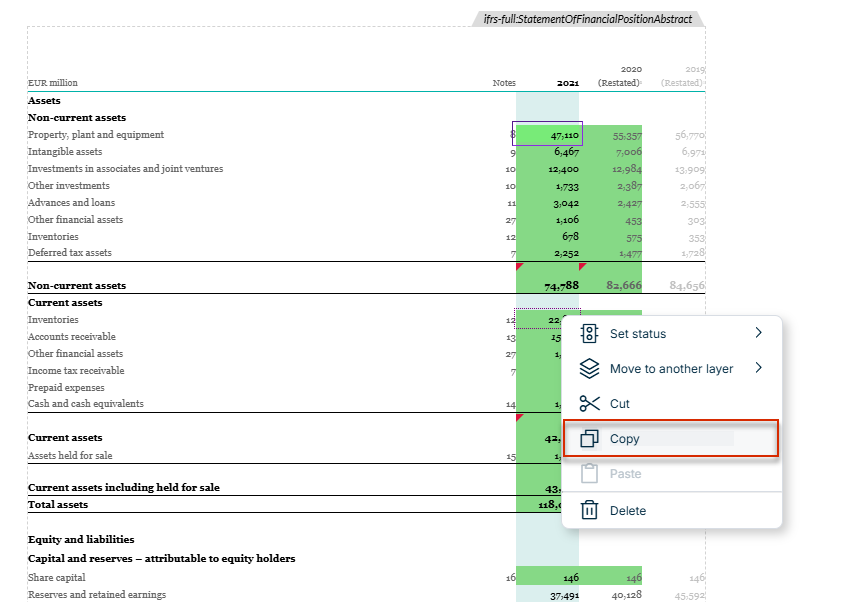
Open the context menu of the element and choose the Copy command.

Copying a tag
3

Select an element and choose Insert from the context menu. The tag is inserted together with all properties and the current status.

The following additional functions are available for the taxonomy and the elements it contains:

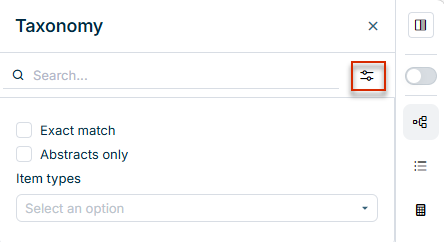
To quickly find the suitable tag, the taxonomy can be filtered by certain criteria. Click , to open the search options:

Part of the 'XBRL document' workspace. The screenshot shows the search options for browsing the taxonomy.
Search options for taxonomy

The following filters are available:

  • Exact match: filters tags that match the exact term entered under Search and contain only it, for example the search term Assets finds only ifrs-full:assets.
  • Abstracts only: shows abstracts that contain the search term.
  • Item types: filters the search results by the chosen element types. As soon as you activate the option, you can select the desired element types in the displayed list.

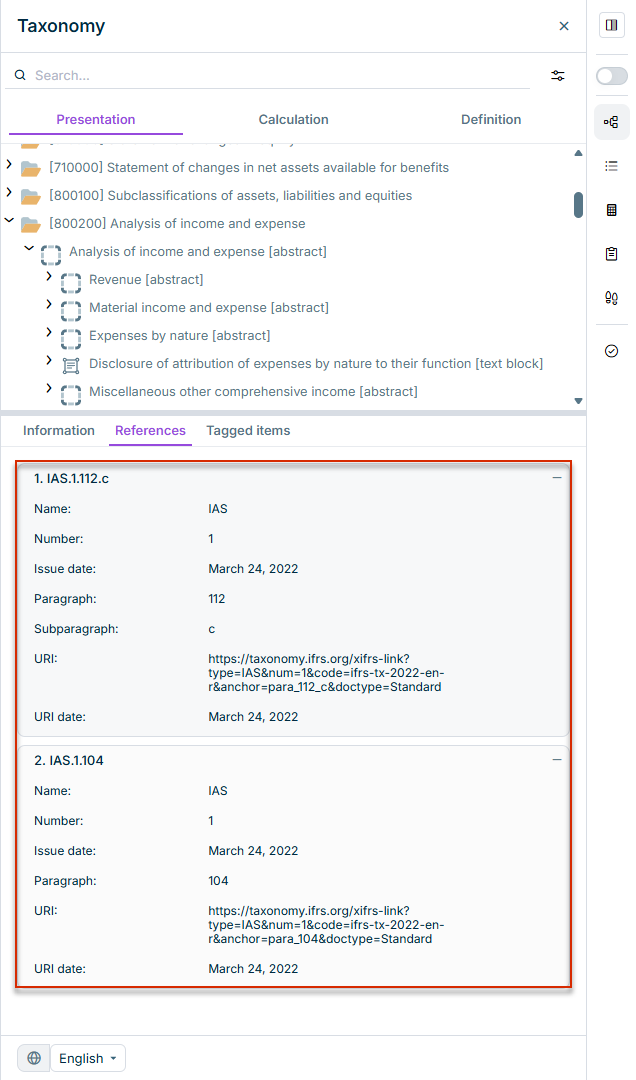
As soon as you select an element in the taxonomy, the references of the selected tag are displayed in the Properties area:

Shows a section of the 'XBRL document' workspace. The ' Tagged items' drop-down list is open. A tag from the taxonomy is outlined in red. An arrow points from the taxonomy element to the references that are displayed in the 'Properties' area in the 'References' drop-down list.
Display references of a taxonomy element

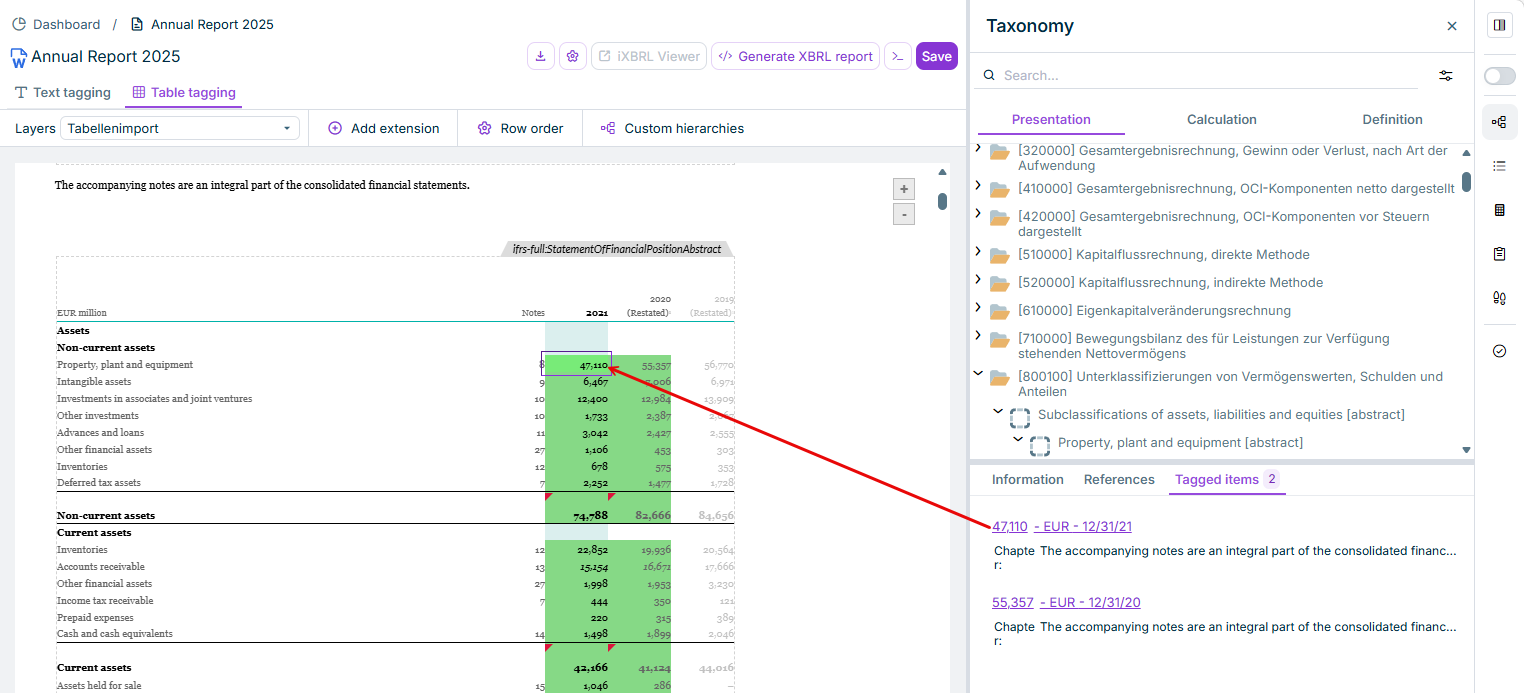
To quickly find out if and where a tag has been used in the document, you can open the Tagged items drop-down list in the Properties area and identify the locations of the tag's usage in the document.

Displays a section of the 'XBRL document' workspace. The ' Tagged items' drop-down list is open. A displayed link is outlined in red. An arrow points from the link to a tagged value in the document.
Display tagged items