Collecting Data

Overview

Once the ESRS questionnaire has been configured, ESG Data Collectors can begin collecting the ESG data. To do this, ESG Data Collectors fill out the ESRS questionnaire and the Emissions Module for the reporting entities that have been assigned to them. The data from the Emissions Module will be automatically copied into the ESRS questionnaire.

During data collection, ESG Masters can assign certain parts of the ESRS questionnaire to individual users (see Defining Individual Access for Users), or display the aggregated responses that have been collected so far at any time (see Displaying Aggregated Responses During Data Collection).

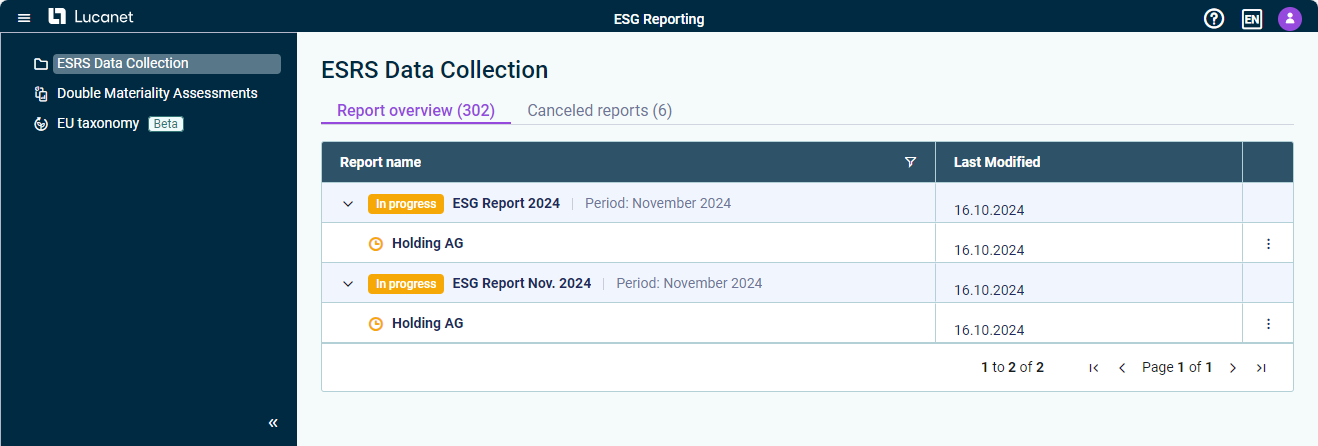
To start data collection in your role as ESG Data Collector, navigate to the ESG Reporting solution and click the reporting entity that you have been assigned to in order to start editing:

The overview of the assigned ESG reports is displayed. View of the 'Data Collection' workspace for ESG Data Collectors

In the subsequently displayed data collection page, you can switch between ESRS and Emissions Module via the tab view at the top.

Collecting Data in the ESRS Questionnaire

The ESRS questionnaire is split into four sections: General Disclosures, Environmental, Social, and Governance. It is displayed as follows, for example:

Displays the user interface of an ESRS questionnaire. User interface of the ESRS questionnaire

Note for ESG Data Collectors:

The scope of the categories or questions visible to you as an ESG Data Collector depends on two aspects:

  • The ESG Master can configure the ESRS questionnaire for the reporting entity to which you are assigned, i.e. assign this reporting entity to the whole ESRS questionnaire or to certain parts of it (see Configuring the ESRS Questionnaire).
  • After the ESRS questionnaire has been configured, the ESG Master can assign you to certain parts of the ESRS questionnaire (see Defining Individual Access for ESG Data Collectors).


For those reasons, you may not see the whole questionnaire, but only parts of it.

Note for ESG Masters:

If you are assigned to certain parts of the ESRS questionnaire for data collection, the status Partially editable appears at the top of the data collection page, indicating that you only have read access to the parts of the ESRS questionnaire to which you have not been assigned.

In the ESRS questionnaire, enter the data required for your reporting entity. While doing this, please note the following information:

  • All the data you enter will be saved automatically.
  • You can use the panel on the right of the screen to navigate between the individual categories and the questions relating to them.
  • No matter what user language you have selected, the questions in the ESRS questionnaire are always provided in English only.
  • To get an overview about all users assigned to specific categories or other parts of the ESRS questionnaire, click the users icon .
  • You can attach files or download attached files (see following subheadings).
Attaching Files in ESRS

You can attach files in ESRS. Uploading documents can provide supporting information and evidence for prior data input.

To attach a file, navigate to the desired element and click the attachment icon .

The ESRS tab is displayed. The file-attachment-icon is highlighted in red.


After clicking the attachment icon, attach a chosen file by drag and drop or by selecting the browse option.

The ESRS tab is displayed. The 'attach-file' field is highlighted in red.
Downloading Attached Files

After a file is uploaded, you are able to download and access the file on your local device at any time.

To download a file, click the download icon  on the ESRS tab of your report.

The ESRS tab is displayed. The download icon is highlighted in red. Download file in ESRS
Filling Out the Emissions Module

The Emissions Module is only available with the Advanced or Professional license package.

Like the Greenhouse Gas Protocol (GHG Protocol), the Emissions Module is split into three scopes: 1, 2, and 3. The three scopes represent the following three categories:

  • Scope 1: all direct GHG emissions, e.g. natural gas or gasoline
  • Scope 2: all indirect GHG emissions resulting from the generation of power, e.g. electricity or district heating
  • Scope 3: all indirect GHG emissions arising from consumption, e.g. waste disposal


The Emissions Module is displayed as follows, for example:

Displays the user interface of the Emissions Module. User interface of the Emissions Module

To enter emissions, you will need to create footprints for each emission (see next subheading).

Creating a Footprint

To create a footprint:

  1. If necessary, navigate to the Emissions Module tab.
  2. Select the category you require on the right-hand side of the screen.
  3. Click Create footprint.
  4. Enter a name for the footprint, then enter the necessary data.
  5. Click Create.

Once you have entered all the data for the Emissions Module, the data will be automatically copied into the Environmental section of the ESRS questionnaire, under Metrics and Targets.

When creating a footprint, the system automatically uses the latest data version of the emission factor for GHG calculation. The data version used is stored and displayed for every footprint, so you can track at all times on which emission factor the calculation of the footprint is based: 

Shows a footprint created for electricity. Highlighted is the location where the data version of the emission factor is shown. Data version displayed on a footprint
Submitting Data

Once all the data have been collected for both the ESRS questionnaire and the Emissions Module, click Submit, and leave a note, if necessary (see also General Functions in ESG Reporting).

The data will then be checked by the ESG Master.

If any of the required data is missing, you will not be able to submit the data. The missing responses will be automatically marked with a red warning symbol to make them easier to identify.