Dimensions are the most powerful concept in Lucanet xP&A (Extended Planning & Analysis). Dimensions allow you to build your business’ structure directly into your financial models, removing the need for formula duplication and lookups.

With dimensions in xP&A, you can:

  • Reduce the number of formulas in your models by 100x or more
  • Make it much easier to maintain and develop your models over time
  • Significantly reduce the chance of human error when working with formulas
  • Make it much easier to connect to historical data
  • Make it much easier to visualize and pivot data from your models

You have several options for creating a dimension in xP&A:

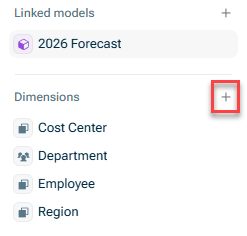
  • Create a new dimension via the + icon in the overview of the model on the left.
Shows the model sidebar in xP&A with the 'Dimensions' section listing 'Cost Center', 'Department', 'Employee', and 'Region'. Highlighted in red is the '+' icon used to create a new dimension.
Create a new dimension
  • Create a dimension directly on a variable:

You can also create a new dimension directly on a variable by clicking on the Dimensions button and adding a dimension breakdown.

Shows the 'Dimensions' button (tooltip 'Dimensions (Ctrl + 2)') on 'Variable 2' in xP&A, showing it already has 3 dimensions applied.
Add a dimension to a variable

If dimensions exist in your data sources, these will show up as options when you click the Dimensions button on a variable that is connected to integrated data. If you select these dimensions, this will automatically create the dimension in xP&A (if they do not exist in xP&A yet), and add it to your model/variables. See linking dimensions from data sources for more.

  • Create a dimension in the Dimensions workspace:
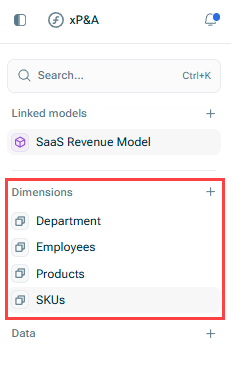
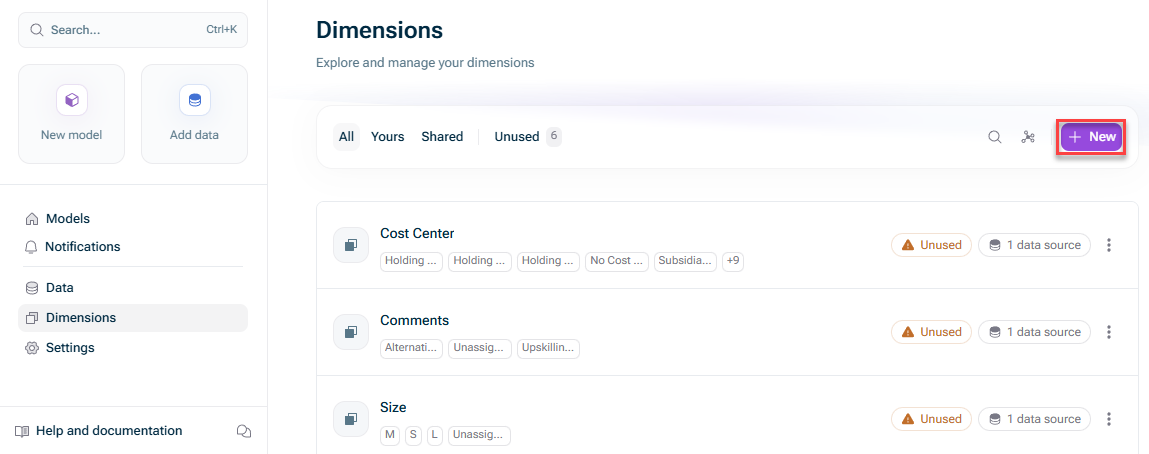
Open the Dimension workspace and click New.

Shows the '+ New' button to be used to add a new dimension in the 'Dimensions' workspace in xP&A
Create a new dimension in the dimensions workspace

How you edit a dimension in xP&A depends on whether you are editing the dimension in the spreadsheet or in the Dimensions workspace.

To edit a dimension in the spreadsheet of a model in xP&A:

1

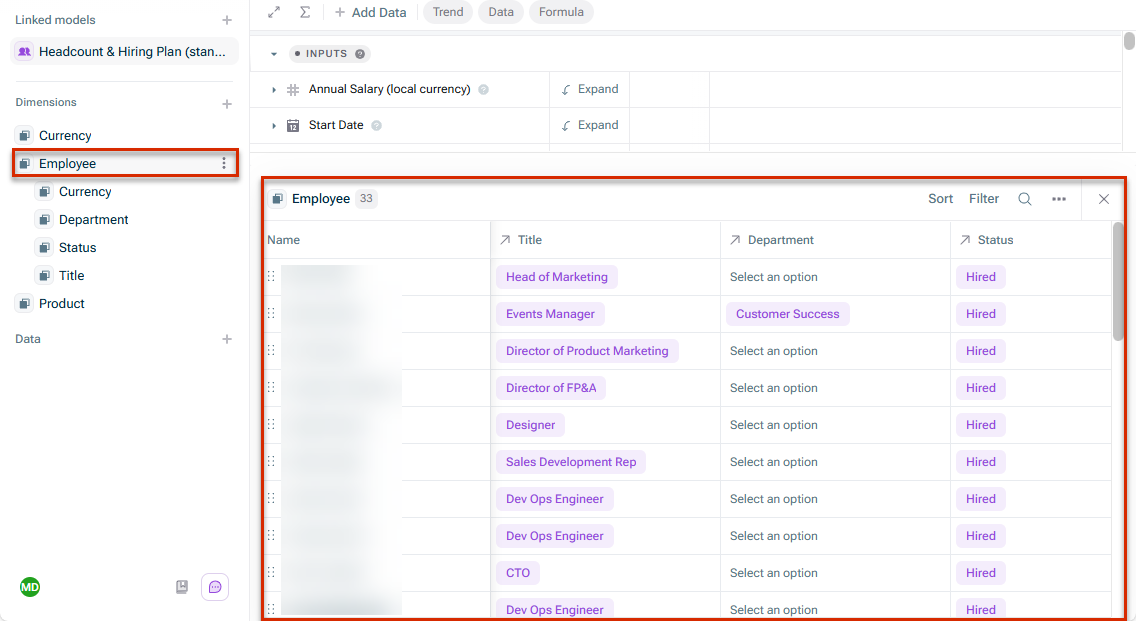
Click the dimension you want to edit.

Shows the 'Dimensions' section in the xP&A model sidebar, highlighted in red, with 'Employee' expanded to show 'Currency', 'Department', 'Location', and 'Title'.
Dimensions in a model
2

The dimension is displayed as follows, for example:

Shows the 'Employee' dimension in xP&A, selected in the 'Dimensions' sidebar and expanded in the bottom panel as a table of 33 rows with columns 'Name', 'Title', 'Department', and 'Status', for example 'Head of Marketing' with 'Hired' status. Both the sidebar selection and the bottom panel are highlighted in red.
Dimension in a model
3

If necessary, edit the dimension items. The following functions are available:

  • You can rename, duplicate, or delete an item in the item's three-dot menu.

  • Change the order of the items by moving one or more items using drag and drop.
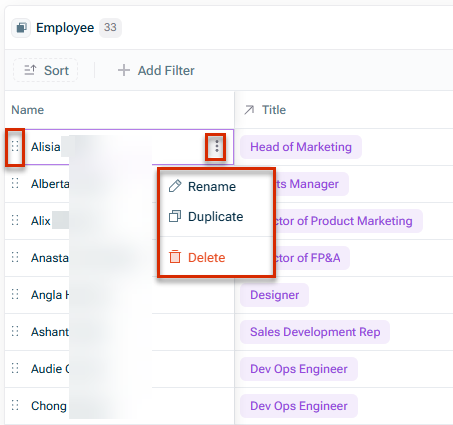
Shows the 'Employee' dimension items table in xP&A. Highlighted in red are the 'Alisia' row's three-dot menu icon and its open three-dot menu with the options 'Rename', 'Duplicate', and 'Delete'.
Edit dimension item
4

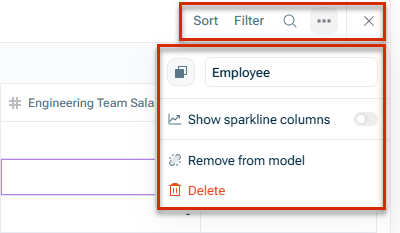
If necessary, edit the dimension and the item list using the functions in the upper right corner of the dimension area.

Shows the dimension options menu in xP&A, highlighted in red, with the dimension name field 'Employee', a 'Show sparkline columns' toggle, and the 'Remove from model' and 'Delete' options. Also highlighted in red are the 'Sort', 'Filter', search, and three-dot icons above the dimension area.
Edit dimension

The following functions are available:

  • Sort, filter or search the dimension
  • Rename the dimension
  • Change the dimension icon
  • Show or hide sparkline columns
  • Remove the dimension from the model
  • Delete the dimension

Dimensions can also be edited in the Dimensions workspace in xP&A. The Dimensions page shows you a list of all of the dimensions on your account, and any dimensions that are used in models that have been shared with you (shared dimensions).

1

If necessary, click xP&A in the upper left corner.

2

Navigate to the Dimensions workspace.

The Dimensions workspace is displayed as follows, for example:

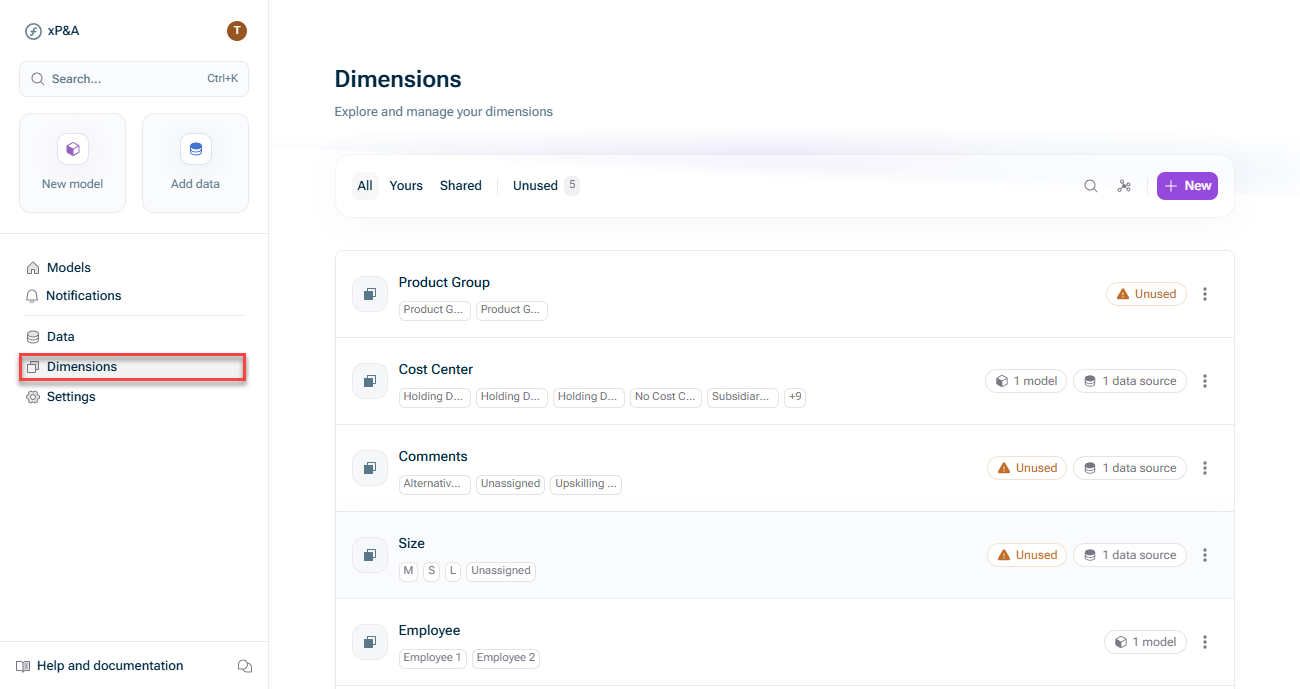
Shows the xP&A navigation sidebar with 'Dimensions' highlighted in red, and the 'Dimensions' workspace listing dimensions such as 'Product Group', 'Cost Center', 'Comments', 'Size', and 'Employee'.
Open the dimension workspace
3

Configure the dimensions as desired (see Options for Dimensions).

4

If you want to edit the dimension items click on an empty space in the dimension line (see Editing Dimension Items).

On the Dimensions page in xP&A, you have the following options for dimensions:

OptionDescription
All / Yours / SharedFilters the list of dimensions
Search iconSearch for a dimension
Graph iconOpen a dimension mapping graph
New iconCreate a new dimension
Category iconGive dimensions an icon by clicking the icon next to the dimension name
X ModelsHover to see which models use the dimension; if you have linked dimensions, the tooltip also shows how they connect to each other
Three-dot iconOpens a context menu to inspect or delete the dimension
Edit a dimension itemClick on an empty space in the desired dimension line (see Editing Dimension Items)

Add new dimension items in xP&A in the bottom row by clicking New item.

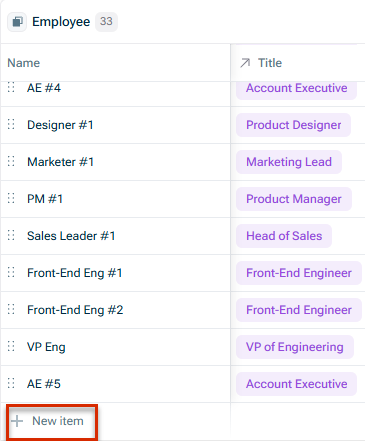
Shows the 'Employee' dimension items table in xP&A with items such as 'AE #4' (Account Executive) and 'VP Eng' (VP of Engineering). Highlighted in red is the '+ New item' button used to add a new item.
Add dimension item

All dimension items for a dimension must be unique, i.e. you cannot have two duplicate dimension items.

To edit dimension items in xP&A:

1

Click on an empty space in the dimension line.

2

The Dimension detail view is displayed as follows, for example:

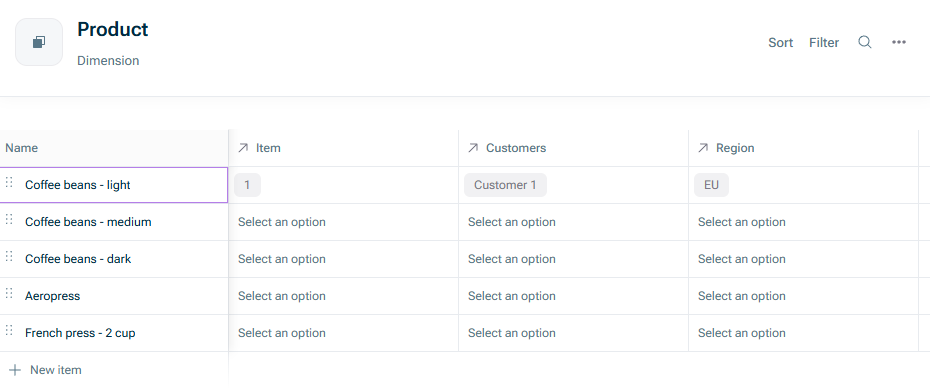
Shows the detail view of the 'Product' dimension in xP&A, with columns 'Name', 'Item', 'Customers', and 'Region'. The 'Coffee beans - light' row is highlighted in purple, showing 'Item' 1, 'Customers' 'Customer 1', and 'Region' 'EU'.
Product dimension with dimension items
3

Configure the dimension items as desired.

The following functions for dimension items are available in xP&A:

  • Add/ delete/ rename dimension items using the three-dot menu behind the name of the dimension item.
  • Create and update dimension-level links and item-level mappings.
  • Set the dimension icon.
  • Search, sort, filter, or reorder dimension items.
  • See which data sources the dimension is linked to (by hovering over each item).
  • Configure a default currency for the dimension item by adding the currency column using the + button. For more information on currency translation and currencies at dimension item level, see Using Currency and Currency Conversion.

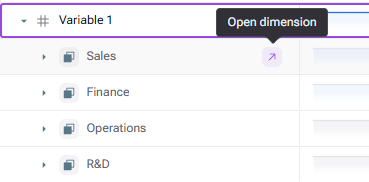
In the spreadsheet in xP&A, you can navigate to the dimension to which a dimension item belongs by clicking the arrow icon:

Shows the 'Variable 1' row in the xP&A spreadsheet, broken down by dimension items 'Sales', 'Finance', 'Operations', and 'R&D'. Highlighted in purple is the arrow icon (tooltip 'Open dimension') used to navigate to the dimension.
Navigate to dimension

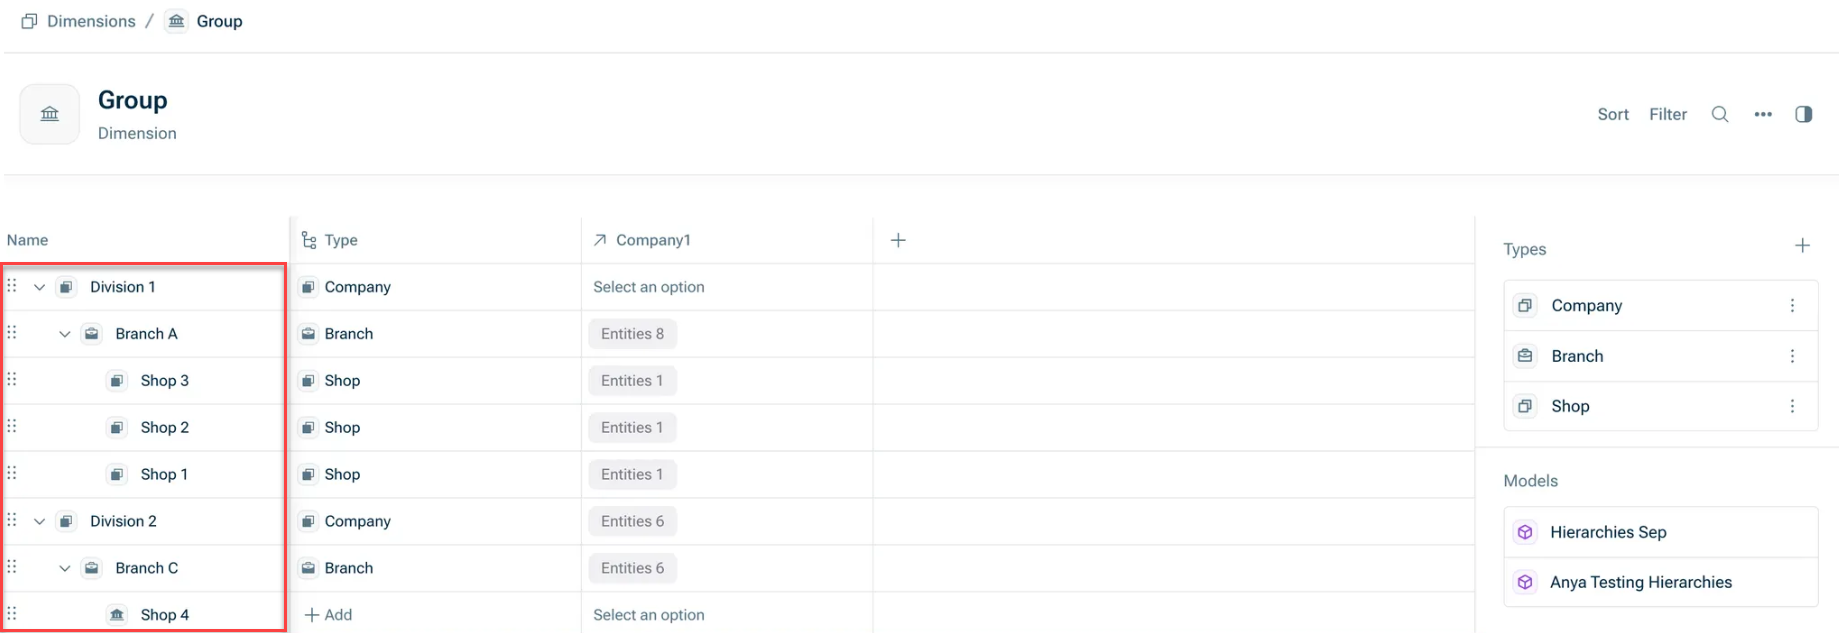
If your dimension has an inherent hierarchy, e.g. your dimension is Group and contains Divisions, Branches, and Shops that are rolled up, you can build your dimension in xP&A in order to display and aggregate data at the corresponding level.

To create this hierarchy in the dimension settings, simply grab a dimension item on the left and drop it under the dimension it belongs. This automatically assigns levels (top items are level 1, their children Level 2, and so on).

In the following example Division 1 is level 1, Branch A is level 2 and Shop 1, 2 and 3 are level 3:

Shows the detail view of the 'Group' dimension in xP&A, with dimension items 'Division 1', 'Branch A', 'Shop 3', 'Shop 2', 'Shop 1', 'Division 2', and 'Branch C' shown alongside the 'Type' and 'Company1' columns. Highlighted in red is the hierarchy 'Division 1' -> 'Branch A' -> 'Shop 1', 'Shop 2', and 'Shop 3'.
Hierarchy of a dimension

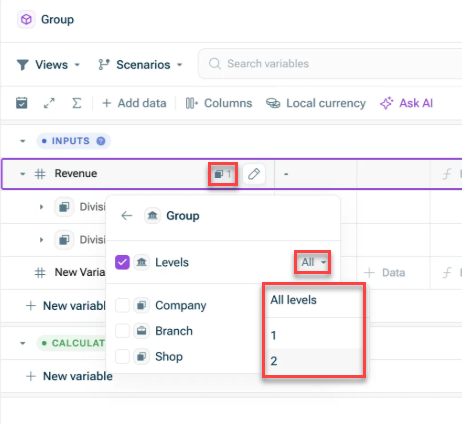
In the spreadsheet in xP&A, you can group your dimensions by a certain hierarchy level. To do so, click the Dimensions button and select the level at which your data is grouped:

Shows the dimension breakdown menu in xP&A for the 'Revenue' variable, with 'Levels' selected and the level drop-down list expanded to 'All levels', '1', and '2'. Highlighted in red are the dimension icon, the level drop-down list button, and the level options.
Grouping by levels

When you import a dimension from a spreadsheet (CSV, MS Excel, or Google Sheets), you can define the hierarchy directly in the cells of the spreadsheet using the > separator. xP&A reads the hierarchy path, creates each dimension item at the correct level, and links it to its parent item automatically – there is no need to rebuild the hierarchy by drag-and-drop after the import.

This is the recommended approach when you are setting up a dimension with a large number of dimension items.

Example

  • In the dimension column of a spreadsheet, write the full path to each item, separating levels with >.
  • The last segment is the item itself
  • Everything before the last segment defines the ancestors
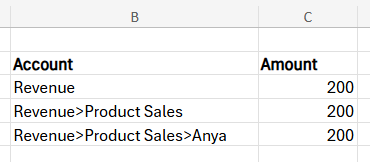
Shows a spreadsheet used to import a dimension hierarchy into xP&A, with column 'Account' containing paths separated by '>' such as 'Revenue', 'Revenue>Product Sales', and 'Revenue>Product Sales>Anya', and column 'Amount' set to 200 for each row.
Dimension hierarchy in the spreadsheet

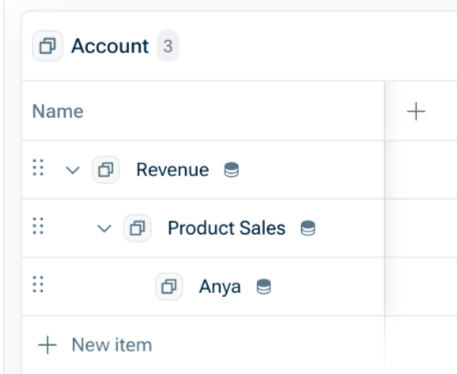
After the import, the dimension appears in the hierarchy in xP&A with the same structure you would get from organizing the dimension items manually:

Shows the 'Account' dimension in xP&A after importing the hierarchy from the spreadsheet, with 'Revenue' containing 'Product Sales', which contains 'Anya', each linked to a data source.
Dimension hierarchy in xP&A after import

Once the dimension has been imported, you can continue to adjust the hierarchy manually with drag-and-drop in the dimension settings, as described in the previous section.

The two methods can be combined; i.e. first bulk-import the structure from a spreadsheet, then finetune individual items in the dimension details in xP&A.

Please note

  • Deduplication: Items with the same path are treated as the same item. Revenue > Product Sales in two different rows resolves to one item Product Sales under Revenue.
  • Automatic creation of parents: You do not need a separate row for every level. If your file only lists leaf items (for example, Revenue > Product Sales > Licenses), xP&A creates Revenue and Product Sales automatically. Auto-created parents have no values of their own; values roll up from their children.
  • Whitespace: Spaces around > are ignored. Revenue > Product Sales and Revenue>Product Sales produce the same result.
  • Maximum depth: A hierarchy can have up to 128 levels.
  • Backwards compatibility: If no cell contains >, the import behaves exactly as before and the dimension is created as a flat list.
  • Invalid path: xP&A shows a warning if a path is malformed — for example, a trailing >, a leading >, or empty segments between two separators (Revenue > > Licenses). In this case, fix the path in your source file and re-import.

In addition to levels, dimensions in xP&A may also have types, which are classifications you can assign to items. Types may align with levels, but don’t have to. For example, you could have a Shop type where Shop 5 and Shop 6 are grouped under Shop 4.

In models, you can group the dimensions either by types or levels.

To add a type to a dimension in xP&A:

1

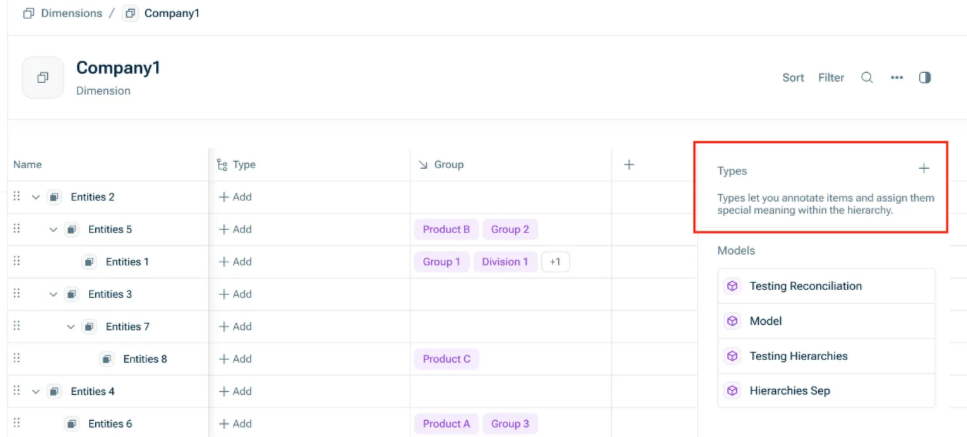
Navigate to the detail view of the dimension and click the + sign in the Types column on the right-hand side:

Shows the detail view of the 'Company1' dimension in xP&A. Highlighted in red is the 'Types' panel on the right, with its '+' icon used to add a new type, and the description 'Types let you annotate items and assign them special meaning within the hierarchy.'
Adding a new type to a dimension
2

Enter the name of the type and click Save.

3

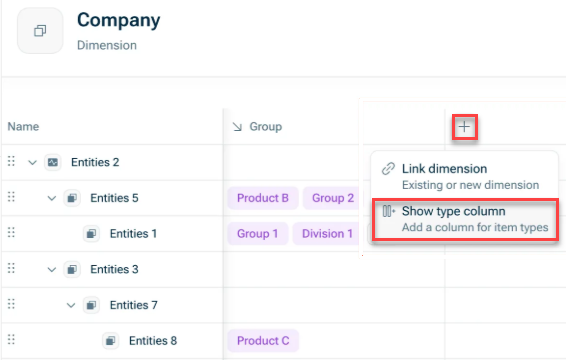
Add the Type column to the dimension table by clicking the + sign on top of an empty column and choosing Show type column:

Shows the detail view of the 'Company' dimension in xP&A. Highlighted in red are the '+' icon above an empty column and the drop-down menu with the options 'Link dimension' ('Existing or new dimension') and 'Show type column' ('Add a column for item types').
Adding the 'Type' column
4

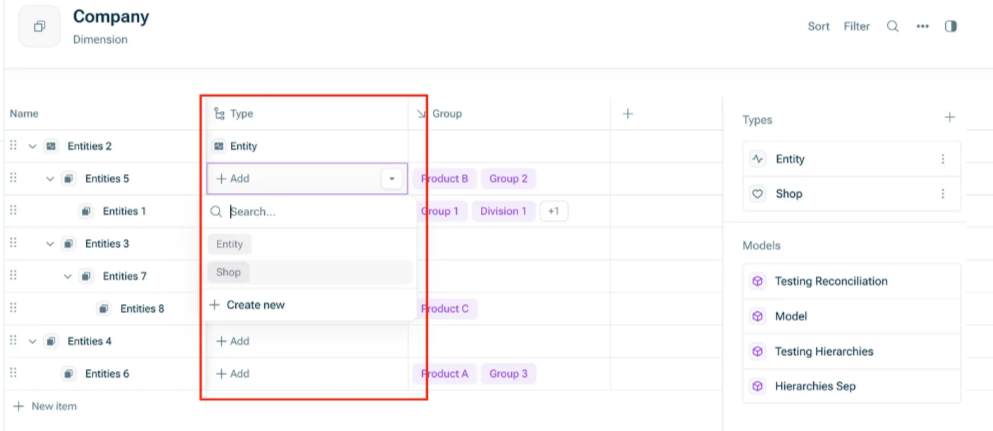
In the Type column, assign the types to the relevant dimension items by choosing them from the drop-down list. You can also click Create new to create a new type during this assignment step.

Shows the detail view of the 'Company' dimension in xP&A. Highlighted in red is the 'Type' column with its drop-down list open, showing the types 'Entity' and 'Shop' and the option '+ Create new'.
Assigning a type to a dimension item

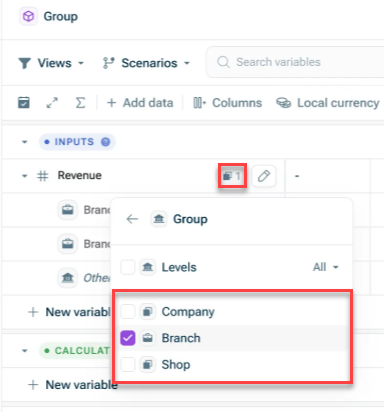
Once the types have been assigned, you can group your dimensions by type in the spreadsheet in xP&A. To do so, click the Dimensions button and select the types you want to use for breaking down your dimensions:

Shows the dimension breakdown menu in xP&A for the 'Revenue' variable. Highlighted in red are the dimension icon and the type list with 'Company', 'Branch' (selected), and 'Shop'.
Grouping by types

The following additional functions for dimensions in xP&A are available:

To include an existing dimension in a model in xP&A, choose one of the following options:

  • Navigate to the dimension under the + icon in the overview of the model on the left. You can include multiple dimensions at once by clicking multiple dimensions while the picker is open:
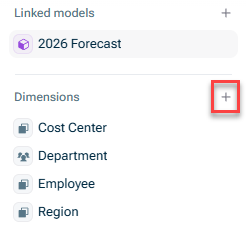
    Shows the model sidebar in xP&A with the 'Dimensions' section listing 'Cost Center', 'Department', 'Employee', and 'Region'. Highlighted in red is the '+' icon used to add a dimension.
    Adding a dimension from the overview

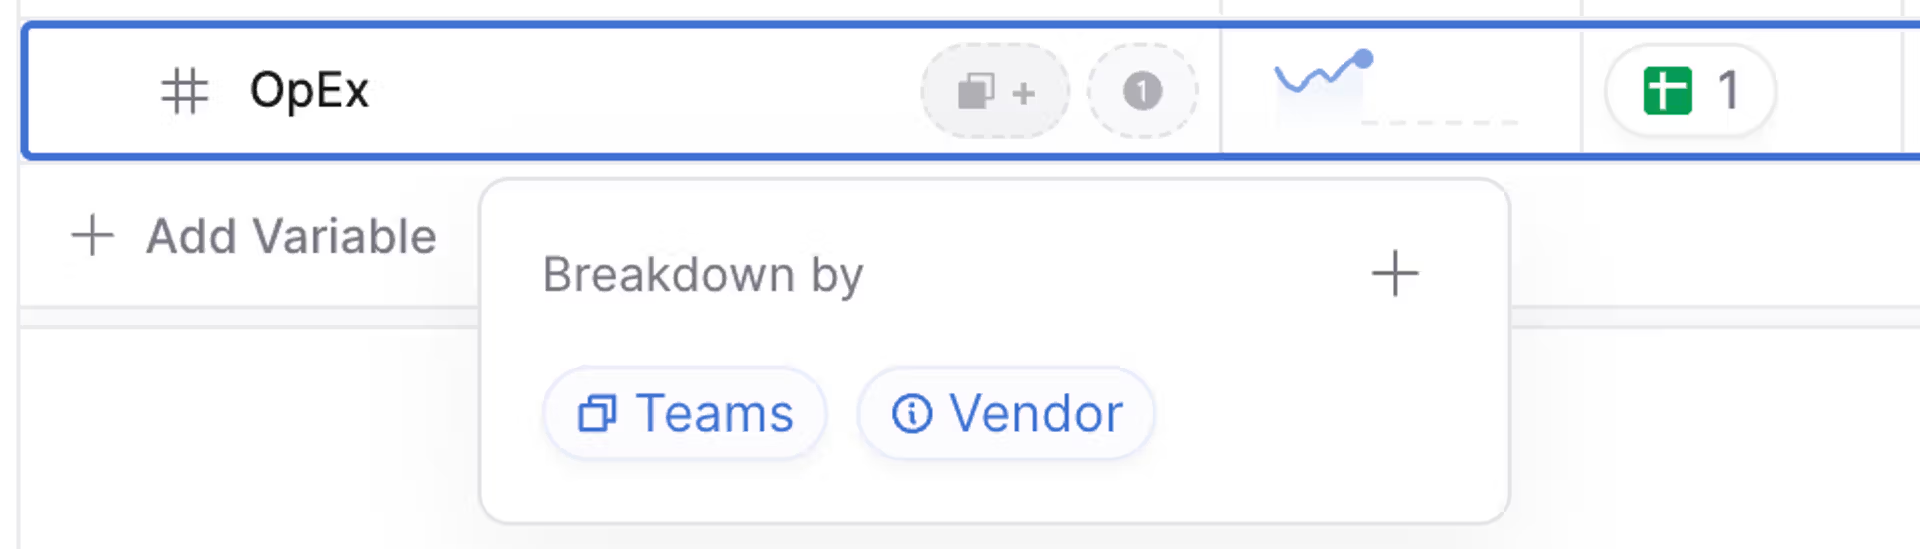
  • Click the Dimensions button on a variable, to add that dimension to the variable (and to the model):

    Shows the 'OpEx' variable in xP&A, highlighted in blue, with its 'Breakdown by' menu open showing the dimensions 'Teams' and 'Vendor' available to add.
    Adding a dimension from a variable

You can show or hide indirect dimension mappings in xP&A in the data tables, or in the detail view of the dimension in the Dimension workspace.

Example:

  • If each Employee has a Title, and each Title sits within a Team, then each Employee sits within a Team via their Title.
  • The indirect dimension mapping is from the Employee to their Team.
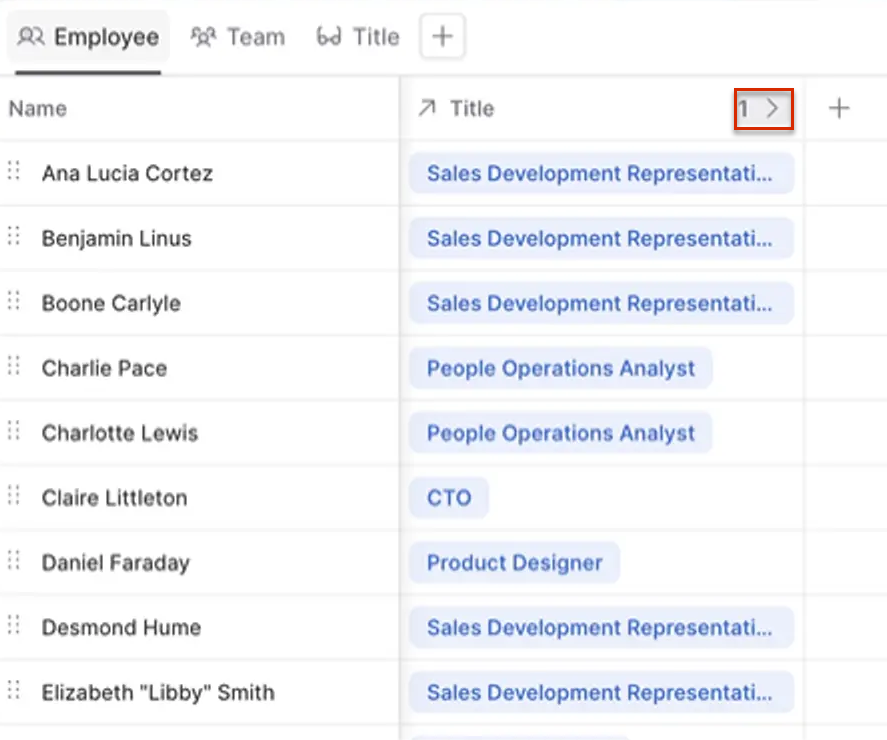
  • When in the Employee dimension, you can reveal the Team of each employee by clicking the > in the column header.
Shows the 'Employee' dimension table in xP&A with 'Name' and 'Title' columns. Highlighted in red is the '1 >' control in the 'Title' column header, used to reveal the indirect 'Team' dimension mapping.
Show/Hide indirect dimensions

1-to-1 vs. 1-to-many relationships

  • Linked dimensions have a 1-to-1 relationship, i.e. each dimension item in the primary dimension links to only one dimension item in the linked dimension. Each employee may only have one job title, for instance.

  • xP&A's dimensions are not designed for 1-to-many relationships, i.e. one job title cannot sit within multiple departments.

Often, there will be a relationship between dimensions. For example, assigning each Employee to a Job Title, or assigning each Deal to a Sales Representative.

To link dimensions in xP&A, click the + in the far-right column (in the data tables, or in the detail view of the dimension in the Dimensions workspace) and select the Link dimension option.

Shows a dimension table in xP&A with columns 'Name', 'Title', 'Status', and 'Currency'. The '+' icon in the far-right column is clicked, opening the 'Link dimension' option ('Existing or new dimension').
Link dimensions

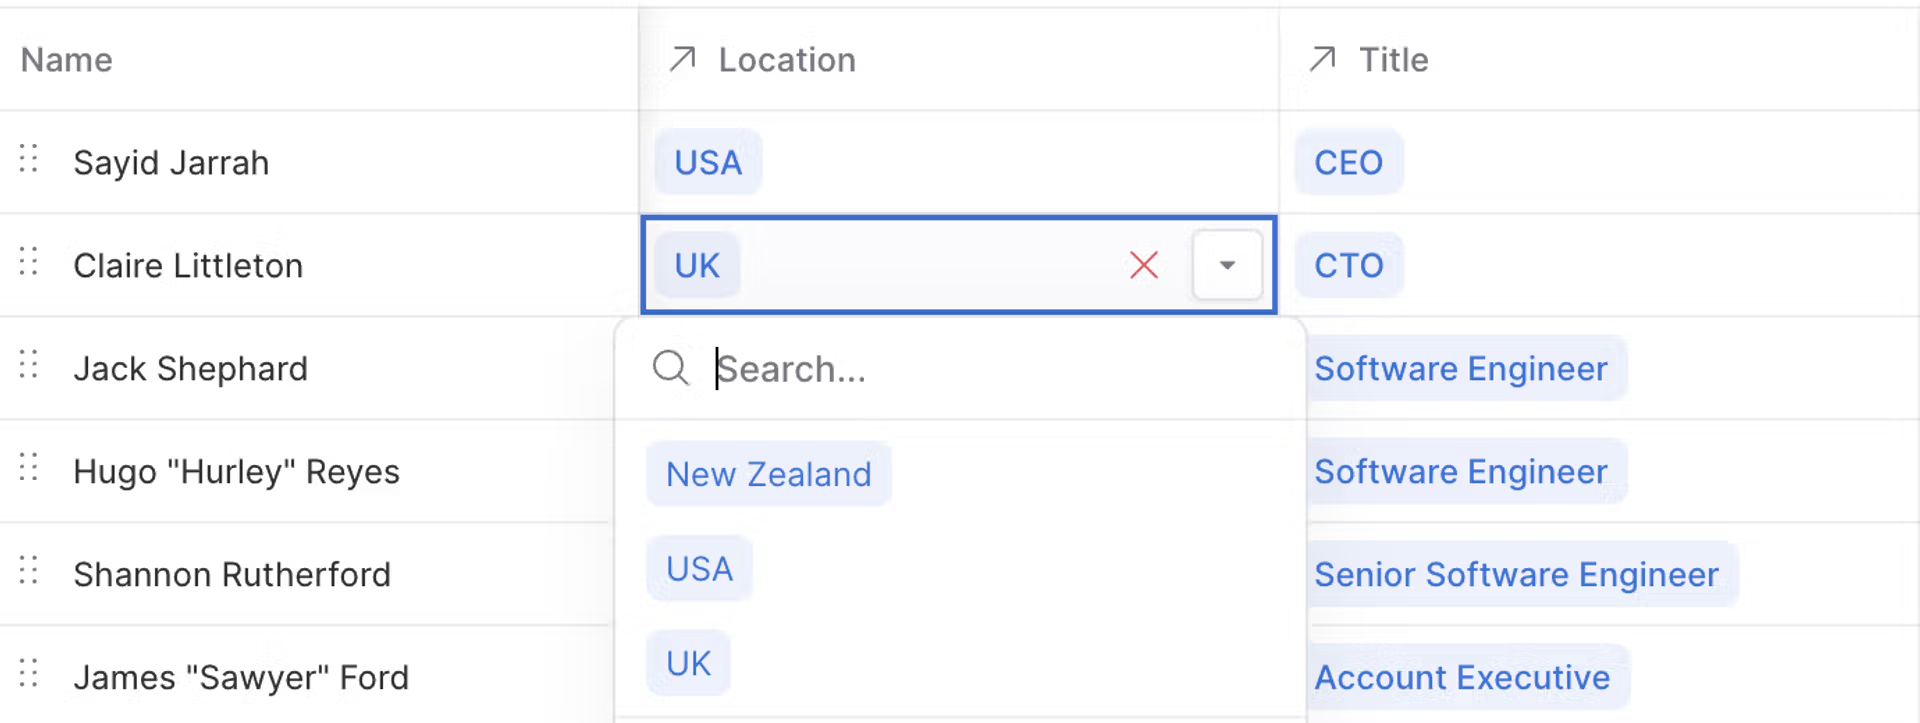
This will create an extra column in the data table, allowing you to map the two dimensions together (e.g. giving each Employee a Location).

Shows a dimension table in xP&A with 'Name', 'Location', and 'Title' columns. The 'Location' cell for 'Claire Littleton' is open as a drop-down list, currently set to 'UK', with the options 'New Zealand', 'USA', and 'UK' to choose from.
Map dimensions

In hierarchical dimensions with levels, only the lowest dimension items can be linked.

Example: In Group A → Branch 1 → Shop New, only Shop New can be linked.

Dimension linking in xP&A can have an impact on your cell count and thus the performance of your model. Always verify your dimension relationships before implementing your model to avoid exponential cell growth and potential system performance issues.

For more information, see Cells and Limits.

To paste data in (e.g. from a spreadsheet), simply copy your data, then select your row(s), and paste (Ctrl/Cmd + V). xP&A will "paste over" whatever row(s) you had selected.

If you do not want to paste over what you have already in the data table, then create a new item at the bottom of the table (you may have to take off alphabetical sorting if you have that applied), select that new item, and paste over that new item (see Adding a dimension item).

This content was generated using AI and reviewed by Lucanet subject matter experts before publication.