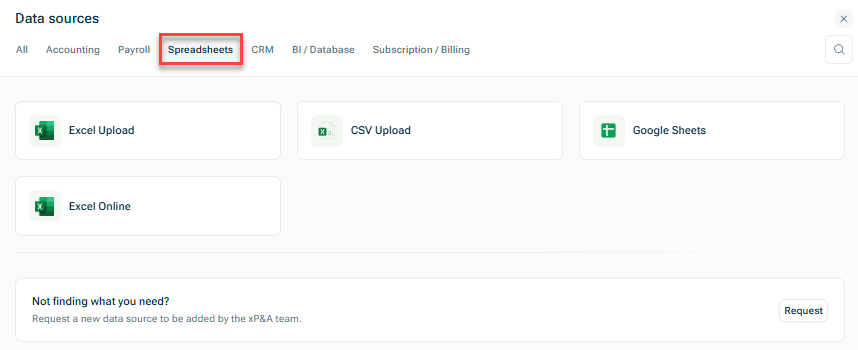
In xP&A, you can connect to the following spreadsheet file formats:

  • Google Sheets
  • Excel Online
  • Excel Upload
  • CSV Upload

Google Sheets and Excel Online are synchronized, i.e. you can refresh the data source and the latest data will be imported automatically, whereas data integrated via CSV Upload and Excel Upload need to be updated manually.

The following three data formats for spreadsheet files are supported:

  • Tables
  • Transactions
  • Time-series

Each connected file needs to be formatted in a certain wayso that the data can be imported into xP&A.

We also provide various templates for the different file and data formats, helping you to set up the files much easier.

In order to pull in data from a spreadsheet, the spreadsheet needs to have a certain format. The format requirements depend on the type of data you want to connect.

The table format is useful where your values do not vary over time, i.e. it is more of a static database of information.

A table must structured as follows:

  • The first row represents the dimension name or variable name.

  • Every subsequent row (below the top row) represent a single dimension item.

  • The first column must contain the primary dimension.

  • Additional columns can contain:

    • Mapped dimensions:

      In case of mapped dimensions, the first row must have the name of the dimension being mapped from and the name of the dimension being mapped to, in the following format: [from dimension] > [to dimension]. Each subsequent row contains the "mapped" dimension

      Note: (The arrow (">") is important because it is used by xP&A to distinguishes between a normal dimension column, and a mapped dimension column! This is equivalent to linking dimensions in xP&A, except that you cannot modify the link from within xP&A in this case.)
    • Unmapped dimensions:

      The first row must contain the name of the dimension and all subsequent other row contains a dimension item.

      Note: It is rare that you will use unmapped or nested dimensions in the table format.
    • Variables:

      The first row must contain the name of the variable and all subsequent rows will contain the values, whether it's a date or a number, for the associated dimension item.

      Note: You must not include a > in a variable column.

Example

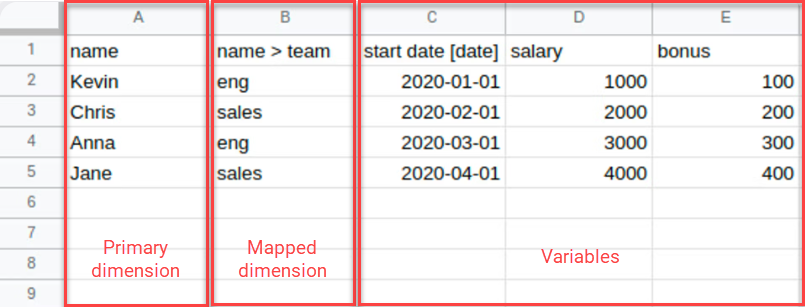
Shows a spreadsheet for table, highlighted are the column A as the primary dimension, column b as the mapped dimension, and columns C-E as variables.
Example of a table

The transactions format is useful where your data varies over time, and you track it on a granular basis.

xP&A allows two types of transactions format:

Standard format

The standard format for transaction data allows you to pull in data on a transaction-by-transaction basis into xP&A. This is useful for values that are recorded on a per-day, per-week, or per-event basis, like Sales by Customer.

The standard format rules are:

  • The first column must have the name Date.
  • Subsequent columns can be values(such as variables or Data Items) or dimenisons, with a freely-definable name.

    Note: You can add [dimension] or [variable] to a column name to ensure that the system recognizes the column correctly.
  • You can also add dimension mappings. In this case, the column name must have the name of the dimension being mapped from and the name of the dimension being mapped to, in the following format: [from dimension] > [to dimension].
  • You can also add a Cohort column to integrate cohorts.

Example

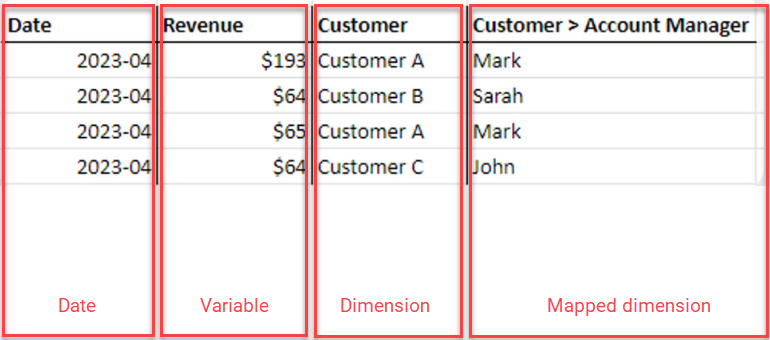
Shows a spreadsheet for transactions, highlighted are the column A as the date, column b as the variable, columns C as a dimension and column D as a mapped dimension
") Example of transactions (standard format)

Alternative format

If your data source has Data Items coming through in rows rather than columns then you can use the Alternative format for data ingestion.

The alternatove format ruels are:

  • The first column must have the name Date.
  • The second column must have the name Type and contain the Data Item or variable names.
  • The third column must have the name Value and contain the respective values.

Example

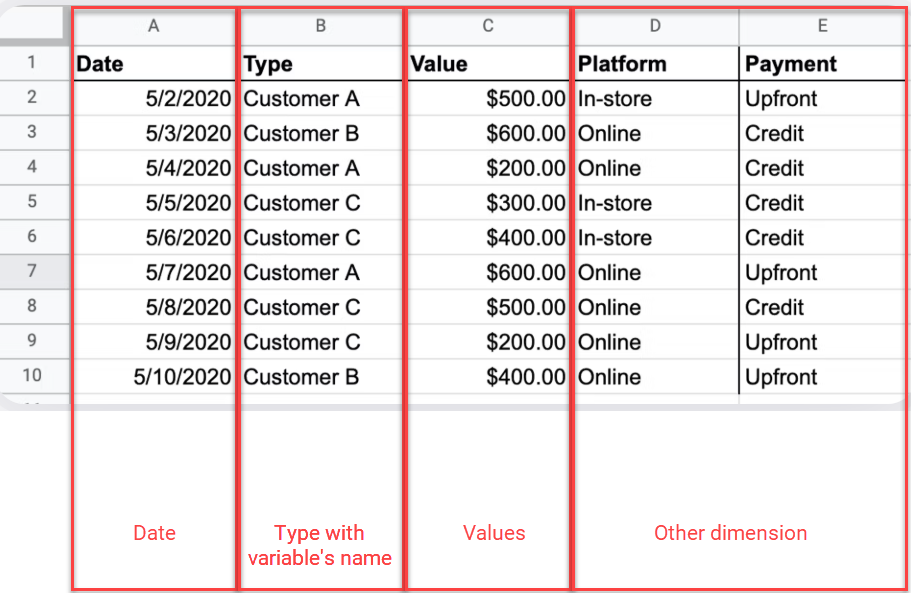
Shows a spreadsheet for transactions, highlighted are the column A as the date, column b as the type, columns C as the value and column D and E as other dimension columns
") Example of transactions (alternative format)

The time-series format is useful where your data varies over time (e.g. by month).

xP&A allows three types of time-series format:

Basic time-series

The basic time-series rules are:

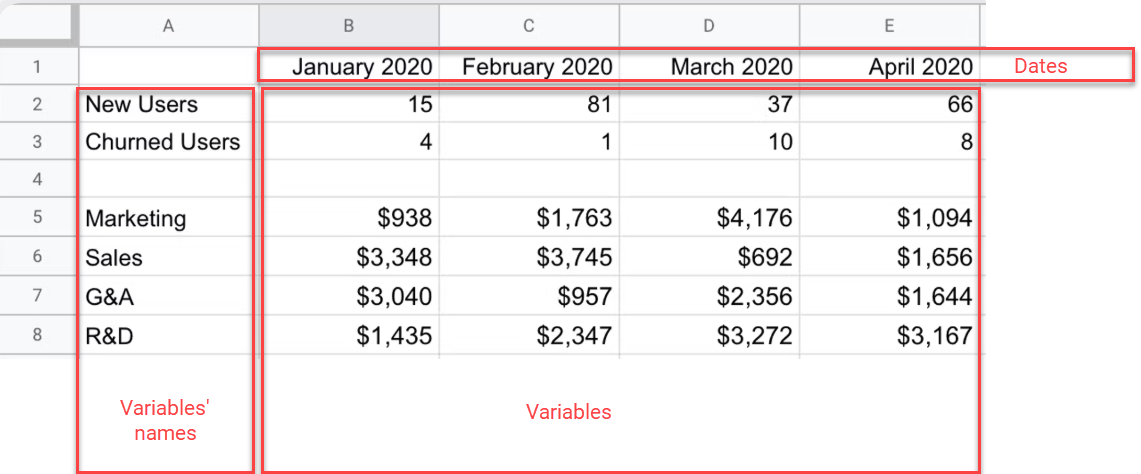
  • The first row must have dates for each value.
  • The first column must have the names of each variable.
  • Each subsequent row represents a single variable.
Example

Shows a spreadsheet for basic time-series, highlighted are the date row on top, column A with the variables' names, and column B-E with the variables.
Example of basic time-series

Time-series with dimensions

With this type, you can include several dimensions.

The rules for time-series with dimensions are:

  • Each row represents a single variable, for a single dimension item.
  • The columns can be split into four sections:
1

The first column must have the variables' names.

2

The next columns represent the dimensions:

- The first row of this section must have the name of the dimension. - The rows below may have the name of an item in that dimension.

3

The last columns represent the values.

- The first row of this section must have dates. - The rows below contain the values themselves - which should be numbers (not text)

  • If a variable has more than one dimension, you can create a row for each possible iteration. For example, if Website Revenue was tracked by both Product and Geography, you would have 12 rows for Website Revenue (3 Products x 4 Geographies).

Example

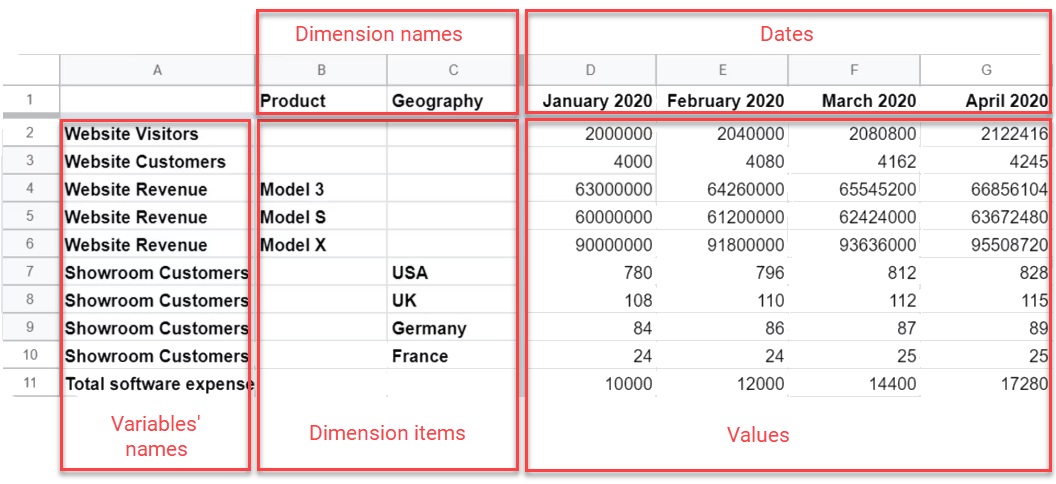
Shows a spreadsheet for time-series with dimensions, highlighted are the first row with the dimension names and dates, and the subseuqnt rows with the variables' names, the dimensions, and the values
Example of time-series with dimensions

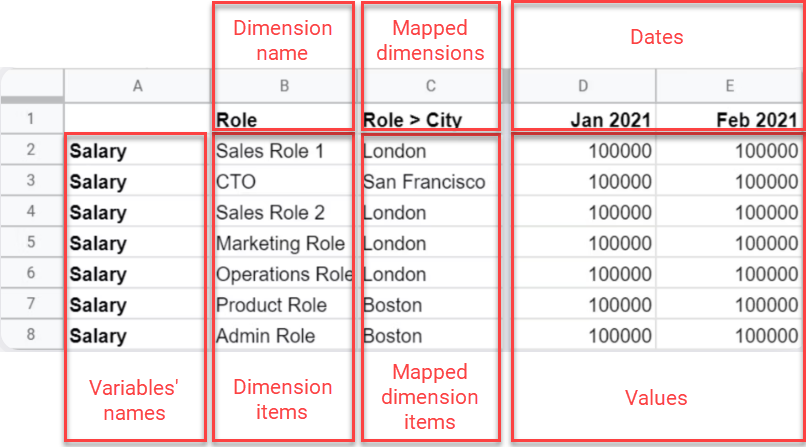
Time-series with linked dimensions

With this type, you can include dimensions and mappings (i.e. links between dimensions and dimension items). You can include several dimensions and several mappings at the same time.

If you set up the mappings in your data source, xP&A will automatically know how to slice and dice your variables.

The rules for time-series with linked dimensions are:

  • Each row represents a single variable, for a single dimension item.
  • The columns can be split into four sections:
1

The first column must have the variables' names.

2

The next columns represent the dimensions: - The first row of this section must have the name of the dimension. - The rows below may have the name of an item in that dimension.

3

The next columns hold the dimension mappings:

- The first row must have the name of the dimension being mapped from and the name of the dimension being mapped to, in the following format: [from dimension] > [to dimension]. - The rows below may have the name of an item in the dimension being mapped to

4

The last columns represent the values.

- The first row of this section must have dates. - The rows below contain the values themselves - whcoh should be numbers (not text)

Example

Shows a spreadsheet for time-series with dimensions, highlighted are the first row with the dimension names, the mapped dimensions and dates, and the subsequnt rows with the variables' names, the dimensions, the mapped dimensions, and the values
Example of time-series with mapped dimensions

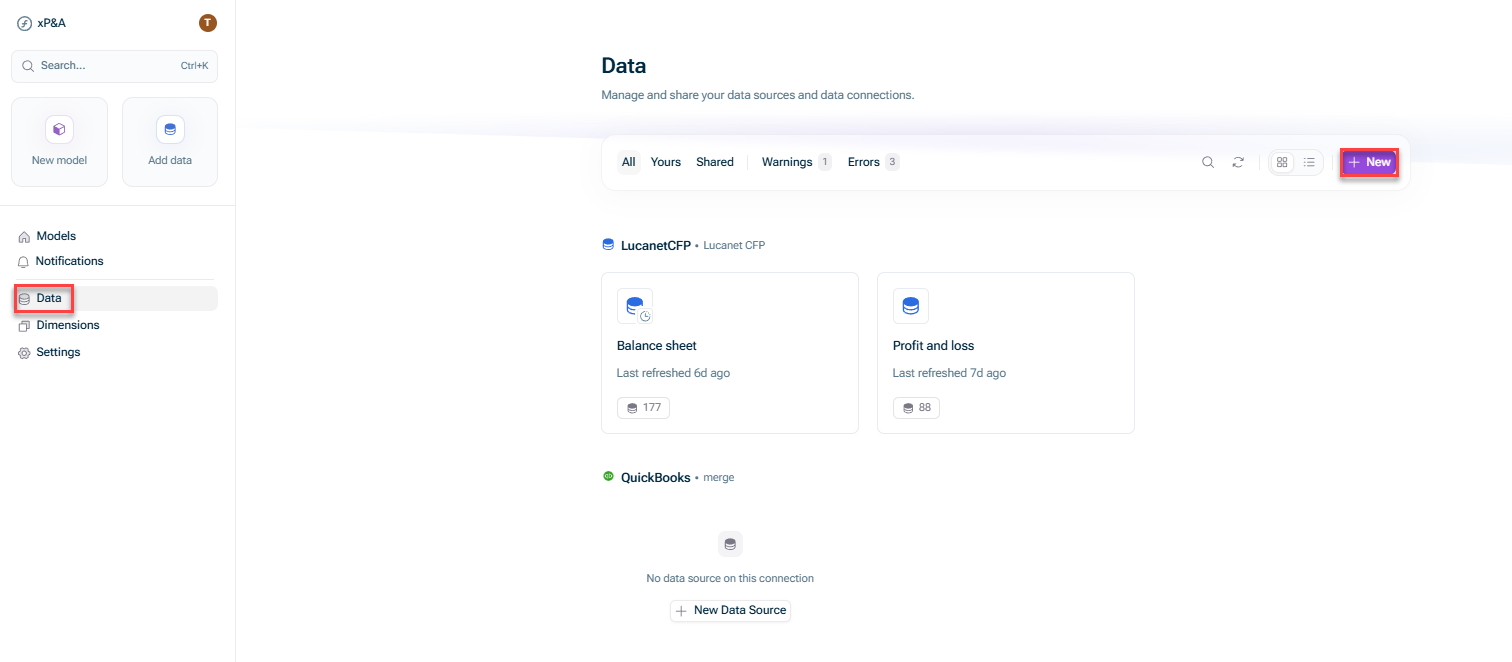
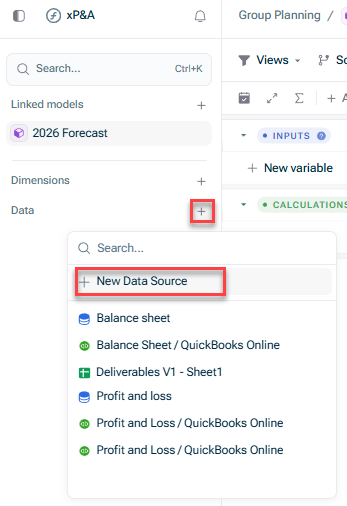
For Excel Upload and CSV Upload configure the following steps in the New Data Source dialog:

StepDescription
Upload fileDrag & drop or browse for the file you would like to connect.
'Upload file' step
HeadersWorksheet: Select the worksheet you would like to pull the data from. Headers: In the file preview on the right, select the row representing the column headers of your dataset.
'Headers' step
FormatSelect the format of your data set and click Apply to see a preview of the formatted data.
'Format' step
DimensionsAssign the dimensions of your data sources to the dimensions in xP&A in order to use them in xP&A.
'Dimensions' step

For Excel Online configure the following steps in the New Data Source dialog:

StepDescription
ConnectionChoose a connection: Authenticate with your Excel Online account or choose an already existing connection with Excel Online. If you encounter issues with the authentication, you need to Select your file: Select the file which you would like to connect. Select a worksheet from your file: Select the worksheet from which you would like to pull in the data.
'Connection' step
HeadersHeaders: In the file preview on the right, select the row representing the column headers of your dataset. You can click Refresh data to synchronize the file and get the latest data of your selected file.
'Headers' step
FormatSelect the format of your data set and click Apply to see a preview of the formatted data.
'Format' step
DimensionsAssign the dimensions of your data sources to the dimensions in xP&A in order to use them in xP&A.
'Dimensions' step

For Google Sheets configure the following steps in the New Data Source dialog:

StepDescription
ConnectionChoose a connection: Authenticate with your Google Sheets account or choose an existing connection with Google Sheets. Select your file: Select the sheet which you would like to connect. Paste URL: Alternatively, you can paste the URL of the sheet which you would like to connect. Select a worksheet from your file: Select the worksheet from which you would like to pull in the data.
'Connection' step
HeadersHeaders: In the file preview on the right, select the row representing the column headers of your dataset. You can click Refresh data to synchronize the file and get the latest data of your selected file.
'Headers' step
FormatSelect the format of your data set and click Apply to see a preview of the formatted data.
'Format' step
DimensionsAssign the dimensions of your data sources to the dimensions in xP&A in order to use them in xP&A.
'Dimensions' step

In order to set up your spreadsheets according to the requirements more efficiently, you can use the following templates for Google Sheets and/or MS Excel:

Template/Use caseLink to template and example
Basic headcount listBasic headcount list - Google Sheets Template
Example for basic headcount list
Payroll actuals by month (time-series)Payroll actualy by month (time-series) - Excel Template
Example for payroll actuals by month
Time-series cohortsTime-series cohorts - Google Sheets Template
Transaction format cohortsTransaction format cohorts - Google Sheets Template Transaction format - Excel Template
Basic time-seriesBasic time-serie - Google Sheets Template
Time-series with two dimensionsTime-series with two dimensions - Google Sheets Template

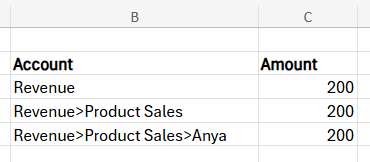
When you import a dimension from a spreadsheet (CSV, Excel, or Google Sheets), you can define the hierarchy directly in the cells of the spreadsheet using the > separator. xP&A reads the hierarchy path, creates each dimension item at the correct level, and links it to its parent item automatically - there is no need to rebuild the hierarchy by drag-and-drop after the import.

This is the recommended approach when you are setting up a dimension with a large number of dimension items.

Example

Dimension hierarchy in the spreadsheet using the > separator:

Shows a dimension hierarchy in a spreadsheet using the >
Dimension hierarchy in the spreadsheet

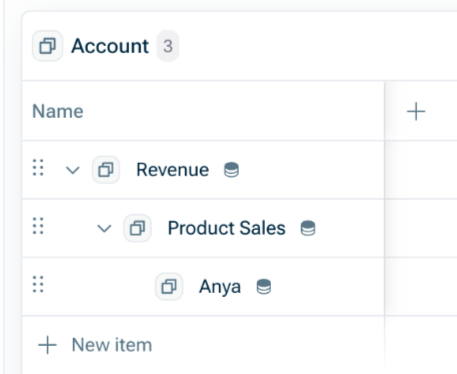
After the import, the dimension appears in the hierarchy in xP&A with the same structure you would get from organizing the dimension items manually:

Shows the Dimension hierarchy from the spreadsheet in xP&A after import
Dimension hierarchy in xP&A after import

For more information on this topic, see Creating and Editing Dimensions.

In case you encounter problems when authenticating to your Excel Online or Google Sheets account, you first need to grant access permissions to xP&A.

Please note that an Administrator role is required for each system to configure the permissions.

Excel Online

If you receive the error Access Denied or Need admin approval when connecting to Excel Online, please send the following troubleshooting guide to your IT Administrator:

1

Sign in to the Microsoft Entra admin center as a Cloud Application Administrator or Global Administrator.

2

Navigate to Identity | Applications | Enterprise applications.

3

In the search box, type Causal.

Note: The app might also be called Lucanet xP&A. If neither name appears in the search results, it means the app has not been “provisioned” yet. Ask one of the xP&A users to attempt to create an Excel Online connection again. When they get the Need admin approval error, the app will be created in your directory, and you will be able to find it.

4

Click Causal (or Lucanet xP&A) in the list to open the application overview.

5

In the left sidebar, under Security, select Permissions.

6

Click Grant admin consent for [ Your Organization] and accept the permissions ( files.read.all and sites.read.all) in the displayed dialog.

7

Once granted, the permissions list will show Granted for [ Your Organization] in the status column.

Users can now create Excel Online connections in xP&A.

For more information, you can also consult the Microsoft documentation: Grant tenant-wide admin consent to an application.

Google Sheets

For Google Sheets, you can find the instructions to configure permissions for xP&A to access data here: Control which apps access Google Workspace data.