Variables are the building blocks of your models in Lucanet xP&A (Extended Planning & Analysis). If you're a spreadsheet user, you can think of them a bit like spreadsheet cells. If you're a programmer, you can think of them as, well, variables.

You can define a variable in xP&A using a formula. Formulas let you work with numbers, ranges, and other variables.

This article contains the following chapters on creating and editing variables in xP&A:

  • Aggregation Functions: xP&A has three types of aggregation functions that determine how a variable 'rolls up' Dimensions, Time, and Data respectively.
  • Creating Variables Using AI: xP&A offers different options for AI assistance when creating new variables. AI can be used to suggest new variables to be added to your model.
  • Moving Variables: You can move variables within a model, as well as between models.
  • Referencing Variables From Linked Models: Instead of a single model with all of your variables and formulas, you can structure your work into separate, smaller models. Once linked, you can reference variables between them.
  • Using Relative Time for Variables: Sometimes variables do not refer to specific calendar time steps of your model (Jan 2022, Feb 2022) but refer to relative time (Month 1, Month 2).
  • Using Groups: Groups are sets of variables within sections. You can also create nested groups simply by creating a group under an existing group.
  • Using Sections: Variables can be organized into several Sections in the spreadsheet view.

To create a variable in xP&A:

1

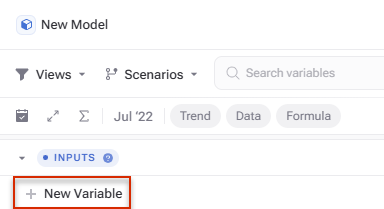
Click New Variable at the end of a section.

Shows the 'INPUTS' section of a model's spreadsheet in xP&A, with the 'New Variable' button highlighted in red at the bottom of the section.
Creating a new variable
2

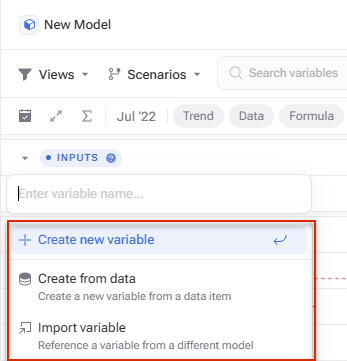
The following drop-down menu is displayed:

Shows the drop-down menu displayed when adding a new variable in xP&A, with the 'Create new variable', 'Create from data', and 'Import variable' options highlighted in red.
Drop-down menu for a new variable
3

Do one of the following:

  • Create a new variable: If you select this option, enter the name of the new variable in the input field.
  • Create from data: Creates a new variable from a data item. If you select this option, you can first select the desired data source and then the desired variable. For more information on this topic, see Linking Variables to Integrated Data.
  • Import variable: Reference a variable from a different model. If you select this option, you can first select the desired model and then the desired variable.
4

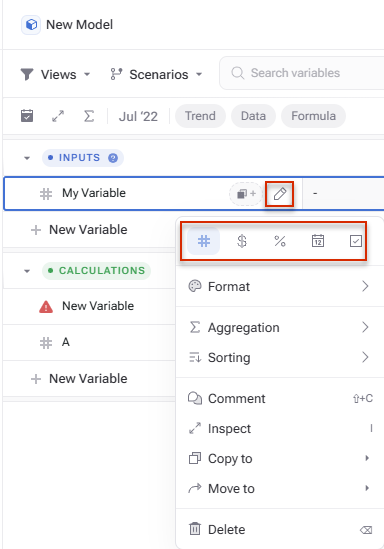
If you have defined a new variable, you can then specify its format type by clicking on the Edit icon icon or the icon to the left of the variable name:

Shows the variable row 'My Variable' in xP&A with the edit icon highlighted in red, and the format-type icons for number, currency, percent, date, and boolean highlighted in red above the 'Format', 'Aggregation', 'Sorting', 'Comment', 'Inspect', 'Copy to', 'Move to', and 'Delete' menu options.
Choosing a data type for a variable

There are five main format types for variables in xP&A: Number, Currency, Date, Percent, and Boolean.

OptionDescription
NumberFor quantities that aren't percentages or currencies.

Note: Number formatting (i.e. the decimal and thousands separators) follows your platform-wide formatting preferences which you can define in your user settings at the bottom left of the main menu. (See Formatting Preferences).

DateThe number will be formatted as a date. You can enter the date as date(yyyy,mm,dd) or as date(yyyy,mm).
Currency $Choose a specific currency (e.g. USD), or select Custom if the currency is not listed (e.g. cryptocurrencies). The currency symbol for common currencies is pre-set from the currency you select (e.g. $ for USD), but you can manually change the prefix/suffix.

Note: To learn more about Currency and how xP&A handles FX conversion, see Using Currency and Currency Translation.
Percent %This expects the variable's value to be a decimal.

Example: 0.5 will be displayed as 50%. You can also enter directly as "50%".
BooleanA variable that can be True or False (1 or 0), displayed as a checkbox/toggle.

In addition to the standard formats, advanced formats can also be assigned to a variable in xP&A. Proceed as follows to use the advanced formats:

1

Click Edit icon to open the context menu.

2

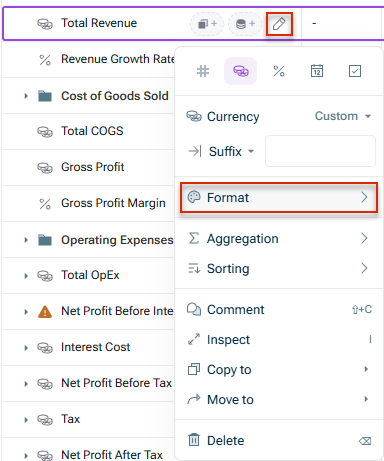
Click Format.

Shows the context menu of the 'Total Revenue' variable in xP&A, with the 'Format' option highlighted in red above the 'Aggregation' and 'Sorting' options.
Context menu 'Format'
3

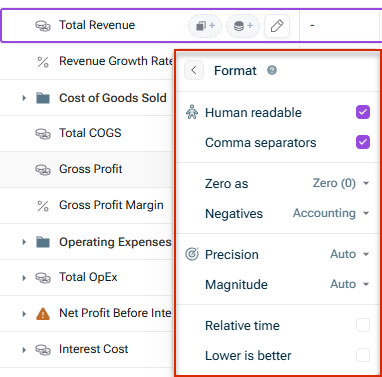
The context menu is displayed as follows:

Shows the 'Format' panel for a variable in xP&A, with the 'Human readable', 'Comma separators', 'Zero as', 'Negatives', 'Precision', 'Magnitude', 'Relative time', and 'Lower is better' options highlighted in red.
Advanced format options
4

Choose the desired option (see Advanced formatting options).

The following advanced formatting options are available in the Format context menu in xP&A:

OptionDescription
Human-readable1,000 -> 1k, 1,000,000 -> 1m, etc. Human readable is automatically on.
Comma separatorsComma separators, i.e. 1000 -> 1,000, 10000 -> 10,000, etc. Comma separators are automatically on.
Zero asDisplays cells with 0 values as -, making it easy to spot cells that have non-zero numbers.
NegativesAccounting negatives i.e. ($100,000) not -$100,000 Red negatives i.e. -$100,000 or both ($100,000)
PrecisionAutomatic, or specify the number of decimal places or significant figures.
MagnitudeAutomatic (as entered), or specify the 'unit' (thousand, lakh, million, crore, billion, trillion) you want to display the value in. For example, if you entered 100 but format the display as 'thousand', this will be 0.1k.
Relative timeActivate to use relative time for the variable. For more information, see Relative Time for Variables.
Lower is betterActivate if in comparisons values of the variable shall be displayed in green if they are lower than the values they are compared with.

You can set custom unit format for your variables in xP&A, and set whether that unit is displayed before or after the number (prefix vs. suffix).

To add a prefix and/or a suffix in xP&A:

1

Click Edit icon to open the context menu.

2

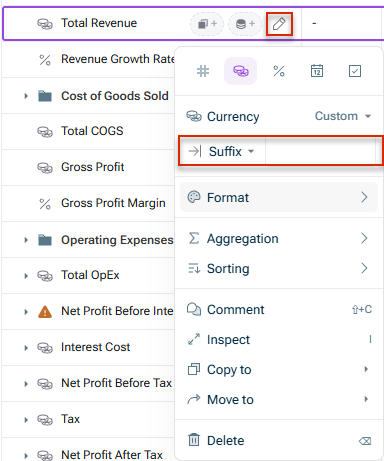
If necessary, use the drop-down menu to switch to prefix or suffix.

Shows the context menu of a variable in xP&A, with the 'Suffix' drop-down option highlighted in red.
Add suffix and/or prefix to a variable
3

Enter the desired prefix or suffix in the input field.

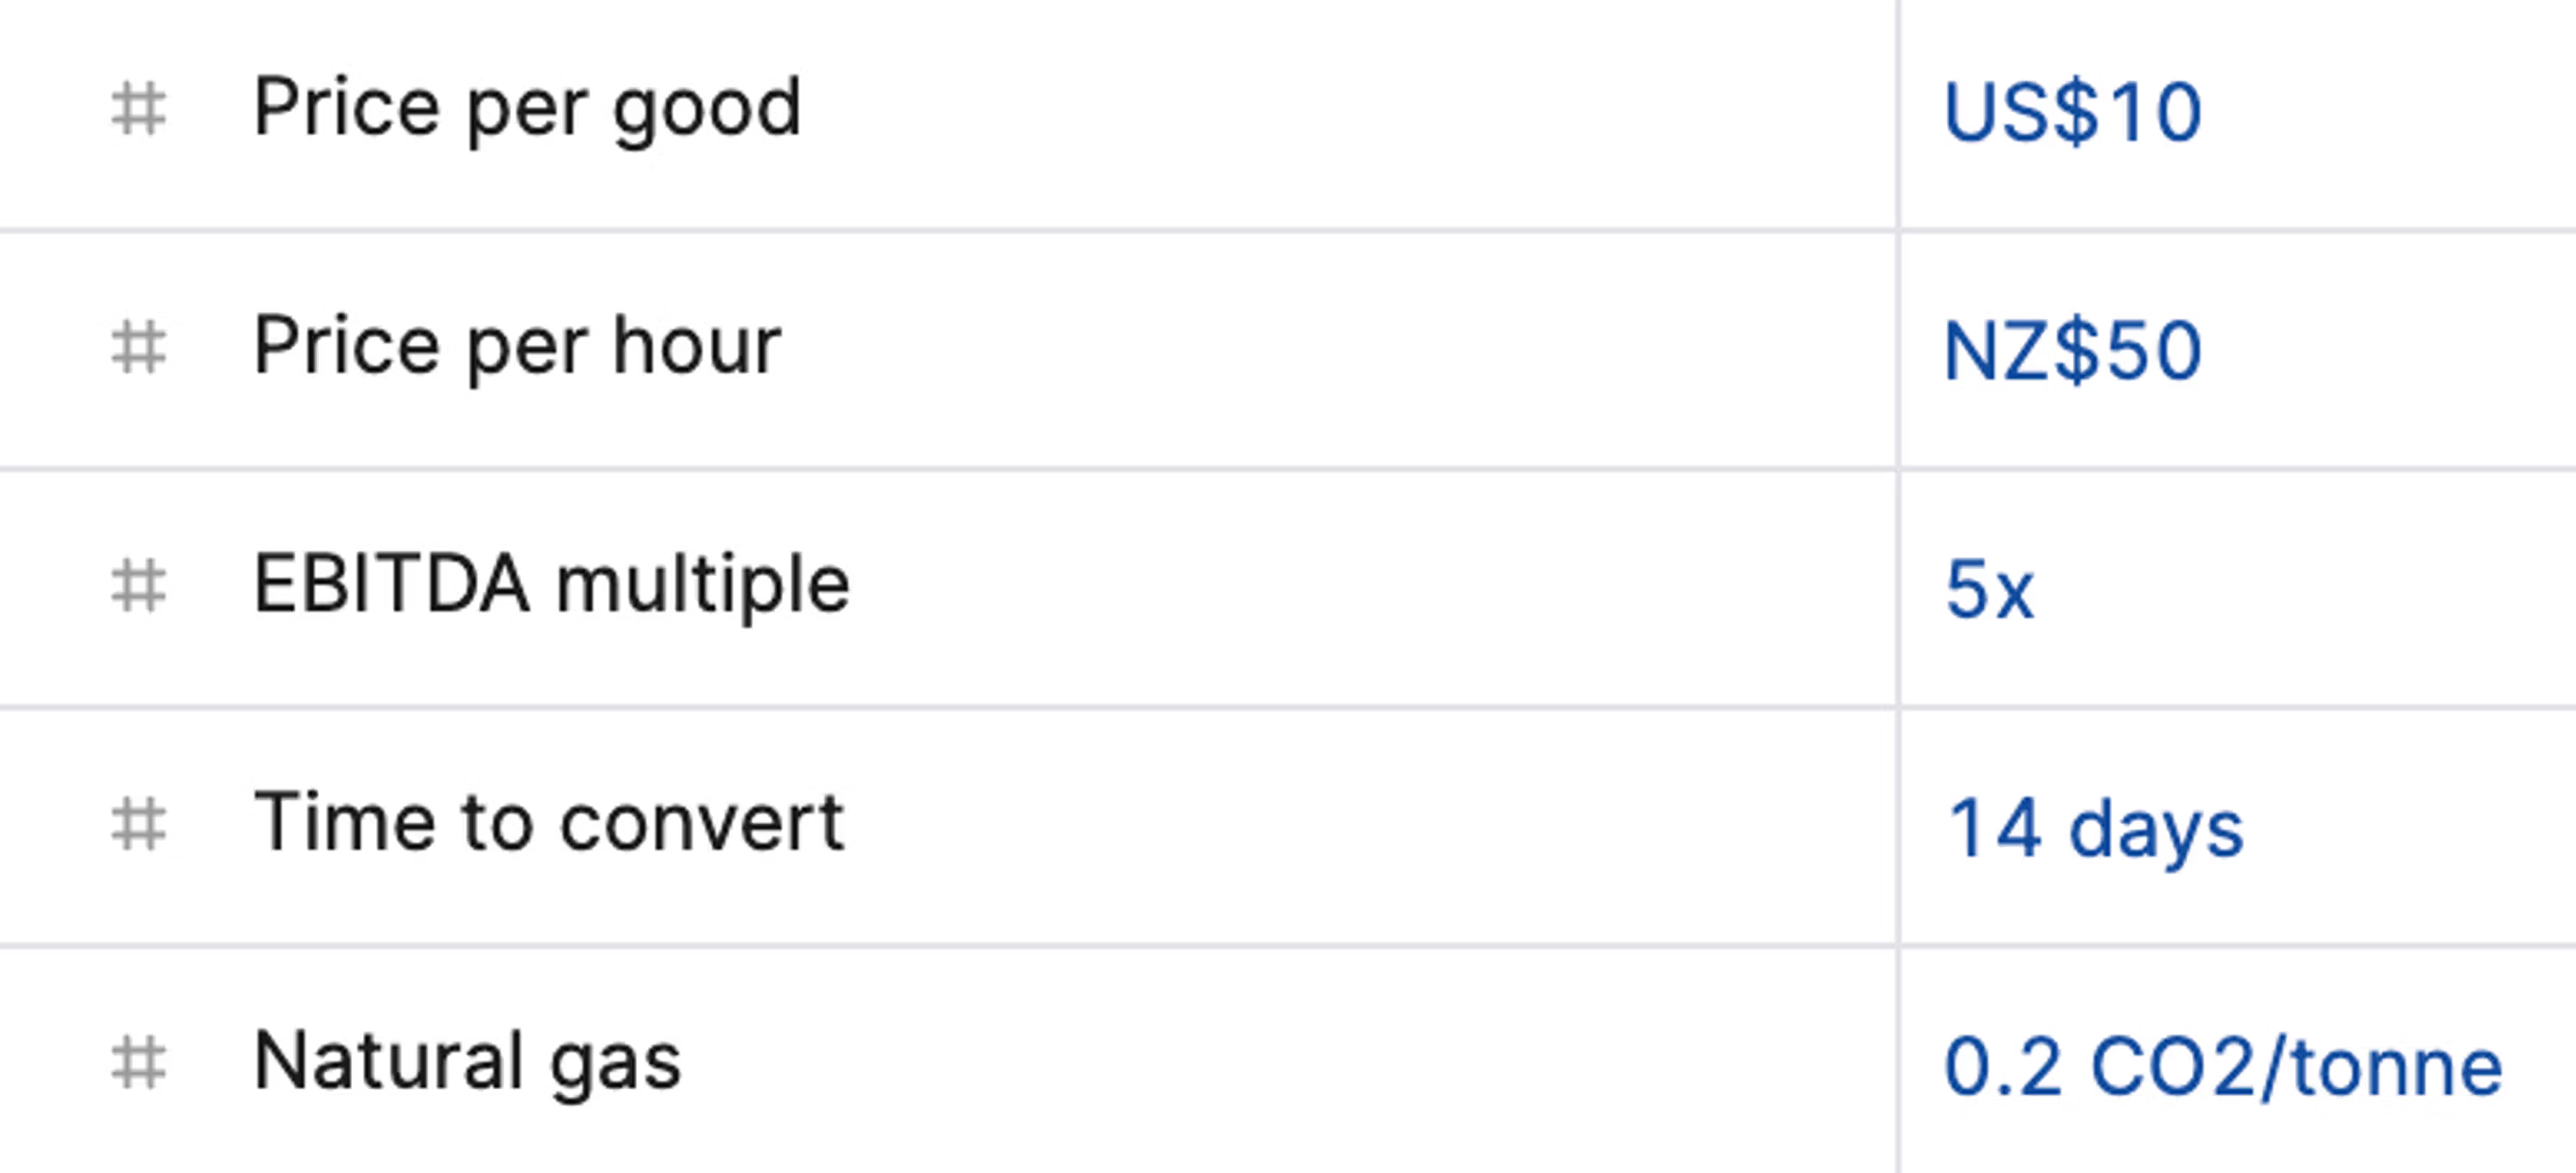
This gives you ultimate flexibility to visually distinguish the units of variables in your models (e.g. currencies, earnings multiples, ratios, time units etc). Note that custom units are purely visual and do not affect calculations whatsoever.

Shows example variables in xP&A with custom prefixes and suffixes applied: 'Price per good' as 'US$10', 'Price per hour' as 'NZ$50', 'EBITDA multiple' as '5x', 'Time to convert' as '14 days', and 'Natural gas' as '0.2 CO2/tonne'.
Examples of prefixes and suffixes

There are three variable types used in formulas in xP&A, and they are distinguished by their colour.

Blue variables are variables that are coming from the existing model.

Shows a blue-colored variable named 'Next financing date' in xP&A, indicating it comes from the existing model.
Variable that is coming from the existing model

Green variables are variables that are coming from a linked model. If you hover over the variable you can see which model it is coming from.

Shows a green-colored variable named 'Revenue' in xP&A, indicating it comes from a linked model.
Variable that is coming from a linked model

Purple variables are xP&A's special helper variables, e.g. today, none, date / timestep, cohort.

Shows a purple-colored helper variable named 'date' in xP&A.
Helper variable in xP&A

This content was generated using AI and reviewed by Lucanet subject matter experts before publication.