To enable automatic insertion and updating of values in Excel files and interaction between MS Office files, names and/or name suffixes must be assigned to specific columns, cells and cell ranges in MS Excel. Names and name suffixes are used to link MS Word with Excel spreadsheets.

You can easily insert and edit names and name suffixes for Disclosure Management using the Excel ribbon.

In this chapter, we demonstrate the importance of names in Excel files and how to insert and edit names.

The following table shows the names that must or may be present in an Excel file in Disclosure Management so that the corresponding values and information are automatically inserted and/or updated in the Excel file:

NameDescription
outareaOutarea for the export to Word. Outareas represent the data basis for the tables in result documents.
name_1Defines a name column. The name column is a mandatory column. It contains the row labeling (i.e. the names of the individual report values).
value_ sequential number_period IDDefines a value column. A value column contains the report values of the current document. In columns that are defined as value columns, the values are inserted or updated after each data import and when the Excel file is updated.
prog_ sequential number_PeriodIDDefines a programming column. The programming column is responsible for programming the contents of the column value_. For example, it contains item numbers from the source system and other information for calculating the corresponding value columns.
footnote_ sequential number_period IDDefines a footnote column. The footnote column can be used to add footnotes to values of Excel files, which are then displayed in the Outareas in Word documents.
sn_duedateDue date of the document. You can find additional information on variables under Inserting Document Variables.
sn_yearReference year of the document, e.g. 2024. You can find additional information on variables under Inserting Document Variables.
sn_prevyearPrevious year of the document, e.g. 2023. You can find additional information on variables under Inserting Document Variables.

The following conditions for names and name suffixes must be observed when programming in MS Excel for Disclosure Management:

  • In MS Excel, different cells, cell ranges and columns must be assigned unique names.
  • When using names in MS Excel, you must observe the distinction between upper and lower case letters.
  • Disclosure Management uses sequential numbers when assigning names, as MS Excel does not allow identical names. This is particularly important when names are entered manually by the user in Excel.
  • Cells and columns can be assigned several names simultaneously in Excel (e.g. a column defined as value_1_CURRENTYEAR01 and as value_1_PREVIOUSYEAR01). However, only one name is displayed when the column is selected in alphabetical order.

While it is possible to program on multiple worksheets, we recommend minimizing the number of worksheets for performance reasons.

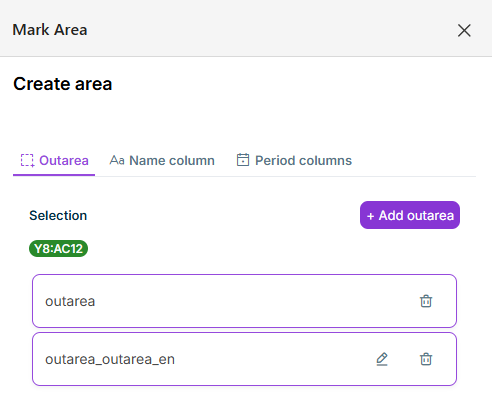
In Office for the Web and Office Native, you create names for Disclosure Management using the Mark Area task pane. The task pane contains a tab each for Outarea, Name column, and Period columns.

Instead of creating outareas and columns manually, you can also have them detected automatically using AI. See Using the Area and Column Assistant.

To detect and define outareas and columns using AI, you need at least the Advanced license.

Shows the 'Mark Area' task pane of Disclosure Management with the area 'Create area', the tabs 'Outarea', 'Name column' and 'Period columns', the selection 'Y8:AC12', the '+ Add outarea' button and the outareas 'outarea' and 'outarea_outarea_en' with the edit and delete icons.
Task pane for creating and editing outareas and columns

You can find detailed instructions for the individual tabs in Defining Outareas (Outarea tab) and in Creating and Editing Columns (Name column and Period columns tabs).

Changes to names have a direct impact on programming or links in MS Word. If, for example, the name of the Outarea (outarea) is changed, the Outarea must be reinserted in MS Word.

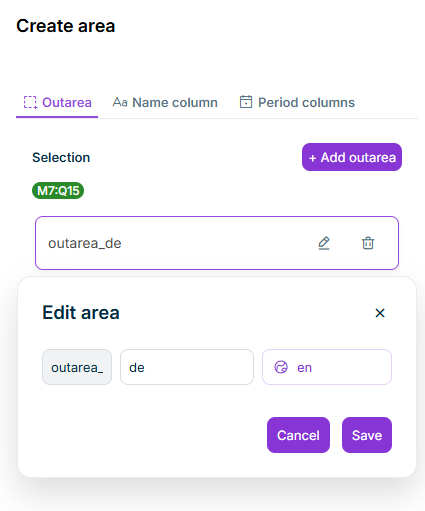
In Office for the Web and Office Native, you edit or delete a name using the Mark Area task pane:

1

In the Excel ribbon, click Mark Area and open the relevant tab (e.g. Outarea).

2

Click the desired entry and then

  • the pencil icon to edit the name.
  • the trash icon to delete the name.
Shows the 'Outarea' tab of the 'Mark Area' task pane in Disclosure Management with the outarea 'outarea_de' and the pencil and trash icons, and the 'Edit area' dialog with the prefix 'outarea_', the name 'de', the language 'en' and the buttons 'Cancel' and 'Save'.
Editing names in the 'Mark Area' task pane

In Office for Desktop, you have several options for creating names for Disclosure Management in MS Excel:

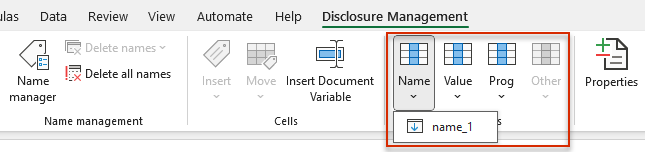
The simplest option for assigning a name is the Excel ribbon for Disclosure Management. To assign a name using the Excel ribbon:

1

In MS Excel, select the cell, cell range or column for which you want to assign a new name. Depending on which cell, row or column you have selected, the available buttons are enabled in the Excel ribbon based on the context.

Shows part of the Excel ribbon for Disclosure Management in Office for Desktop with the opened menu of the 'Name' button and the entry 'name_1'. Highlighted in red are the buttons 'Name', 'Value', 'Prog' and 'Other' in the 'Columns' area.
The 'Name' button in the Excel ribbon
2

Click the desired button in the Excel ribbon.

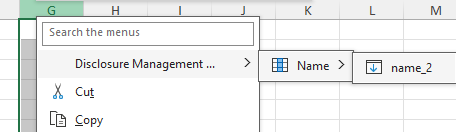
You can also use the Disclosure Management context menu to assign names. To assign a name using the context menu:

1

Select the desired cell, row or column.

2

Right-click to open the context menu.

3

The Disclosure Management menu contains the functions provided by Disclosure Management based on the context:

Shows the context menu of a column in MS Excel with the entry 'Disclosure Management ...' and its submenus 'Name' and 'name_2'.
'Disclosure Management' context menu in MS Excel

You can also use the MS Excel name manager to create names. To create a name using the name manager:

1

Select the cell or column for which you want to assign a name.

2

In the Excel ribbon, click in the Name management area on Name manager.

Shows part of the Excel ribbon for Disclosure Management in Office for Desktop with the areas 'Files', 'Name management', 'Cells' and 'Columns'. Highlighted in red is the 'Name manager' button.
Open the name manager from the Excel ribbon
3

In the name manager, click New.

4

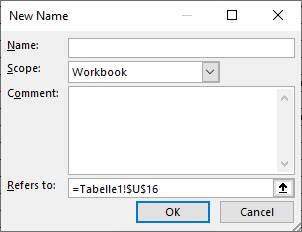
The New Name dialog is displayed:

Shows the 'New Name' dialog of MS Excel with the fields 'Name', 'Scope' (value 'Workbook'), 'Comment' and 'Refers to' and the buttons 'OK' and 'Cancel'.
Creating a new name in MS Excel
5

Specify the new name and click OK.

We recommend that you always use the Excel ribbon or the Disclosure Management context menu to insert names, as this avoids errors due to incorrect spelling.

Changes to names have a direct impact on programming or links in MS Word. If, for example, the name of the Outarea (outarea) is changed, the Outarea must be reinserted in MS Word.

In Office for Desktop, all existing names for Disclosure Management can be filtered, sorted, edited and deleted using the MS Excel name manager.

To edit a name via the Excel name manager:

1

In the Excel ribbon, click in the Name management area on Name manager.

Shows part of the Excel ribbon for Disclosure Management in Office for Desktop with the areas 'Files', 'Name management', 'Cells' and 'Columns'. Highlighted in red is the 'Name manager' button.
Open the name manager from the Excel ribbon
2

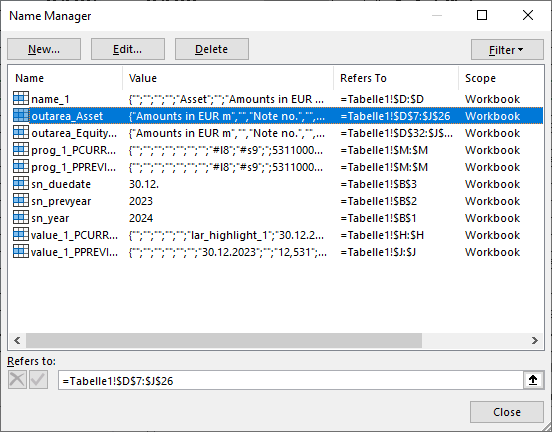
In the name manager, select the name you want to edit.

Shows the 'Name Manager' of MS Excel with the buttons 'New...', 'Edit...' and 'Delete' and a list of names such as 'name_1', 'outarea_Asset', 'prog_1_PCURR...', 'sn_duedate', 'sn_prevyear', 'sn_year' and 'value_1_PCURR...' with the columns 'Name', 'Value', 'Refers To' and 'Scope'.
Name manager in MS Excel
3

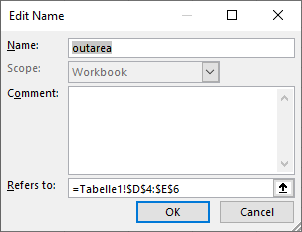
Click Edit. The Edit Name dialog is displayed:

Shows the 'Edit Name' dialog of MS Excel with the name 'outarea', the fields 'Scope', 'Comment' and 'Refers to' and the buttons 'OK' and 'Cancel'.
Edit name in MS Excel
4

Edit the name and click OK.

This content was generated using AI and reviewed by Lucanet subject matter experts before publication.