Outareas provide the database for the tables in result documents and define the cell areas of an Excel table that can be used for exporting into a Word file. An Excel file can contain multiple Outareas.

  • The name of outareas always begins with outarea.
  • Outareas can be extended by a name and a language addition. Name and language extensions are always preceded by an underscore (_), for example outarea_P&L_en.
  • All names that begin with outarea are interpreted as an outarea and can be inserted in MS Word.

In Office for the Web and Office Native, you create, move, and manage Outareas using the Mark Area task pane.

To create an Outarea:

1

In MS Excel, select the cells that are to define the new Outarea.

2

In the Excel ribbon, click Mark Area.

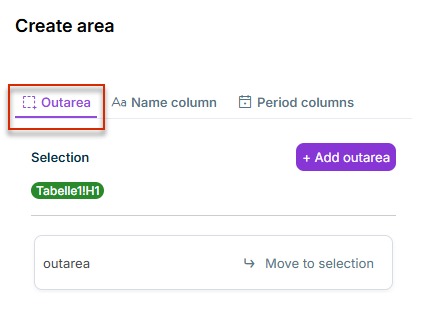
The Mark Area task pane opens on the right and the Outarea tab is displayed. The selected cell range is shown in the Selection area.

The 'Mark Area' task pane is displayed in Office for the Web. The 'Outarea' tab is open.
'Outarea' tab in the 'Mark Area' task pane
3

On the Outarea tab, click + Add Outarea.

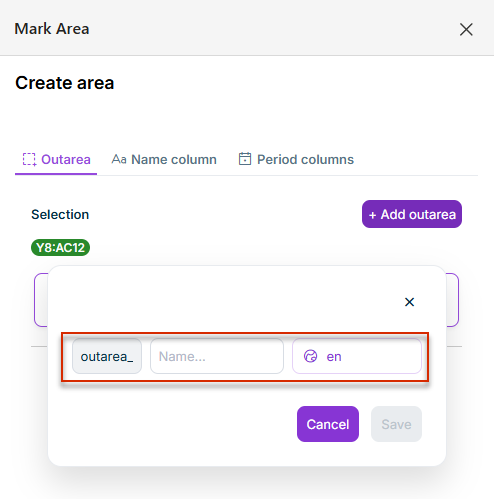
A dialog is displayed. If applicable, enter a name extension in the outarea_ input field and, for multilingual documents, select a language code from the drop-down list. Then click Save.

When adding an Outarea, a name extension and a language code are requested.
Defining the name extension and language for the Outarea

To move an Outarea:

1

Select the cells where an existing Outarea is to be moved to.

2

In the Excel ribbon, click Mark Area.

The Mark Area task pane opens on the right and the Outarea tab is displayed.

3

On the Outarea tab, next to the desired Outarea, click Move to selection.

The Outarea is moved to the selected cell range.

To rename or delete an Outarea:

1

In the Excel ribbon, click Mark Area.

The Mark Area task pane opens on the right and the Outarea tab is displayed.

2

On the Outarea tab, click the Outarea that you want to rename or delete.

3

Click

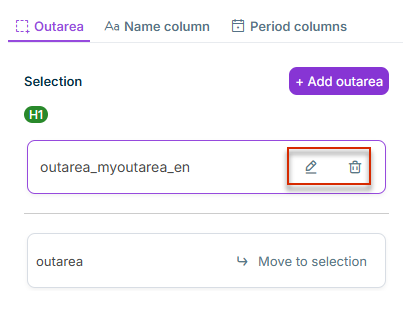
  • the pencil icon to rename the Outarea.
  • the trash icon to delete the Outarea.
On the 'Outarea' tab, a pencil icon for renaming and a trash icon for deleting are displayed next to an Outarea.
Renaming or deleting an Outarea

After inserting a table from MS Excel in MS Word, the two files will be linked. If an Outarea is renamed or deleted, this link will no longer exist. Data from MS Excel will then no longer be displayed in the Word file.

To create an Outarea in an Excel file:

1

In MS Excel, select the cells that are to define the new Outarea.

2

You have two options for inserting an Outarea:

  • In the Excel ribbon, click Insert and choose Insert Outarea from the menu.
    \
Inserting an Outarea via the Excel ribbon
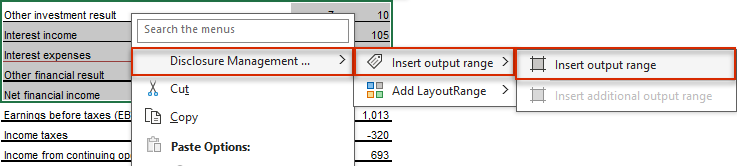
  • Open the context menu by right-clicking it and choose Disclosure Management | Insert Outarea.
Inserting an Outarea via the context menu
3

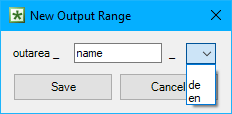
If you're editing a monolingual document, the new Outarea will be inserted. If you're editing a multilingual document, the New Outarea wizard will be displayed:

'New Outarea' dialog
4

If applicable, enter a name extension for the Outarea in the outarea_ input field.

5

If necessary, select a language code from the drop-down list. The drop-down list displays the language codes for the document languages created so far.

6

Click Save.

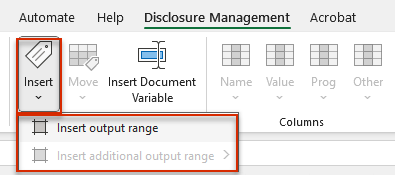
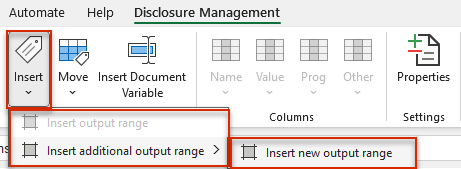
If an Outarea already exists in an Excel file, the Insert Additional Outarea menu command will be displayed in the context menu of the Insert button and in the Disclosure Management context menu.

Displays the menu of the 'Insert' button. Displays the 'Insert additional output range | Insert new output range' menu command. The 'Insert' button and the menu command are highlighted in a red border.
Creating an additional Outarea using the 'Insert' button

To move an Outarea:

1

Select the cells where an existing Outarea is to be moved to.

2

Open the Disclosure Management context menu by right-clicking it.

3

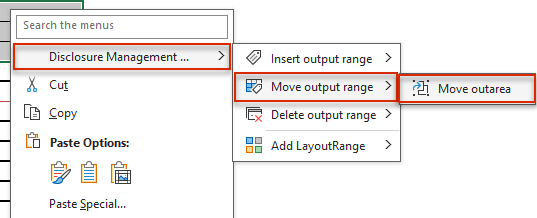
In the context menu, choose Disclosure Management | Move Outarea.

Moving an Outarea

The easiest way to delete and rename an Outarea is by using the Excel Name Manager. To do so, click Name Manager in the Excel ribbon.

Displays part of the Excel ribbon. The mouse cursor is positioned over the 'Name Manager' button.
Opening the Name Manager from the Excel ribbon

In the Name Manager, you can edit the name of an Outarea or delete an Outarea. You can find out more about working with the Excel Name Manager in Creating and Editing Names and Name Extensions in Excel.

After inserting a table from MS Excel in MS Word, the two files will be linked. If the name of the Outarea is changed via the Name Manager or the Outarea is deleted, the link will no longer exist. Data from MS Excel will then no longer be displayed in the Word file.

When checking in an Excel file, you will be notified if this is the case. You can then cancel the check-in process and undo the change.