To import postings from Data Collection into Consolidation & Financial Planning (CFP), you set up an integration in the CFP workspace Importing data into reporting entities. CFP requests posting data from a Data Collection process and imports the returned postings into the selected reporting entities.

The integration uses the existing workflow for a data source of type Provision via script with a dedicated Import from DC script.

Posting data is exported only from CFP Pivot table elements in the Data Collection form template (see Configuring Tables in Form Templates for more information).

Before you can import postings from Data Collection into CFP, the following must be set up:

  • A CFP user account with full Editor rights configured in Administration (see Defining User Permissions)
  • The Import from DC script available in your CFP environment. The script is not available by default — contact your Lucanet representative to have it set up.
  • An assignment table that maps Data Collection dimension codes to the corresponding CFP elements created in CFP (see Creating Assignment Tables)
  • Both the Import Data and DC-SchedulePostings adjustment levels created in CFP — a CFP dimension that separates values by their origin or purpose, so that the same account in the same period can hold different values on different adjustment levels
  • The reporting entities used in the Data Collection process configured in CFP
The data source determines which script CFP executes and which data levels, adjustment levels, dimensions, and reporting entities the import uses. You create and configure it once, before you create any data import that relies on it.

For a description of each field on the data source, see Provision via script (#2075). The values below are the ones that apply to Data Collection.

To create and configure the data source:

1

Navigate to Import and Journals | Importing data into reporting entities | Data sources.

2

Create a data source of the type Provision via script and select it in the structure view (see Defining the Data Source for the Import).

3

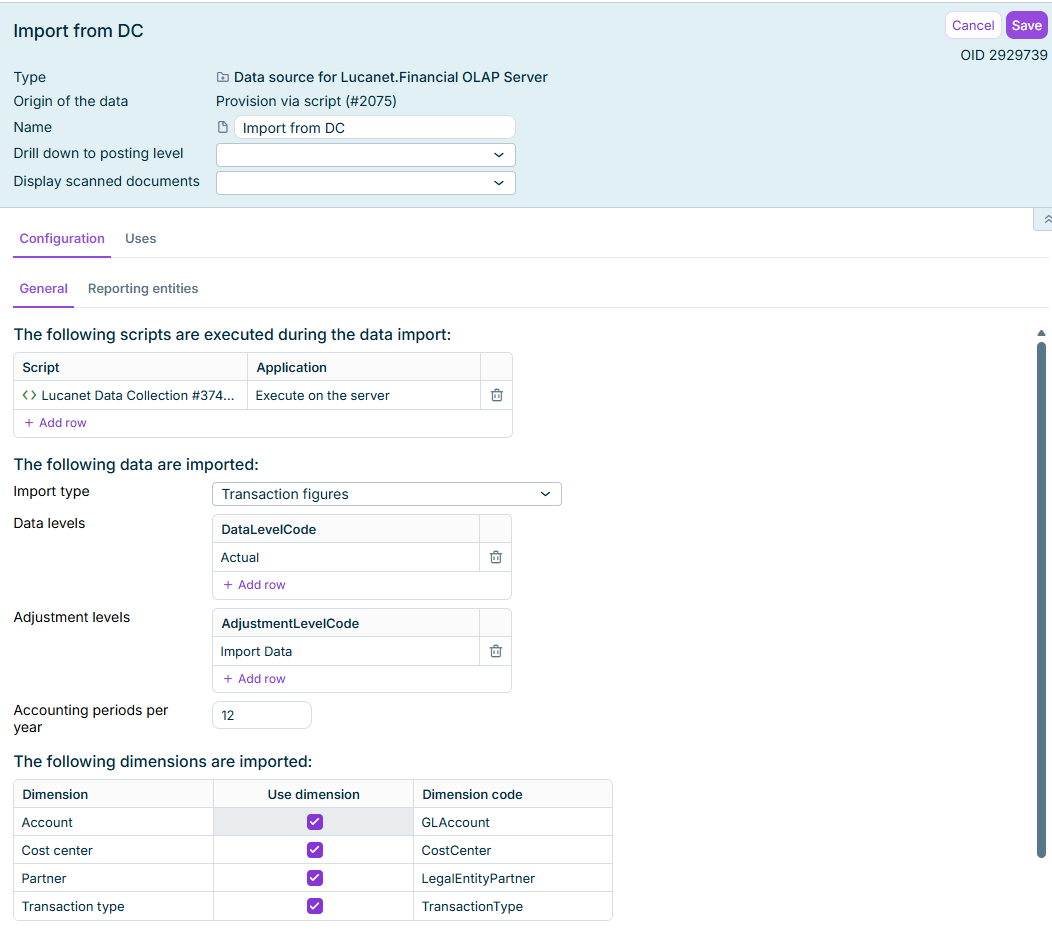
Click Edit in the top right corner. The detail view of the script is displayed as follows, for example:

The data source detail view in edit mode displays the script list, the data that is imported, and the dimensions that are imported.
Detail view of the 'Import from DC' data source
4

On the General tab, add the Lucanet Data Collection #3744-DC.REST-JSON.FOS v1.0.0 script to the script list.

5

Still on the General tab, configure the following:

  • Data levels: Add Actual. Data Collection collects actual data only; planning data is not supported.
  • Adjustment levels: Add at least Import Data and DC-SchedulePostings. Import Data is the default for postings generated from Balance Sheet, P&L, and Statistical Ledger tables; DC-SchedulePostings always receives postings generated from Schedule tables. If the amount source column carries CFP adjustment level metadata, that adjustment level is used instead and its postings go into a separate posting document.
  • Dimensions: Activate the dimensions into which the Data Collection postings are imported: Account, Partner, Cost center, and Transaction type.
  • Cost centers in the Balance Sheet: Select Use specified cost centers so that the actual cost centers from Data Collection are used.
6

On the Reporting entities tab, add the reporting entities whose Data Collection postings you want to import. Only reporting entities added here are available for selection when you execute the import.

7

Click Save in the top right corner.

The data import references the data source you configured and adds the assignment table that translates Data Collection dimension codes into CFP elements.

To create the data import:

1

Navigate to Import and Journals | Importing data into reporting entities | Data imports.

2

Optionally, create a dedicated folder for imports from Data Collection by right-clicking the Data Imports root folder and choosing Create | Folder.

3

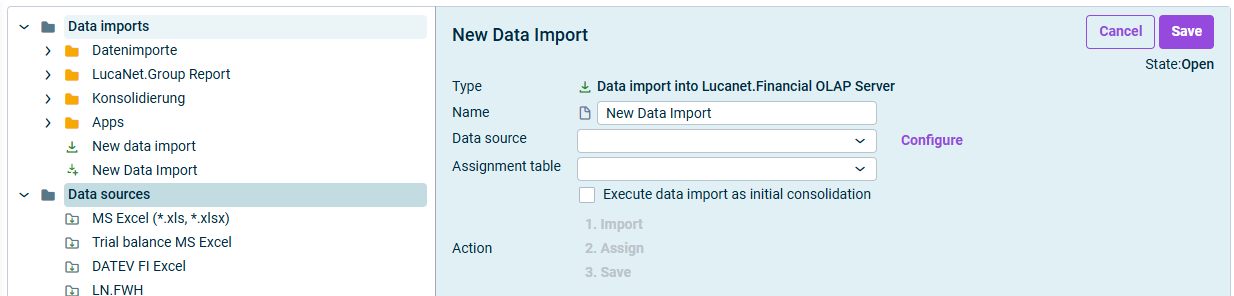
Right-click the newly created folder, or the Data Imports root folder, and choose Create | Data Import. The New Data Import dialog is displayed:

The 'New Data Import' dialog is displayed.
'New Data Import' dialog
4

Enter a name for the data import.

5

In the Data source field, select the data source that executes the Import from DC script.

6

In the Assignment table field, select the assignment table that maps Data Collection dimension codes to CFP elements.

7

Click Save.

Configure next to the Data source field reopens the configuration of the selected data source. Any change you make there applies to every data import that uses this data source.

The import is executed form by form — each execution imports the postings from one specific Data Collection form.

To import the postings from a Data Collection form:

1

Open the data import and click Edit in the top right corner. The 1. Import option becomes available.

2

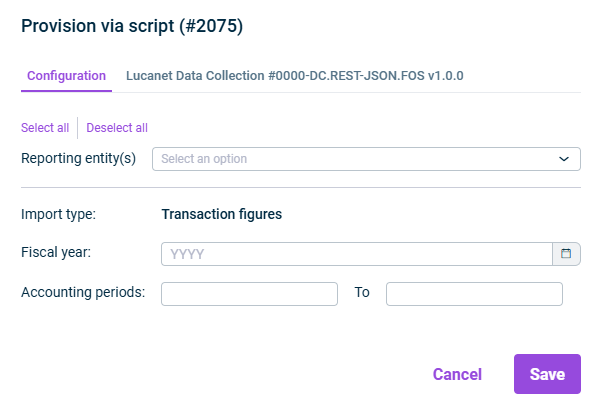
Click 1. Import. The Provision via script dialog is displayed:

The 'Provision via script' dialog is displayed.
'Provision via script' dialog

Configure the Lucanet Data Collection #3744-DC.REST-JSON.FOS v1.0.0 tab first. If you make changes on the Configuration tab first, the process list does not load correctly.

3

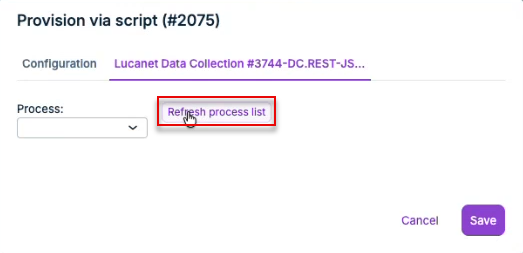
On the Lucanet Data Collection #3744-DC.REST-JSON.FOS v1.0.0 tab, click Refresh process list. The list refreshes with all available Data Collection processes and their corresponding forms.

The 'Refresh process list' button is displayed on the Lucanet Data Collection script tab.
'Refresh process list' button
4

In the Process drop-down list, select the form whose postings you want to import.

5

On the Configuration tab, configure the following:

  • Reporting entity(s): Select at least one of the reporting entities configured in the data source.
  • Import type: Select Balances (cumulated values) or Transaction figures.
  • Fiscal year: Enter the fiscal year to import.
  • Accounting periods: Enter the first and last accounting period to import.
6

Click Save. CFP retrieves the posting data from Data Collection and imports the returned postings.

7

Click 2. Assign to assign the imported data to the corresponding elements in the Lucanet database (see Assigning Data).

8

Click 3. Save to save the data import.

The Postings section of the data import displays the postings created during the last execution, with their reporting entity, data level, period, transaction currency, and adjustment level.

Once the imported postings are correct, you can finalize the data import to prevent it from being changed or deleted. To do so, right-click the data import in the tree view and choose Finalize data import (see Finalizing a Data Import).

  • Posting documents generated from balance sheet and P&L tables must balance per reporting entity.
  • Posting documents generated from statistical ledger tables do not need to balance and are not validated for balance by CFP.