There are two ways that time settings can be applied in Lucanet xP&A (Extended Planning & Analysis):

At Formula Level

The key concept to understand about working with time in xP&A is the timestep index system that can be applied in variables in formulas.

At Model Level

Besides this, you can define certain time settings for each model in xP&A, which include:

  • Granularity
  • Date range
  • Last actual date
  • Relative dates
  • Fiscal year settings

In addition to the time settings affecting the calculations of your data in xP&A, you have the option to use a time filter in the spreadsheet or dashboard view to merely define the time period you want to look at.

The time step index in xP&A allows you to modify variables in formulas, e.g. refer to the value of a variable in three months. This is done using Time modifiers in formulas.

The time step index always starts at 0, not 1. So 0 corresponds to the first time step of the model (e.g. Jan'22), 3 corresponds to the fourth time step (Apr'22), and so on.

Shows the 'timeStep' variable row in xP&A, with a formula icon and the values 0, 1, 2, and 3 shown for consecutive timesteps.
Timestep in a formula

The Date function in xP&A converts an input in Date format to the appropriate timestep in a model to allow further calculations. For more information on the functions for Time, see Functions.

Shows the 'date(year, month, day)' function in the xP&A formula editor, with the description 'The timestep number of a date. Timesteps start with 0.'
Date function

In addition, xP&A also has various in-built helper variables (like date, month, year, or lastActualDate) that make it easy to work with time.

Shows the 'month' helper variable used in a formula in xP&A: '= if month = 4 then 1 else 0'.
Helper variable for time

You can also adjust your time settings at the level of each model in xP&A. Proceed as follows:

1

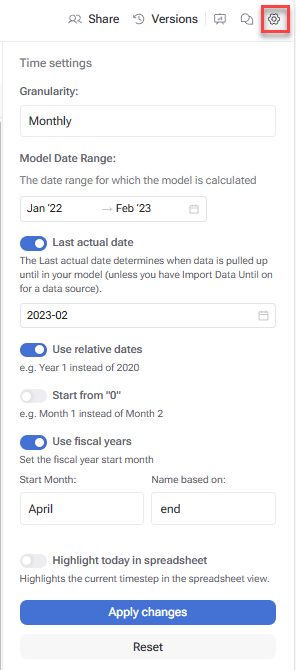
Click the gear icon to open the Model settings.

2

Adjust the options as necessary.

For a description of the options see the following sections.

3

Click Apply changes.

4

In the Apply changes dialog, choose if you want to apply the changes to the current model only or to all linked models.

The following options are available for time settings in xP&A:

Shows the 'Time settings' panel for a model in xP&A, including the 'Granularity' field set to 'Monthly', the 'Model Date Range' set to 'Jan '22' to 'Feb '23', the 'Last actual date' toggle enabled and set to '2023-02', the 'Use relative dates' and 'Use fiscal years' toggles enabled with 'Start Month' set to 'April', and the 'Highlight today in spreadsheet' toggle disabled. Highlighted in red is the gear icon used to open this panel.
Time settings for a model
OptionDescription
GranularityGranularity refers to the level of detail in which data of a model are organized. The following granularity levels exist:

• Daily
• Weekly
• Monthly
• Quarterly
• Yearly
• None

For more information on this topic, see Different Time Granularities.

Warning: If you change the granularity of a model, you will no longer be able to compare with prior versions.
Model date rangeThe date range for which the model is calculated.
Last actual dateThe last actual date is a model-level setting that represents your latest month (or week if in a weekly model) of "actual" historic data.

To determine your Last actual date, activate this option and select the desired month to be used as last actual date.

Note:
• There is also a Helper variable available for the last actual date.
• For more information on the last actual date in xP&A, see Last Actual Date.

Warning:
• Use this option in a model's time settings only if you enter your actual "historic" data manually.
• If you import your actual data using a data integration, this option described here is not used. In this case, the last actual date is set using the integration via a data source.
Use relative datesActivate this option, if you want to use relative dates for your model.

Relative dates refer to time periods that are not tied to specific calendar dates but are instead defined in relation to a current or reference point. For example, Year 1 instead of 2020.

Relative dates allow for comparisons across time periods, such as comparing data from the current month to the previous month or year.

Examples:
• Retention rate: You probably will not use January, February and March for a retention rate, but rather use a customer's first, second, and third month.
• Sales person (or other productivity driven role) ramp time: When you add a new sales person you probably don't want to assume that they will be 100% productive in their first month but rather that they ramp up at some percentage over time.

For more information on relative dates, see Relative Time for Variables.
Start relative dates from "0" / Start from "0"Activate if the first period to be considered is Period 0.
Use fiscal yearsActivate this option if you also want to use a fiscal year for your model and select the Start month and if you want to have your fiscal year label be based on the end of year or start of year.

Your fiscal year settings will affect the column headers in the spreadsheet, as well as any quarterly and yearly roll-up columns.

Example: If your fiscal year runs from April 1 to March 31, then you would set your start month to be April. If you chose the label to be based on the end of the year, i.e. the fiscal year from April 1, 2024 to March 31, 2025 would be labelled "FY24".
Highlight today in spreadsheetActivate this option to highlight the current timestep in the spreadsheet view.

In xP&A, you can easily adjust the time period you are looking at across the spreadsheet and dashboard by adjusting the time filter in the top-right corner:

Shows the 'Time filter' panel in the xP&A spreadsheet view for the 'Group Planning / 2027 Forecast' model, with the date range set from 'Jan '25' to 'Dec '26' and an 'Apply to all linked models' checkbox. Highlighted in red are the 'Spreadsheet' and 'Dashboard' toggle buttons, the time filter button in the top-right corner, and the expanded time filter panel.
Time filter in the spreadsheet

You can choose between the following options for adjusting the time filter in xP&A:

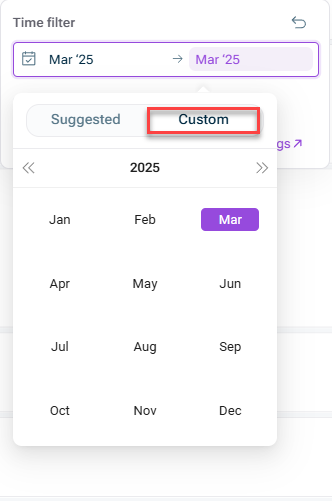
  • Enter a custom time filter using the calendar:

    Shows the 'Time filter' panel in xP&A with the 'Custom' tab selected, displaying a calendar for '2025' with 'Mar' highlighted as the selected month and the date range set to 'Mar '25' to 'Mar '25'. Highlighted in red is the 'Custom' tab.
    Custom time filter

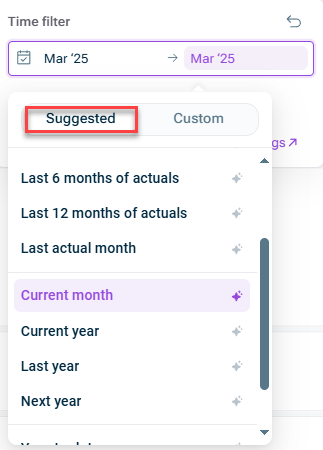
  • Select a dynamic suggested option (e.g. Last 6 months of actuals, Last actual month, Current year, Next year), which will automatically update the visible time range based on changes to either the Last Actual Date, or calendar time.

Example: if your time filter is set to Last 6 months of actuals, and you roll forward your model's Last actual date, the filter will automatically adjust for the latest 6 months of actuals.

Shows the 'Time filter' panel in xP&A with the 'Suggested' tab selected, listing dynamic options including 'Last 6 months of actuals', 'Last 12 months of actuals', 'Last actual month', 'Current month' (selected), 'Current year', 'Last year', and 'Next year'. Highlighted in red is the 'Suggested' tab.
Suggested time filter
  • The time filter setting does not change the model time settings or underlying calculations, it simply filters for the time range you have selected.
  • Dashboard viewers (who do not have edit access to the underlying model) can easily toggle the period they are looking at by themselves (although the default period will be set by model editors).

This content was generated using AI and reviewed by Lucanet subject matter experts before publication.