You can import financial data from Excel files directly into Lucanet Data Collection forms. After uploading a file, you map Excel data to form rows and columns interactively. Data Collection saves your mappings so that recurring imports are faster — upload an updated file and your previous configuration is restored automatically.

To import values together with their partner, cost center, transaction type, and adjustment level details, use the Excel import template. For more information, see Importing Data with the Excel Template.

Before starting an Excel import in Data Collection:

  • The form must have status In Progress.
  • You must be assigned as a Collector for the reporting entity, or you must be an Administrator.
  • The form must contain at least one pivot table with at least one Numeric or Currency column.

To start an Excel import in Data Collection:

1

Navigate to Data Collection | Data collection.

2

Open the form you want to import data into.

3

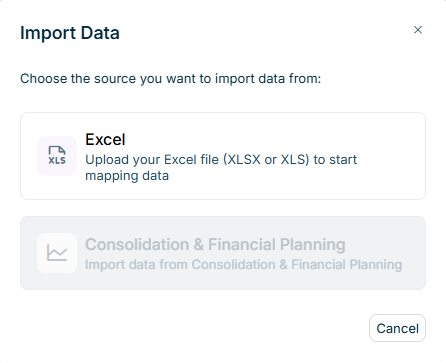
Click More actions | Import Data in the top right. The Import Data dialog is displayed:

Shows the 'Import Data' dialog in Data Collection with the text 'Choose the source you want to import data from:', the 'Excel' option, the greyed-out 'Consolidation & Financial Planning' option, and the 'Cancel' button.
'Import Data' dialog
4

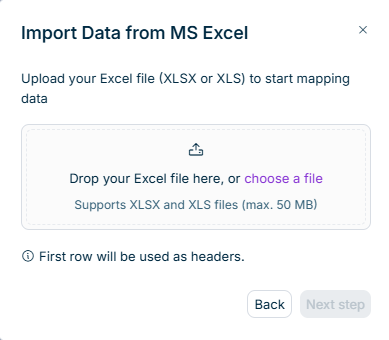
Select Excel. The Import Data from MS Excel dialog opens.

Shows the 'Import Data from MS Excel' dialog in Data Collection with the text 'Upload your Excel file (XLSX or XLS) to start mapping data', an upload area with the text 'Drop your Excel file here, or choose a file' and 'Supports XLSX and XLS files (max. 50 MB)', the note 'First row will be used as headers.', and the 'Back' and 'Next step' buttons.
'Import Data from MS Excel' dialog

The first row of your Excel file will be used as column header.

5

Upload your Excel file by dragging it into the upload area, or click choose a file to browse.

Supported formats and limits:

  • File formats: .xlsx, .xls
  • Maximum file size: 50 MB
6

Click Next step.

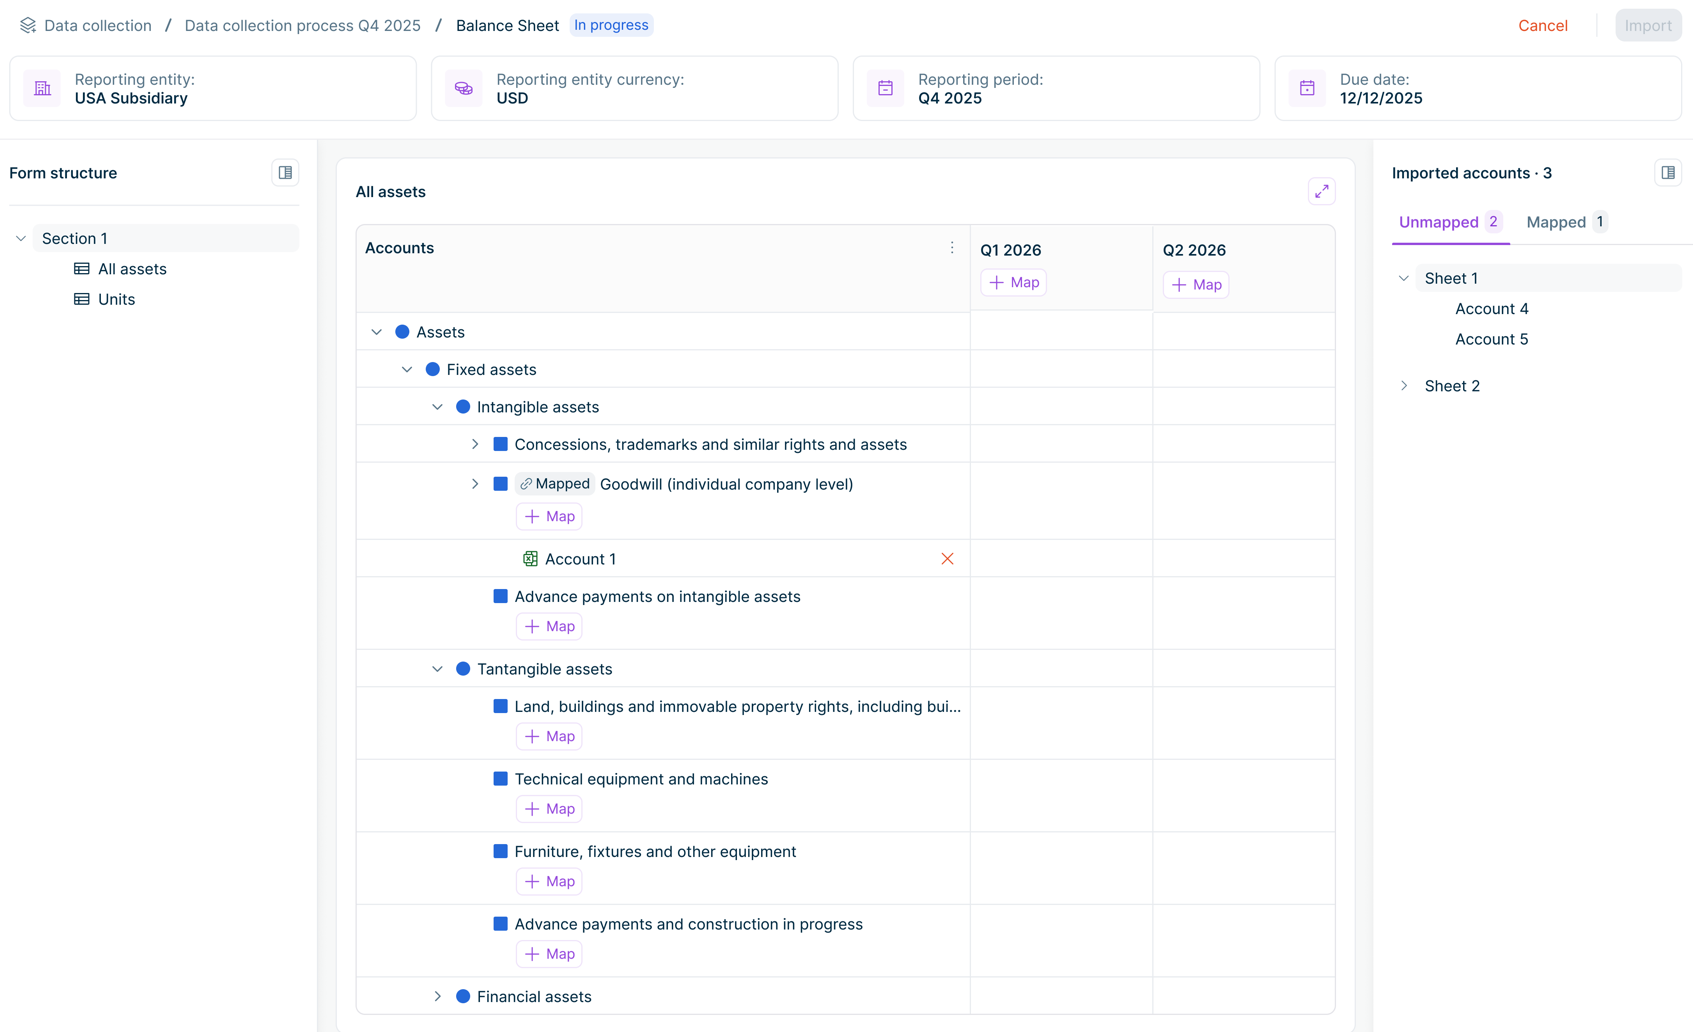
After a successful upload, an Imported accounts panel appears on the right with all accounts from the uploaded file, organized by sheet. Each row and column in the form shows a + Map link.

Shows a form in Data Collection with the 'Form structure' panel on the left, the 'All assets' table in the middle, and the 'Imported accounts · 3' panel on the right with the 'Unmapped 2' and 'Mapped 1' tabs and the accounts 'Account 4' and 'Account 5' under 'Sheet 1'. The table displays '+ Map' links for the 'Q1 2026' and 'Q2 2026' columns and for the rows, and 'Account 1' as a subordinate entry beneath the mapped row 'Goodwill (individual company level)'.
Form detail view with an 'Imported accounts' panel on the right

To configure the Excel import in Data Collection, you link Excel accounts to form rows, and Excel columns to form columns. You must configure at least one row mapping and one column mapping before you can execute the import.

Row mappings link a form row to one or more accounts in your Excel file. When you execute the import, values from all mapped accounts are summed and written to the target row.

To map an account to a row:

1

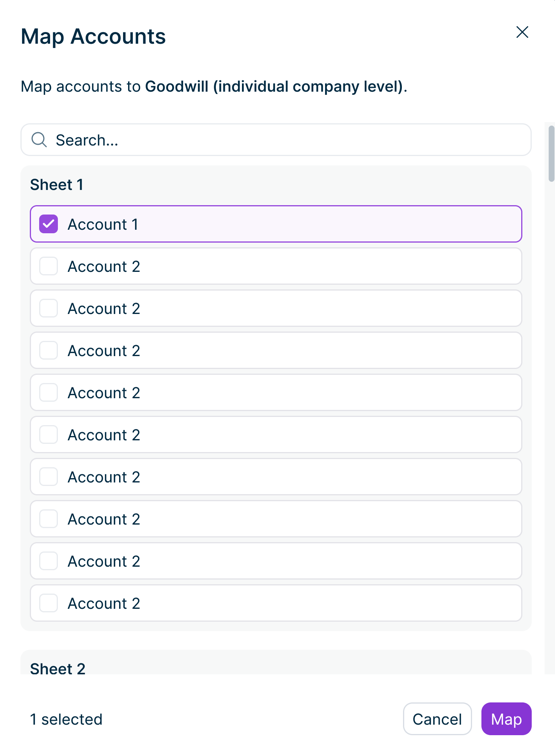
Click + Map next to a lowest-level row. The Map Accounts dialog opens, showing all accounts organized by sheet.

Shows the 'Map Accounts' dialog in Data Collection with the text 'Map accounts to Goodwill (individual company level).', a search field, the accounts under 'Sheet 1' with 'Account 1' selected, the 'Sheet 2' group, the '1 selected' counter, and the 'Cancel' and 'Map' buttons.
'Map Accounts' dialog
2

Select one or more accounts to map to this row. You can select accounts from multiple sheets. Use the search field to filter by account name.

3

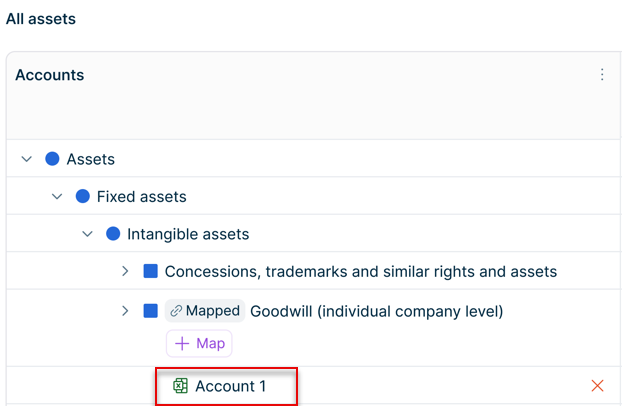
Click Map. The row now shows a link icon and the mapped accounts appear as subordinate entries beneath it.

Shows the 'All assets' table in Data Collection with the 'Accounts' column, in which the row 'Goodwill (individual company level)' displays the 'Mapped' label and a '+ Map' link. Highlighted in red is the subordinate entry 'Account 1' beneath the row, with the delete icon on the right.
A mapped row with the linked account shown as a subordinate entry

Only lowest-level rows can be mapped. Superordinate rows and total rows do not have a + Map link — their values are calculated automatically.

Each Excel account can only be mapped to one form row. Accounts that are already mapped to another row do not appear in the Map Accounts dialog.

Removing a mapped account

To remove a mapped account, click the delete icon on the subordinate entry beneath the row. The account becomes available again for mapping to a different row.

Column mappings link a form column to a column in your Excel file.

To map a column:

1

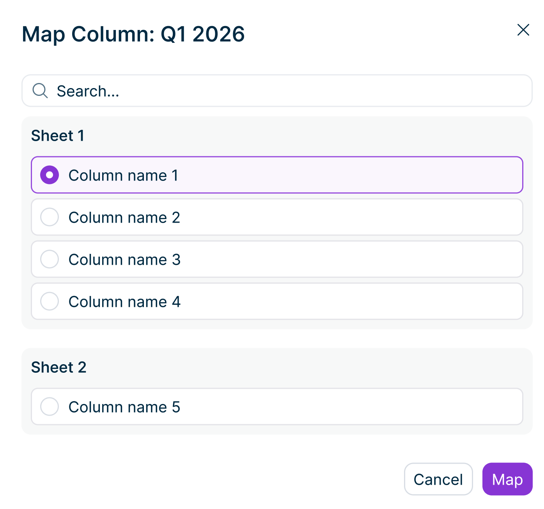
Click + Map in a Numeric or Currency column header. The Map Column dialog opens, showing all columns organized by sheet.

Shows the 'Map Column: Q1 2026' dialog in Data Collection with a search field, the columns 'Column name 1' to 'Column name 4' under 'Sheet 1' with 'Column name 1' selected, 'Column name 5' under 'Sheet 2', and the 'Cancel' and 'Map' buttons.
The Map Column dialog for selecting an Excel column
2

Select the Excel column that contains the values for this form column. You can use the search field to filter by column name.

3

Click Map. The column header now shows a link icon to confirm the mapping.

Shows a column header in Data Collection with the text 'accounts' and a link icon. Highlighted in red is the link icon.
A column header with a link icon after mapping

You can map the same Excel column to form columns in several tables of the form, but only once within a table. After you map an Excel column in a table, Data Collection no longer offers it in the Map Column dialog of that table; the column remains available for all other tables. If you remove the mapping, the Excel column is offered again in that table. The import writes the value of the Excel column to every form column it is mapped to. Total columns do not have a + Map link — they are calculated automatically.

Form columns with the entry method Manual only are not offered for mapping — you can only enter their values manually (see Configuring Tables in Form Templates).

Once at least one row and one column are mapped, the Import button becomes available in Data Collection.

To start the Excel import in Data Collection:

1

Click Import in the top right.

2

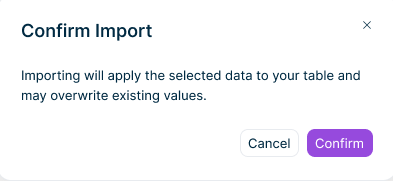
If the form already contains collected data, a Confirm Import dialog appears. Click Confirm to overwrite existing values, or Cancel to return to the mapping view.

Shows the 'Confirm Import' dialog in Data Collection with the message 'Importing will apply the selected data to your table and may overwrite existing values.' and the 'Cancel' and 'Confirm' buttons.
'Confirm Import' dialog

Additional notes:

  • Manual editing and additional imports are disabled for all users while the import is in progress.
  • After a successful import, the form is displayed in editing mode. The form now includes the imported data as well. Superordinate rows and total columns are recalculated automatically.
  • Imported values cannot be automatically undone. To restore previous data or correct imported values, edit the affected cells manually after the import.
  • If columns were skipped because their entry method is Manual only, a message after the import lists the columns that were not updated.
  • If an element selection is configured for a drill down dimension in the reporting package, rows that contain an element outside the selection are rejected. The import result identifies the rejected rows (see Creating and Configuring Reporting Packages).

The next time you import data for the same form and reporting entity, Data Collection automatically restores your previous row and column mappings. Upload the new Excel file and the mappings are applied immediately — you only need to adjust them if your file structure has changed. If a restored mapping contains a column whose entry method was changed to Manual only in the meantime, that mapping is skipped when the import is executed.

If the new file is missing accounts that were previously mapped, a red warning icon is displayed on the superordinate row and the missing account name is shown with strikethrough text. The data can still be imported — missing accounts are skipped and their target rows receive no value from that account. To clean up, click the delete icon on the missing account entry to remove the orphaned mapping.

Excel import in Data Collection supports tables with the following drill down configurations:

  • One drill down level, configured to either the Local Account dimension or the Partner dimension
  • Two drill down levels, with Local Account as the first level and Partner as the second level

For a Partner drill down, the import uses the partner assigned to the local account (see Assigning Partners to Local Accounts in Data Collection). For these cells, the import creates individual drill down entries — one per mapped account — rather than updating the cell value directly. If a table combines a row drill down and a column drill down, the import writes each imported value to the cell at the intersection of the row element and the column element.

Excel import is not supported for tables with:

  • Drill down configured to a dimension other than Local Account or Partner, for example Cost Center
  • Two drill down levels other than Local Account as the first level and Partner as the second level

Some local accounts are dedicated to a single counterparty, for example an intercompany receivables account. In Lucanet Data Collection, you can assign the partner of such a local account once per reporting entity. Every Excel import and Lucanet.Financial Warehouse import then applies the assigned partner to the values of that local account, so collectors no longer have to enter the partner manually after each import.

The assignment applies to tables with a Partner drill down, either as a single level or as the second level below Local Account. The following rules apply:

  • Each local account can have one partner.
  • The assigned partner replaces a different partner from the source of the import. If no partner is assigned, local accounts keep the partner from the source.
  • Assignments are saved per reporting entity and reused for all forms and data collection processes of that reporting entity.
  • If you change or remove an assignment, the next import applies the change.
  • You assign partners for one reporting entity at a time, in an import for that reporting entity.
  • Administrators can assign partners for every reporting entity, and collectors for the reporting entities assigned to them.
To assign a partner to a local account in an Excel import:

1

Start the Excel import and map the local accounts to rows (see Mapping Rows).

2

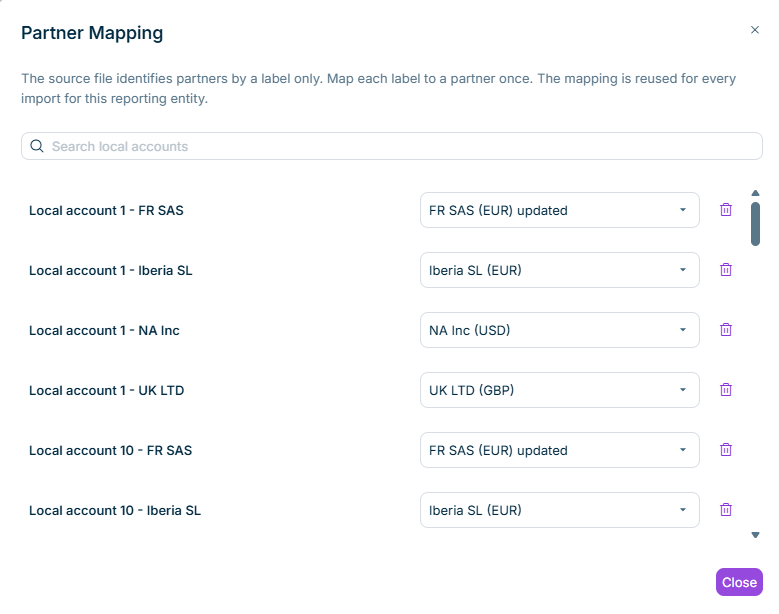
In the Imported accounts panel, click Map partners. The Map Partners dialog is displayed:

Shows the 'Map Partners' dialog in Lucanet Data Collection with the 'Search local accounts' field and a list of local accounts. Each local account has the assigned partner in a drop-down list and a delete icon. At the bottom is the 'Close' button.
'Map Partners' dialog
3

In the drop-down list next to the local account, select the partner. To find a local account, enter its name in the Search local accounts field. Data Collection saves each assignment immediately.

4

Click Close.

The Map Partners dialog lists the local accounts that are mapped to rows of the form. If no local account is mapped yet, the dialog contains no entries. The Map partners button displays the number of assignments of the reporting entity.

Removing an assignment

To remove an assignment, click the delete icon next to the local account in the Map Partners dialog. The next import uses the partner from the source again.

For the Lucanet.Financial Warehouse import, you open the same dialog in the element mapping (see Importing Data from Lucanet.Financial Warehouse).

This content was generated using AI and reviewed by Lucanet subject matter experts before publication.