Form templates are the foundation of data collection in Data Collection. A form template defines the structure and layout of the data you want to collect from reporting entities. You can configure your form templates by adding elements that are based on Consolidation & Financial Planning structures, or by creating them from scratch.
After creating a form template, you configure it by adding sections, adding elements to those sections, and setting the configuration options for each element.
A form template consists of sections that contain elements. Sections help organize your form into logical groups, while elements are the individual data entry fields within each section. To build your form template, first add one or more sections, then add elements to each section.
To add a section:
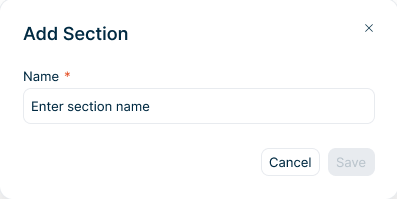
1
In the Form structure panel, click + Add section. The Add Section dialog is displayed:
'Add Section' dialog
2
Enter a unique Name for the section within the form template.
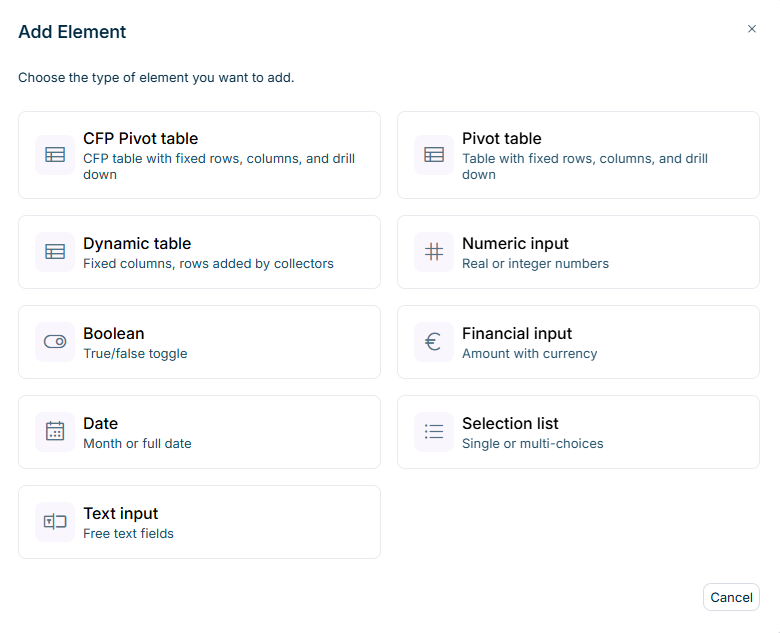
The following elements are available when creating a form template:
Element
Description
CFP Pivot table
A table whose row structure is imported from a Consolidation & Financial Planning workspace, with fixed rows and columns
Pivot table
A custom table with fixed rows and columns
Dynamic table
A table where collectors add, duplicate, and remove rows themselves during data collection, up to a configured maximum. See Entering Data in Dynamic Tables for the collector workflow.
For Pivot table, CFP Pivot table, and Dynamic table, you also configure the table structure (columns, rows, and drill down) on the table itself (see Configuring Tables in Form Templates).
The Add Element dialog may display additional element types that are grayed out. These element types are not yet available and will be provided in a future update.
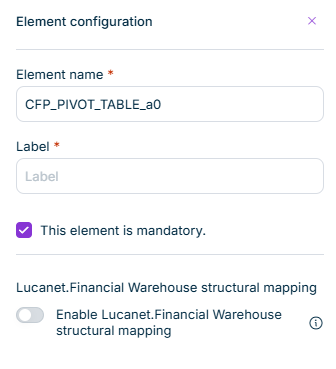
In the form template detail view, click the element you want to configure.
2
Click the cog-wheel icon on the selected element. The Element configuration panel is displayed on the right:
'Element configuration' panel
3
Configure the element as needed (see the configuration options below).
4
Click Apply changes to save the configuration.
The following configuration options are available in the Element configuration panel. Options marked with an asterisk (*) are required for the element type they apply to. The remaining options either apply to specific element types or are optional.
Field
Description
Available for
Element name *
A unique identifier for the element within the form template.
All elements
Label *
The display name shown to data collectors. The label must be unique within the template for each language.
All elements
This element is mandatory
When activated, collectors must complete this element before submitting the form.
When enabled, the table can receive data from Lucanet.Financial Warehouse during data collection. See Importing Data from Lucanet.Financial Warehouse for the full configuration and import workflow.
Pivot table, CFP Pivot table
Maximum number of rows *
The maximum number of rows a collector can add to this table. Positive integer.
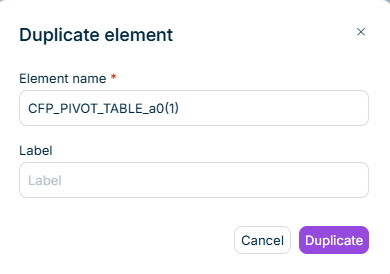
You can duplicate an existing element to reuse its configuration without recreating it from scratch. The duplicate inherits all properties of the original — element type, configuration, mappings, required-field status, and all language labels — and is placed immediately after the original element in the same section.
Element duplication is available only while the form template is in Draft state.
To duplicate an element:
1
Click the Duplicate icon in the top right corner of the element. The Duplicate Element dialog is displayed:
'Duplicate Element' dialog
2
The system adds a suffix (for example, (1)) to the Element name. Review the proposed name, and add a Label, if applicable.
When first created, a form template is automatically in Draft state. While in this state, it can undergo any number of modifications. Once its configuration is finalized, the form template must be Published before it can be used in validation rules and reporting packages.
To publish a form template, click Publish in the top right of the form template editor.
A published form template can only be modified if it is not referenced by other configuration elements (such as ongoing data collection processes). Editing a published form template automatically brings it back to Draft state.