In addition to filling out the ESRS, ESRS 2.0, or VSME questionnaire, the users that have been assigned as editors fill out the Emissions Module entirely or only the parts that have been assigned to them. To fill out the Emissions Module, the users create footprints, either manually or by importing consumption data created in MS Excel with the ESG Emission Agent.

The data from the Emissions Module will be automatically copied into the ESRS, ESRS 2.0, or VSME questionnaire.

The Emissions Module is only available with the Advanced or Professional license package.

Like the Greenhouse Gas Protocol (GHG Protocol), the Emissions Module is split into three scopes: 1, 2, and 3. The three scopes represent the following three categories:

  • Scope 1: all direct GHG emissions, e.g. natural gas or gasoline
  • Scope 2 - location-based: all indirect GHG emissions resulting from the generation of power, e.g., electricity or district heating, based on the average emissions intensity of the grids where energy consumption occurs.
  • Scope 2 - market-based: all indirect GHG emissions resulting from the generation of power, e.g., electricity or district heating, considering the specific energy purchases made by an organization.
  • Scope 3: all indirect GHG emissions arising from consumption, e.g., waste disposal

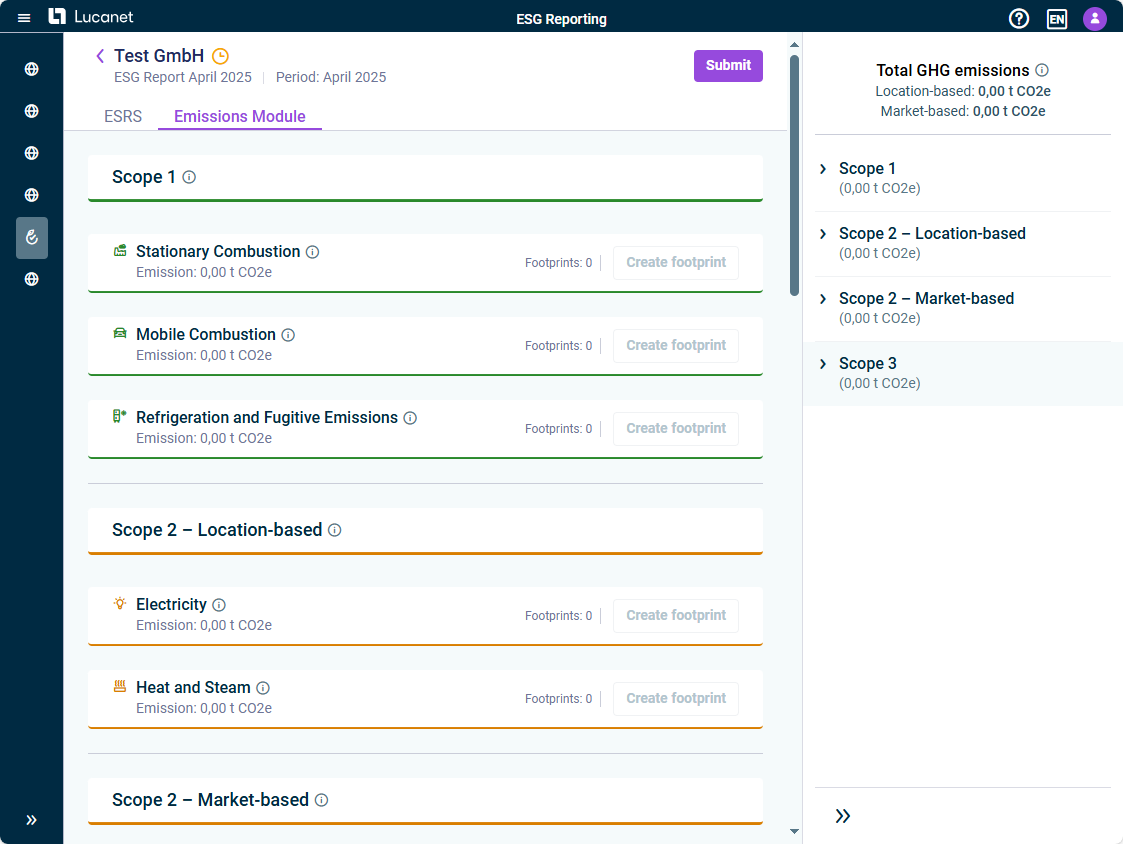
The Emissions Module is displayed as follows, for example:

Displays the user interface of the Emissions Module.
User interface of the Emissions Module

To enter emissions, you will need to create footprints for each emission (see next subheading).

You have two options to create footprints in the Emissions Module:

  • The ESG Emission Agent allows you to upload your existing emission activity data from MS Excel and have Lucanet's ESG Emission Agent automatically convert each row into a structured GHG footprint entry — complete with the correct emission factor, scope classification, and CO₂ equivalent values. You can then review, edit, and approve the footprint suggestions before the footprints are committed to your Emissions Module.
  • You can create single footprints manually in the Emissions Module.

For more information on how the ESG Emission Agent processes your data and generates footprint suggestions, see Overview of the AI-Supported Import Process Using the ESG Emission Agent.

Please note:

  • This functionality can currently only be provided upon request. If you are interested in using this functionality, please contact esg@lucanet.com.
  • Before you start an import, please make sure to keep the Excel files small, aggregate where possible, and split entries across Excel worksheets.

Proceed as follows to upload previously created consumption data and review the footprint suggestions to be added to the Emissions Module:

1

If necessary, navigate to the Emissions Module tab.

2

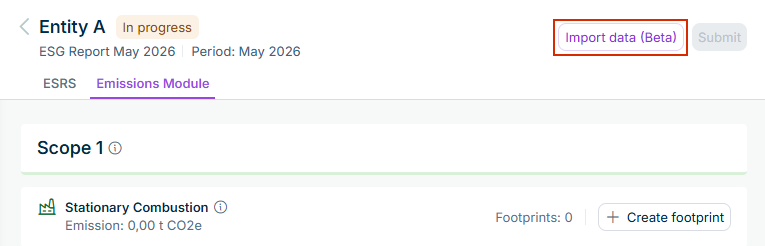
Click Import data (Beta) at the top right of the page.

The 'import data' button in the Emissions Module is highlighted in red.
Button to import consumption data from MS Excel
3

In the subsequently displayed dialog, select your Excel file by clicking Browse.

4

Click Upload to start the import process.

ESG Reporting will automatically start processing the Excel data and generate suggestions for footprints using the ESG Emission Agent for your review (see following subheading). This process may take some minutes.

Disclaimer

AI can make mistakes. Always review suggestions carefully to ensure accuracy.

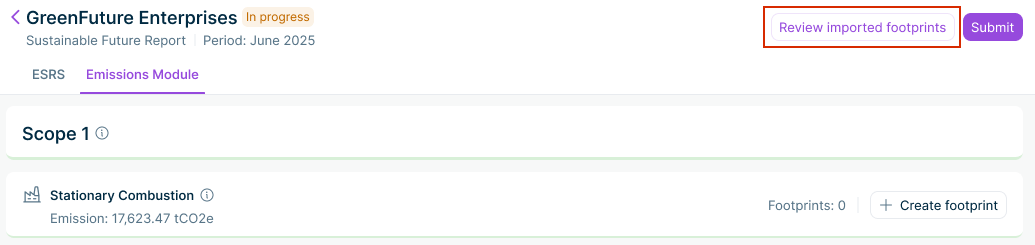
After your Excel file has been processed, you can access an overview of the footprint suggestions generated by the ESG Emission Agent for your review. Click Review imported footprints to start your review.

The button to access the footprint suggestions generated by the ESG Emission Agent is highlighted in red.
Button to access footprint suggestions generated by the ESG Emission Agent

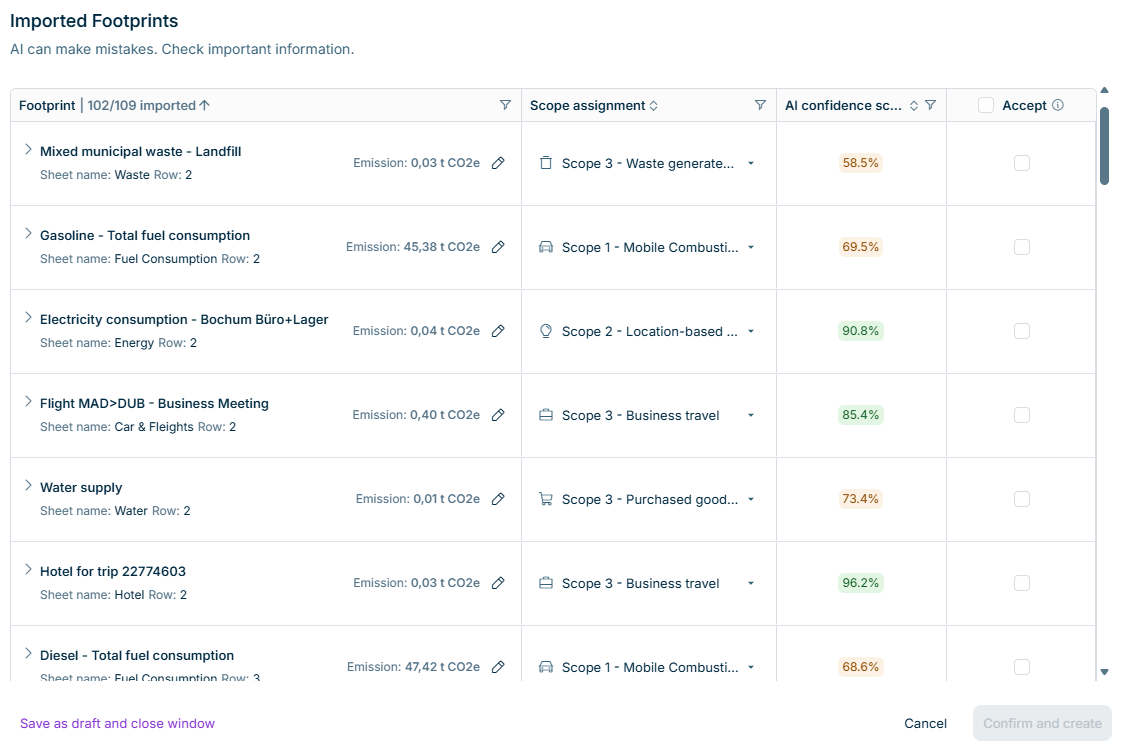
In the subsequently displayed dialog Imported Footprints, you can review each suggestion and decide whether to accept, edit, or not accept it.

If necessary, use the filter and/or sort options in the Footprint, Scope assignment, and AI confidence score columns to facilitate your review.

The 'Imported Footprints' dialog is displayed.
'Imported Footprints' dialog

The following actions are available:

Accepting suggestions

If a suggestion for a footprint has been correctly imported and mapped by the ESG Emission Agent, you can quickly accept it. Do one of the following:

  • Accept individual suggestions: Activate the Accept checkbox for the footprint.
  • Accept all suggestions: Activate the checkbox in the column header Accept.

Click Confirm and create to transform the accepted suggestions into footprints. The footprints will appear in the appropriate scope category and will be included in your ESG report.

Editing suggestions

If a suggestion needs adjustments, you can edit it before accepting. The following options are possible:

  • In the Footprints column, you can click the pencil icon next to the suggestion to open the detail view and modify the footprint data, e.g. name, sector, or sub-sector.
  • In the Scope assignment column, you can adjust the scope.

Rejecting suggestions

If a suggestion is irrelevant, incorrect, or a duplicate, you can reject it by deactivating the Accept checkbox. Rejected suggestions will not be created as footprints and will be discarded after clicking Confirm and create.

Notes:

  • Each suggested footprint displays the name and the row of the Excel sheet that contain the original data that the ESG Emission Agent used to create the suggested footprint.
  • The column AI confidence score displays the expected accuracy of the suggestions generated by the ESG Emission Agent as a percentage.

The overall confidence score is calculated from four weighted factors:

  • Semantic match quality (40%)
  • Region match (30%)
  • Year match (15%)
  • Emission factor specificity (15%)

Even with a high confidence score, always review the footprints generated by the ESG Emission Agent carefully. For more information on how the confidence score is calculated, see Overview of the AI-Supported Import Process Using the ESG Emission Agent.

  • You can only have one review in progress at a time. You have to complete or cancel your current review before you can start a new Excel import.
  • You can cancel the import process at any time, i.e. also when the data is being uploaded or processed. Any data that might already have been created as part of the import will be deleted, and you can start a new import, if necessary.

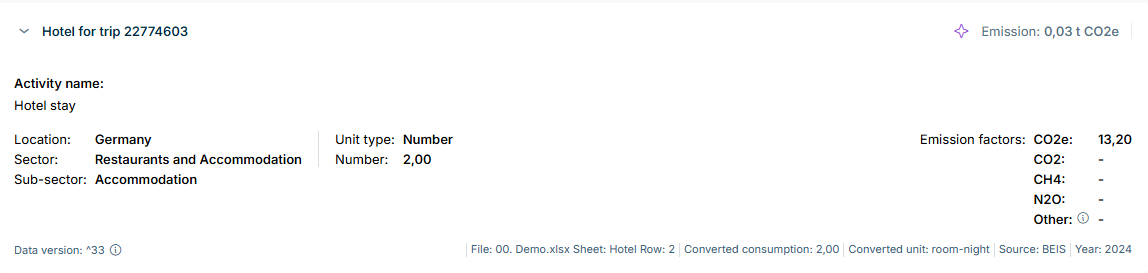
After having accepted and created footprints based on the suggestions generated by the ESG Emission Agent, you can display the footprints by navigating to the corresponding scope, e.g.:

An example of a footprint generated by the ESG Emission Agent is displayed.
Example of a footprint generated by the ESG Emission Agent

The icon is displayed next to each of the footprints generated by the ESG Emission Agent. To facilitate finding the source information that the footprint is based on, the row at the bottom of each footprint displays the Excel file and sheet that the footprint is based on.

Proceed as follows to manually create a footprint in the Emissions Module:

1

If necessary, navigate to the Emissions Module tab.

2

Select the scope you require on the right-hand side of the screen.

3

Click Create footprint.

4

Enter a name for the footprint in the Emission name field.

5

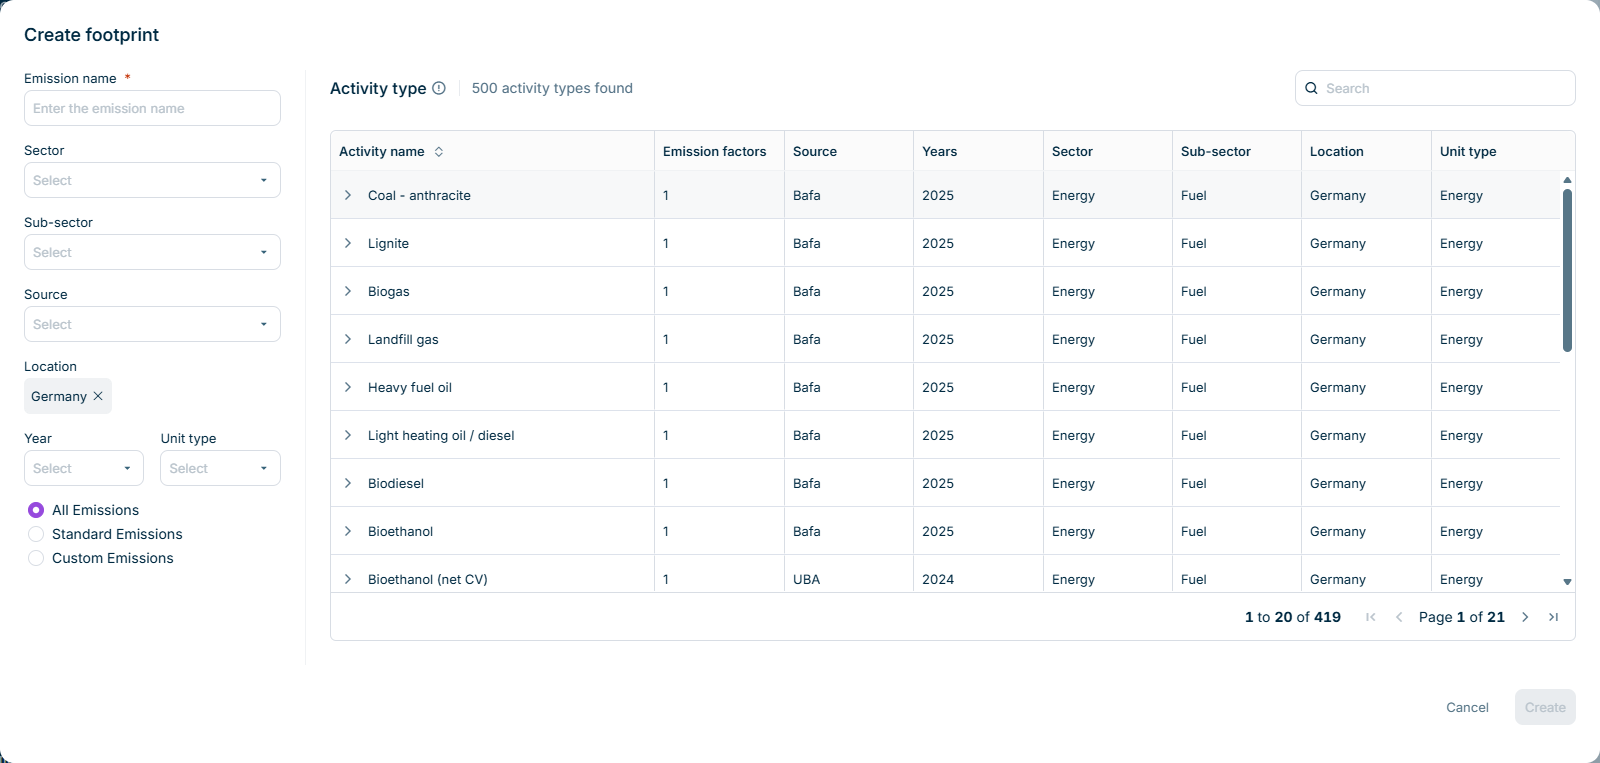
If necessary, use any combination of the filters Sector, Sub-sector, Source, Location, Year, and Unit type to narrow down the emission factors shown in the Activity type table. To show only standard or custom emission factors, select the corresponding option in the Emission factors section.

The Create footprint dialog showing the filter fields on the left and the Activity type table on the right.
Create footprint dialog

The filters Sector, Sub-sector, Source, Location, Year, and Unit type are all optional. The choice of whether to filter for all emission factors or only standard or custom emission factors is also optional. You can apply them in any order, and each filter shows only the options that still return at least one emission factor. You can change or remove any filter, and the Activity type table and the remaining filters update accordingly, without you having to re-enter the others.

6

Select the desired emission factor from the Activity type table.

The Activity type table shows emission factors that are relevant for the footprint you are creating (see the following info box). If necessary, use the Search field to find specific emission factors by entering relevant keywords (e.g., "Motorbike" or "R-170"). The table updates to show factors matching your keyword search and any filters you have applied.

7

Click Create.

Scope- and Category-Aware Emission Factors

The Activity type table is automatically limited to the emission factors that are valid for the footprint you are creating:

  • For Scope 1 and Scope 2 footprints, the table shows all emission factors for that scope.
  • For Scope 3 footprints, the table shows only the emission factors for the footprint's specific GHG Protocol category.

You do not select the scope or category manually — the context is taken from the footprint you are working on. This also applies to the custom emission factors that carry a GHG scope and category definition (see Creating Custom Emission Factors).

Decimal Precision of Emission Values

You can enter emission values with up to 4 decimal places in the footprint input fields. When you leave a field, the value is formatted to exactly four decimal places (e.g. 1.5 becomes 1.5000).

Emission values displayed in the summary panel on the right and in the questionnaire tables that are populated from the Emissions Module are displayed with 2 decimal places, in line with ESRS reporting requirements. The full precision is retained in the background.

Tip for Keyword Search

Use the keyword search to find specific emission factors that may not appear in the initial list. The keyword search helps you access emission factors beyond the first 500 results, making it easier to find specialized factors for your calculations.

Tip for Using Custom Emission Factors

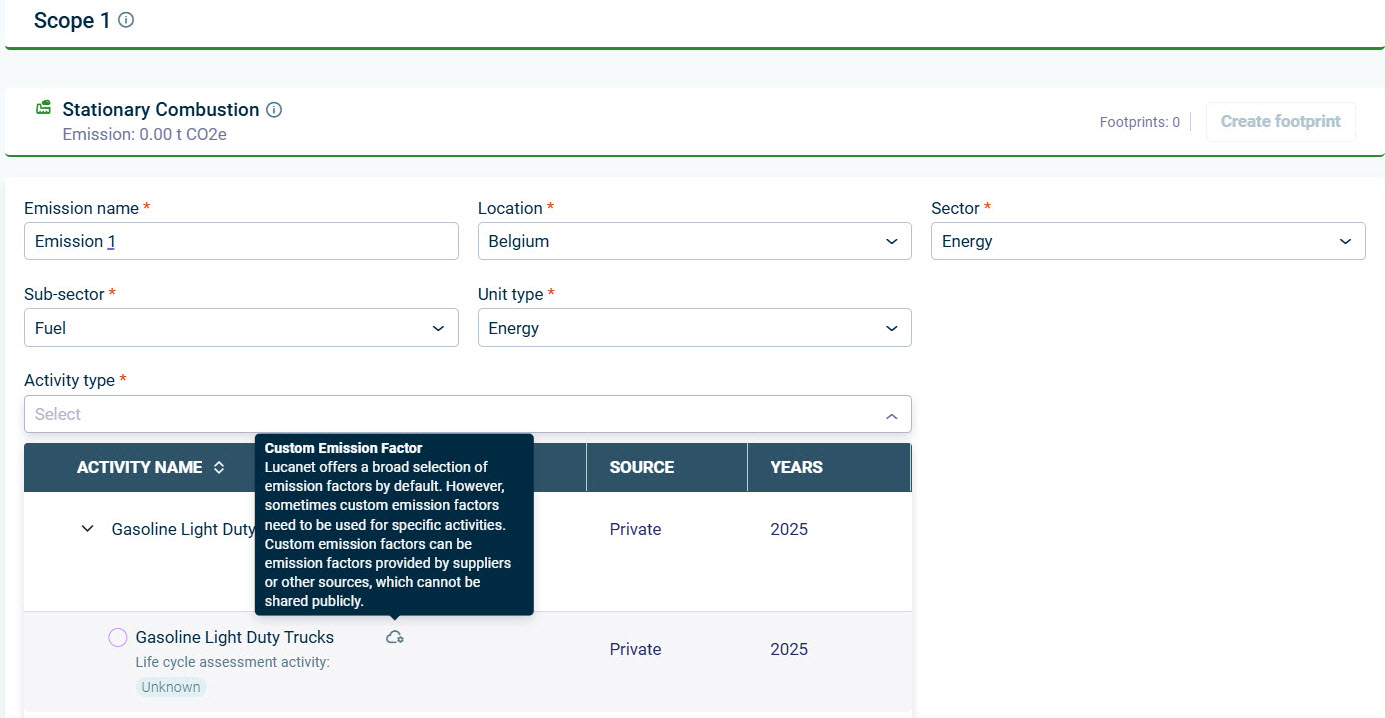
If there are custom emission factors available, the custom emission factors will be displayed in the drop-down list Activity type as follows, for example:

Example of a custom emission factor displayed when creating a footprint

For more information, see Creating Custom Emission Factors.

Once you have entered all the data for the Emissions Module, the data will be automatically copied into the Environmental section of the ESRS or VSME questionnaire, under Metrics and Targets.

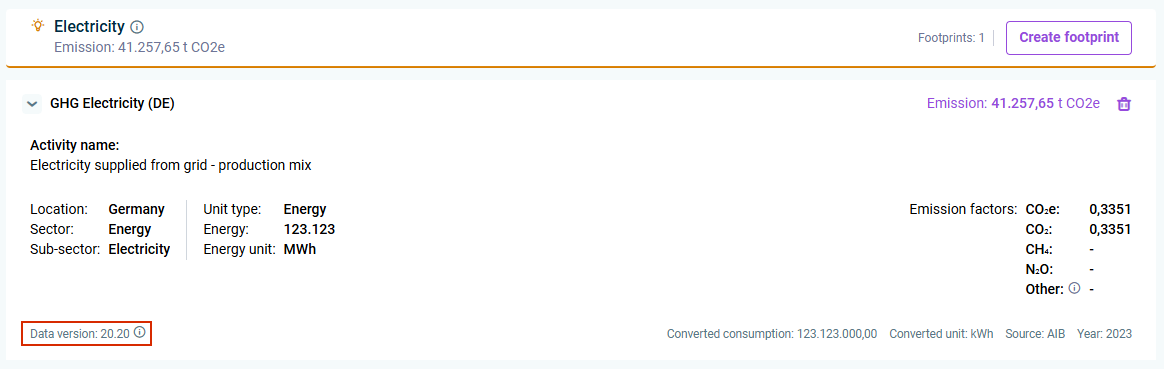
When creating a footprint, the system automatically uses the latest data version of the emission factor for GHG calculation. The data version used is stored and displayed for every footprint, so you can track at all times on which emission factor the calculation of the footprint is based:

A footprint is displayed. The data version is highlighted in red.
Data version displayed on a footprint