With the help of layout actions, you can apply a layout you have defined in Lucanet Disclosure Management’s layout robot to an Excel worksheet that you want to insert in Word.

By saving a layout robot, you can use layout actions in MS Excel and MS Word to give your tables a uniform design. Use the Configure document option to assign a layout robot to a document.

To use layout actions in MS Word:

1

In the Word document, position your cursor in the table to which you want to apply layout actions.

2

Go to the Word ribbon and click the Insert layout actions button.

Open the ‘Layout Action’ dialog from the Word ribbon
3

The Layout Action dialog is displayed in MS Word:

'Layout Action’ dialog
4

Configure the layout action (see Configuring Layout Actions), then click Apply.

The following options are available in the Layout Action dialog:

Displays the 'General' area of the 'Layout Actions' dialog
'General' area in the 'Layout Action' dialog

In the General section of the Layout Action dialog, you can select and configure the table layouts defined in the layout robot.

OptionDescription
Layout ActionClick the corresponding table in the Word document and select the required layout from the drop-down list. Note: If there are no entries in the Layout Action drop-down list, you will first need to assign a layout robot to your document under Configure document.
The screenshot displays the 'Parameter' area of the 'Layout Action' dialog.
'Parameter' area in the 'Layout Action' dialog

In the Parameter section of the Layout Action dialog, you can edit the properties of the table. The following options are available:

OptionDescription
Table widthThe absolute width of the table in cm, e.g. 15.5. Equivalent to the Preferred width table property in MS Word.
Double tab positionMoves the number in the table by the specified factor in order to ensure the numbers wrap around existing footnotes or brackets, for example. This value is specified in cm, e.g. - 0.2 would move the numbers 2 mm to the left. You can find an example at the bottom of the table.
Table indentThe indent of the table in cm, e.g. 2. Equivalent to the Indent from left table property in MS Word.
First layout columnNumerical value indicating which column should be treated as the first layout column. Layout columns are empty columns created between value columns in MS Excel.

Layout columns are used purely for aesthetic reasons.

If a column does not contain any content and its width is <= 0.5 px, the layout robot will register it as a layout column.
First double tab columnNumerical value indicating which column should be the first to include a double tab.
Do not separate paragraphsPrevents paragraph breaks in the table, ensuring it stays together as intended.
Invert zebraInverts the pattern of alternating colors used in a table (e.g. each white column is followed by a gray one, etc.).
Do not apply double tab to percentage valuesThe position of the double tab entered under the Double Tab position option is not applied to percent values.

Example for the Double tab position option: In the example below, negative numbers are written in brackets in MS Excel. This has resulted in the numbers no longer being positioned below one another (left-hand column). Entering a double tab in MS Excel will realign the numbers so they are below one another again (right-hand column):

In two columns, 6-digit numbers are displayed in cells one below the other. Both numbers are the same, the lower number is placed in brackets. In the left column, the numbers are not aligned with each other. In the right-hand column, the numbers are aligned one below the other.
Using a DoubleTab to align numbers one below the other in MS Word
Displays the 'Columns' area of the 'Layout Action' dialog. The 'Use generic column widths' tab is displayed in the dialog.
'Use generic column widths' in the 'Layout Action' dialog
Displays the 'Columns' area of the 'Layout Action' dialog. The 'Use fixed column widths' tab is displayed in the dialog.
'Use fixed column widths' in the 'Layout Action' dialog

In the Columns section of the Layout Action dialog, you can edit the column widths of the selected table. The following options are available:

OptionDescription
Use generic column widthsCombination of fixed and calculated column widths. For example, you can enter the widths for number columns and layout columns (in cm). The width of the name column is then calculated automatically. This value is specified in cm. 
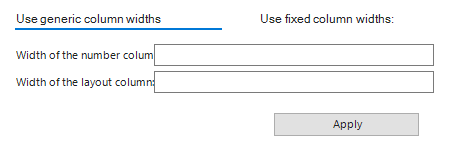
Alternatively, you can use an Auto column; the column width will then be calculated automatically based on the value you enter in the other column. Note: You can use generic column widths if your table regularly alternates between column types, e.g. Name column, Layout column, Value column, Layout column, value column, etc.
Use fixed column widthsUse this option to define fixed column widths. Note: You can use fixed column widths if you don’t want your columns to alternate regularly, e.g. if you want several Name columns next to each other. When using fixed column widths, you will need to enter the width of each column in turn, in cm. Each width should be separated with a semi-colon, e.g. 0.3#1.2#2.0#3#4.1.

A separate layout robot can be stored for each document in Lucanet Disclosure Management.

To assign a layout robot to a document, you must open the Configure document workspace and add a layout robot in the Layout Robot settings area (see also Configuring a Document).

This is also where you can use the icon to save an already assigned layout robot locally, e.g. to use it in another document.

Shows the 'Configure document' workspace. The 'Layout Robot settings' area is displayed. The options for the layout robot are outlined in red.
Assign, save, or delete layout robots