The Microsoft Dynamics 365 Business Central Beta integration in Data Hub extracts data from Microsoft Dynamics 365 Business Central online through OData v4 and writes it into the Lucanet Data Lake as raw datasets. From the Data Lake, the data is available for further processing on the Lucanet CFO Solution Platform.

This page describes the technical details and the prerequisites of the Microsoft Dynamics 365 Business Central Beta integration in Data Hub, every step from creating the connection to starting the import, the connection settings, every option of the source dataset configuration, example configurations, a configuration checklist, and the release notes.

This document describes version 1.2 of the Microsoft Dynamics 365 Business Central Beta integration. In the connection form, the version is displayed in the Source system area, for example Version: 1.2.0. Bugfix versions such as 1.2.1 are applied automatically and do not change the options described on this page. The changes of each version are listed in the release notes.

The Microsoft Dynamics 365 Business Central Beta integration uses the Business Central connector business_central and runs in the Lucanet.Cloud. Unlike other integrations, it does not require a Lucanet.Script Execution Application (SEA) instance. It reads the data from the OData v4 web services of Business Central online and signs in with Microsoft Entra ID through the OAuth 2.0 client credentials flow. Lucanet.Financial Client is not involved.

The Microsoft Dynamics 365 Business Central Beta integration writes the data in raw form. It does not map or transform any values into a target schema: the fields of the entity are stored as the web service returns them. You can join, filter, or map the data later in the Data Lake.

The Microsoft Dynamics 365 Business Central Beta integration in Data Hub requires the following prerequisites. They concern the environment and are not options of the integration:

  • A license for the Microsoft Dynamics 365 Business Central Beta integration. Without a license, Microsoft Dynamics 365 Business Central Beta is not displayed in the Source system drop-down list.
  • A Business Central online environment. Business Central on-premises is not supported.
  • An app registration in Microsoft Entra ID with a client secret, which can sign in through the OAuth 2.0 client credentials flow. The app registration requires the application permission API.ReadWrite.All for Dynamics 365 Business Central, with admin consent. In Business Central, the app registration must be set up and enabled on the Microsoft Entra Applications page, with permission sets that grant read access to the required data. The SUPER permission set cannot be assigned to applications. For more information, see Using Service to Service Authentication in the Microsoft documentation.
  • The entities to be read, available in the OData v4 metadata of the Business Central environment, for example as published web services
To import data with the Microsoft Dynamics 365 Business Central Beta integration in Data Hub, proceed as follows:

1

Create a connection with Microsoft Dynamics 365 Business Central Beta as the source system and enter the settings for accessing Business Central. For more information, see Creating a Connection for the Microsoft Dynamics 365 Business Central Beta Integration.

2

Create a source dataset that uses the connection and specify the data to extract from the source system in its Configurations area. A connection can have one or more source datasets. For more information, see Creating a Source Dataset for the Microsoft Dynamics 365 Business Central Beta Integration.

3

Start an import of the source dataset. Before the first import, check the points of the configuration checklist for the Microsoft Dynamics 365 Business Central Beta integration. For more information, see Starting an Import for the Microsoft Dynamics 365 Business Central Beta Integration.

A connection of the Microsoft Dynamics 365 Business Central Beta integration in Data Hub specifies the settings that Data Hub uses to access Business Central.

To create a connection for the Microsoft Dynamics 365 Business Central Beta integration in Data Hub:

1

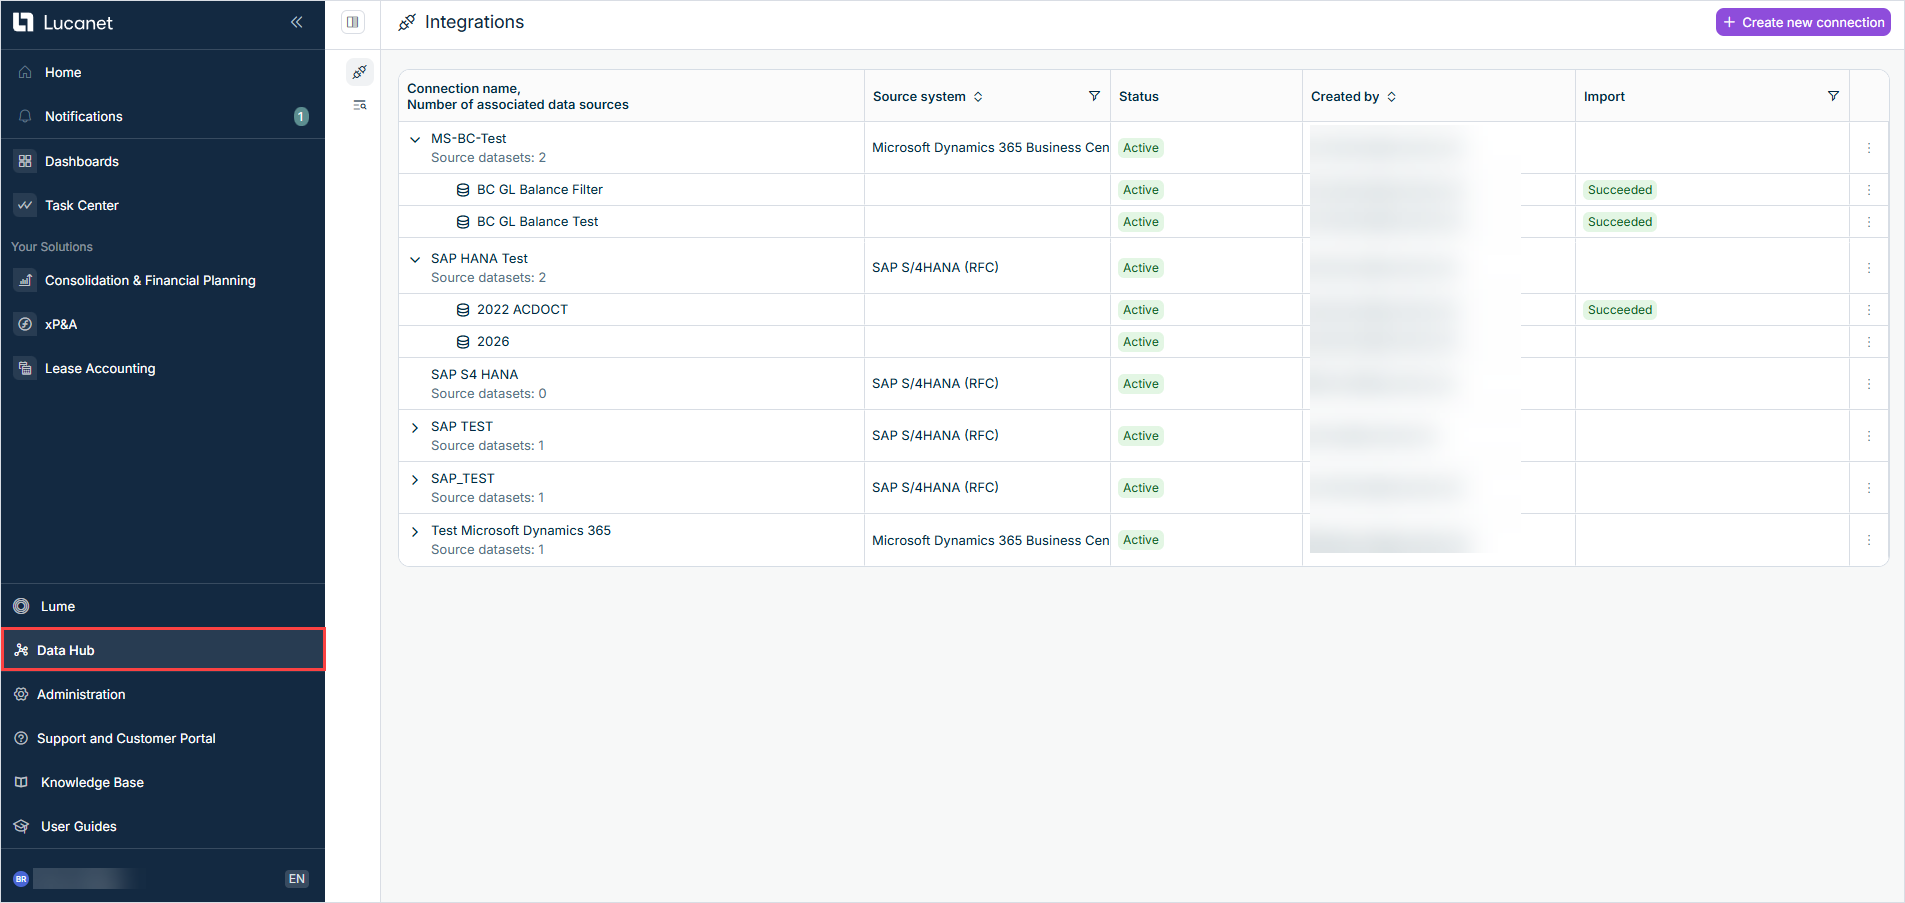
In the main menu, select Data Hub. The Integrations page is displayed as follows, for example:

Shows the 'Integrations' page in Data Hub with the 'Create new connection' button and a table with the columns 'Connection name, Number of associated data sources', 'Source system', 'Status', 'Created by', and 'Import'. The table lists connections with the source systems 'Microsoft Dynamics 365 Business Cen', truncated in the column, and 'SAP S/4HANA (RFC)', all with the status 'Active'. Highlighted in red is 'Data Hub' in the main menu.
Connections and their source datasets on the 'Integrations' page
2

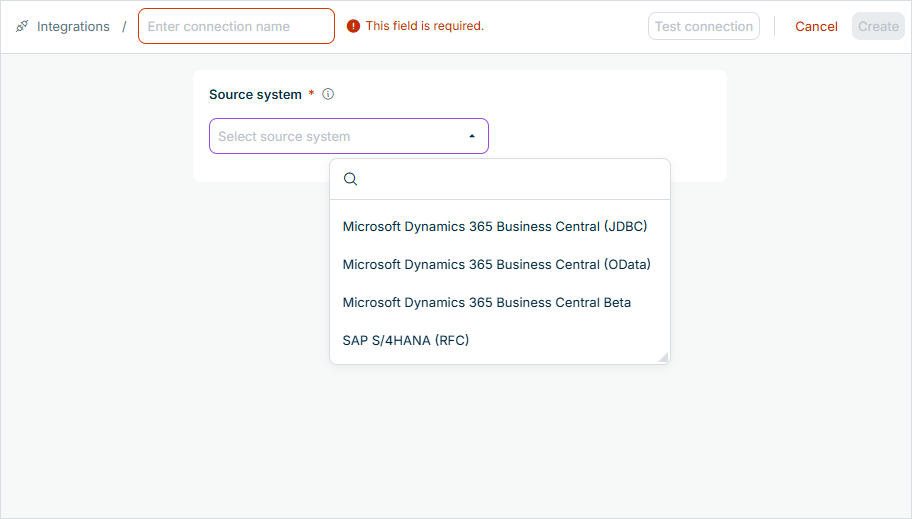
In the top-right corner, click Create new connection. The connection form is displayed as follows, for example:

Shows the connection form in Data Hub with the empty 'Enter connection name' field and the message 'This field is required.', the 'Test connection', 'Cancel', and 'Create' buttons in the top-right corner, and the open 'Source system' drop-down list with the options 'Microsoft Dynamics 365 Business Central (JDBC)', 'Microsoft Dynamics 365 Business Central (OData)', 'Microsoft Dynamics 365 Business Central Beta', and 'SAP S/4HANA (RFC)'.
Connection form with the source-system selection
3

In the Source system drop-down list, select Microsoft Dynamics 365 Business Central Beta. The version of the integration is displayed in the top-right corner of the Source system area. The connection form of this integration has no SEA instance field.

4

At the top of the connection form, enter a name for the connection in the Enter connection name field. The name identifies the connection on the Integrations page.

5

In the Connection area of a Microsoft Dynamics 365 Business Central Beta connection, enter the following information:

OptionRequiredDescriptionExample
Base URLYesURL of the OData v4 service root of the Business Central online environment. The URL must start with https://, and its host must end with .dynamics.com.https://api.businesscentral.dynamics.com/v2.0/<tenant-id>/Production/ODataV4
CompanyNoName of the Business Central company whose data is read, exactly as in the Name field of the company in Business Central, including upper and lower case. Although the field is optional in the connection form, an import fails with an error if no company is entered.CRONUS AG
6

In the Authentication area of a Microsoft Dynamics 365 Business Central Beta connection, enter the following information:

OptionRequiredDescriptionExample
Tenant IDYesDirectory (tenant) ID of the Microsoft Entra ID tenant that Business Central is registered under, as a GUID00000000-0000-0000-0000-000000000000
Client IDYesApplication (client) ID of the app registration in Microsoft Entra ID, as a GUID00000000-0000-0000-0000-000000000000
Client SecretYesClient secret of the app registration(secret)
7

Optionally, enter a description of the connection in the Description field at the bottom of the connection form.

8

Optionally, click Test connection in the top-right corner to check whether Data Hub can reach Business Central with the settings you have entered. Data Hub tests the settings without saving them. For more information, see Testing a Connection.

9

Click Create. The connection is created and displayed on the Integrations page.

A source dataset of the Microsoft Dynamics 365 Business Central Beta integration in Data Hub specifies which data to import from Business Central. Each source dataset belongs to a connection, and a connection can have one or more source datasets.

You create a source dataset for the Microsoft Dynamics 365 Business Central Beta integration in Data Hub in three parts, in this order: first the general options of the source dataset, then one tab per table in the Configurations area, and finally saving the source dataset.

To specify the general options of a source dataset for the Microsoft Dynamics 365 Business Central Beta integration in Data Hub:

1

On the Integrations page, click the Three-dot icon icon in the row of the Microsoft Dynamics 365 Business Central Beta connection and select Create new dataset.

2

In the Name field, enter a name for the source dataset. The name identifies the source dataset on the Integrations page.

3

In the Connection drop-down list, check the connection. The connection from which you create the source dataset is preselected. If necessary, you can select a different connection. The Configurations area then displays the options of the selected source system. After the source dataset is created, the connection can no longer be changed.

4

In the Namespace field, enter a technical identifier for the source dataset. The namespace is used to reference the data tables of the source dataset in SQL queries against the Data Lake, for example namespace.table_name. The namespace can have up to 255 characters and must be SQL-safe, with no spaces or unsupported special characters.

5

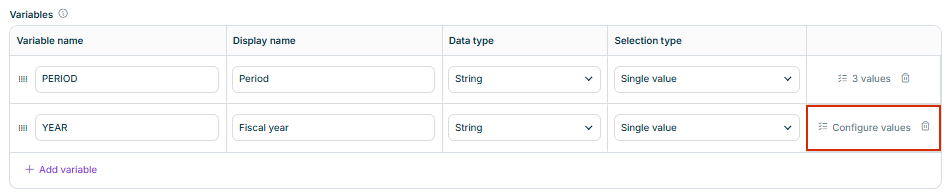
Optionally, define variables in the Variables area. Variables are placeholders in the configuration whose values are selected every time an import is started. In the Microsoft Dynamics 365 Business Central Beta integration, you can use variables with a single value in the Value field of the filter. For more information, see Variables.

The Variables area is displayed as follows, for example:

Shows the 'Variables' area of a source dataset in Data Hub with the columns 'Variable name', 'Display name', 'Data type', and 'Selection type' and the variables 'PERIOD' ('Period', 'String', 'Single value', 3 values) and 'YEAR' ('Fiscal year', 'String', 'Single value'), and the 'Add variable' button. Highlighted in red is 'Configure values' in the row of the variable 'YEAR'.
Variables area of a source dataset

In the Configurations area of a Microsoft Dynamics 365 Business Central Beta source dataset, each tab is a table of the source dataset in the Data Lake. Each table reads one entity of Business Central. A source dataset can contain several tables, which are imported one after the other in the same import.

The following rules apply to the tables of a Microsoft Dynamics 365 Business Central Beta source dataset:

  • To add a table, click Add table. To remove a table, click the × button of its tab. The button is displayed as soon as the source dataset has more than one table.
  • In the Table name field of the tab, enter the name of the table. The name can only contain lowercase letters, digits, and underscores (_), must not contain two underscores in a row, and must be unique within the source dataset.
  • On each tab, you specify the entity in the Entity selection section and optionally restrict the data in the Filtering and projection section.

If you want the Microsoft Dynamics 365 Business Central Beta integration in Data Hub to read an entity of Business Central, select it in the Entity selection section of the table tab. When the form opens, Data Hub loads the entities that the OData v4 metadata of the Business Central environment contains.

The following table describes the options in the Entity selection section of the Microsoft Dynamics 365 Business Central Beta integration:

OptionRequiredDescriptionExample
EntityYesEntity to read, selected from the entities of the Business Central environmentChart_of_Accounts
Load entitiesNoButton that loads the list of entities again, for example after a web service was published in Business Central-

If you want the Microsoft Dynamics 365 Business Central Beta integration in Data Hub to read only some rows or columns of an entity, use the Filtering and projection section of the table tab. Without a filter and without a column selection, all rows and all columns of the entity are read.

The following table describes the options in the Filtering and projection section of the Microsoft Dynamics 365 Business Central Beta integration:

OptionRequiredDescriptionExample
Load columnsNoButton that loads the columns of the selected entity. The columns are also loaded automatically every time you select a different entity.-
ColumnNoColumn of the entity that the filter applies toAccount_Type
OperatorNoComparison of the filter: =, ≠, >, ≥, <, ≤, contains, in, or is null. contains can only be used for text columns. in compares with the single value in Value. is null does not use a value.=
ValueNoValue that the column is compared with, in the format of the column's data type. Can contain a variable of the source dataset, for example {{FROM_DATE}}.Posting
Select specific columns to extract. Leave empty to extract all columnsNoColumns to read. If you do not select any columns, all columns of the entity are read.No, Name, Account_Type

The following rules apply to the filter of the Microsoft Dynamics 365 Business Central Beta integration:

  • Each table can have one filter, which consists of Column, Operator, and Value. If you use a filter, fill in Column and Operator, and Value for every operator except is null. A partly filled filter makes the import fail with an error.
  • The value is converted into the data type of the column when the import is executed. If the value does not match the data type, the import fails with an error.
  • For a column with date and time, a date without a time covers the whole day in UTC. For example, ≤ 2026-06-30 includes all records of 30 June 2026.

The following table describes the format of the value for each data type of the column:

Data type of the columnFormat of the value
Booleantrue or false
Whole numberWhole number, for example 40050
Decimal numberNumber with a dot as the decimal separator, for example 1234.56
DateYYYY-MM-DD, for example 2026-01-31
Date and timeYYYY-MM-DD or YYYY-MM-DDThh:mm:ssZ, for example 2026-01-31T23:59:59Z
Timehh:mm:ss, for example 23:59:59
GUIDGUID, for example 00000000-0000-0000-0000-000000000000
Text and all other data typesText, for example Posting

The following example shows a table of a source dataset of the Microsoft Dynamics 365 Business Central Beta integration that reads the number, name, and account type of all posting accounts from the chart of accounts:

OptionValue
Table namegl_accounts
EntityChart_of_Accounts
ColumnAccount_Type
Operator=
ValuePosting
Select specific columns to extract. Leave empty to extract all columnsNo, Name, Account_Type

The example is a pattern: the names of the entity and its columns depend on the web services published in the Business Central system.

To save the Microsoft Dynamics 365 Business Central Beta source dataset, click Create. The source dataset is created and displayed under the selected connection on the Integrations page.

After the first import, a source dataset can no longer be edited. Before the first import, all options except the connection can still be changed.

An import of the Microsoft Dynamics 365 Business Central Beta integration in Data Hub extracts the data defined in a source dataset from Business Central and writes it into the Data Lake. The Microsoft Dynamics 365 Business Central Beta integration checks the configuration of the source dataset when the import is executed. Every import reads all records of each table that match its filter, page by page, with up to 5,000 records per page. If the import of a table fails, the tables imported before it are already written.

How an import of the Microsoft Dynamics 365 Business Central Beta integration changes the data in the Data Lake depends on whether the source dataset uses variables. For more information, see Starting an Import in Data Hub.

To start an import of a Microsoft Dynamics 365 Business Central Beta source dataset in Data Hub:

1

On the Integrations page, click the Three-dot icon icon in the row of the source dataset you want to import.

2

Select Start import. If the source dataset uses no variables, Data Hub executes the import immediately.

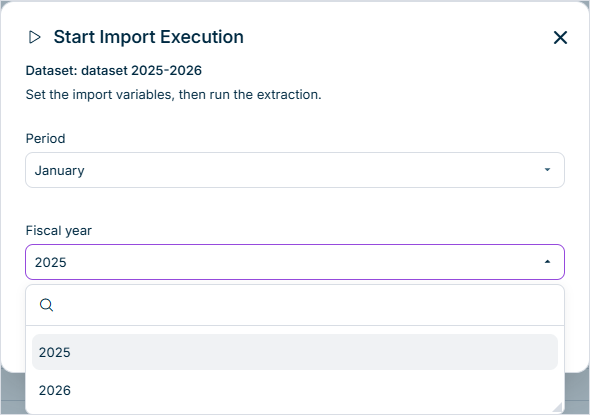
If the source dataset uses variables, the Start Import Execution dialog is displayed as follows, for example:

Shows the 'Start Import Execution' dialog in Data Hub for the dataset 'dataset 2025-2026' with the text 'Set the import variables, then run the extraction.', the variable 'Period' set to 'January', and the open drop-down list of the variable 'Fiscal year' with the values '2025' and '2026'.
'Start Import Execution' dialog of a source dataset with two variables
3

In the Start Import Execution dialog, select a value for every variable of the source dataset, then click Execute.

Data Hub imports the data and records the execution in the execution history of the source dataset. For more information on the execution history, see Importing Data.

After the first import, a source dataset of the Microsoft Dynamics 365 Business Central Beta integration in Data Hub can no longer be edited. Before the first import, check the following points:

  • The connection uses Microsoft Dynamics 365 Business Central Beta as the source system, and Base URL, Tenant ID, Client ID, and Client Secret are filled in.
  • The Base URL contains the OData v4 service root of a Business Central online environment, starting with https://.
  • The Company is filled in.
  • The source dataset uses this connection.
  • Every tab in the Configurations area has a valid, unique Table name and an Entity.
  • If a table uses a filter, Column and Operator are filled in, and Value matches the data type of the column.

The release notes of the Microsoft Dynamics 365 Business Central Beta integration in Data Hub list the changes of each version with new or changed options, newest first. Bugfix versions are not listed.

Version 1.2 is the first documented version of the Microsoft Dynamics 365 Business Central Beta integration in Data Hub. It uses version 0.1.18 of the Business Central connector business_central.

This content was generated using AI and reviewed by Lucanet subject matter experts before publication.