
Once you have configured the data transfer script xP&A #3700-xP&A.SQL.FOS, you can create and configure the data source for the import that uses the script and its parameters.

Note for customers who still use Lucanet.Financial Client

You can either perform this step on the CFO Solution Platform or in Lucanet.Financial Client. The data source will be visible and editable in both systems, no matter where you created it.

Proceed as follows to configure the data source necessary for importing data from xP&A into CFP:

1

Open the Importing data into reporting entities workspace.

2

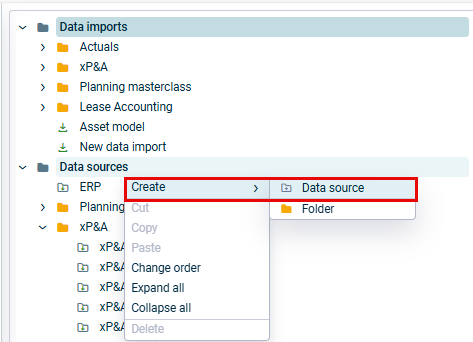
Right-click the folder Data sources and choose Create | Data source from the context menu.

Create a new data source
3

In the Ceate data source dialog, choose Provision via script, enter a name, and click Save to create the data source.

4

Select the data source in the tree view.

5

In the General area on top, behind Drill down to posting level, select the app Lucanet xP&A #3700-xP&A.SQL.FOS which you configured for transferring the desired data.

This enables the drill down from data in CFP to the corresponding data in xP&A.

Select drill-down to posting level
6

Configure the data source parameters as described in the following under Data Source Parameters.

7

Click Save (or press Ctrl+S) to save the data source configuration.

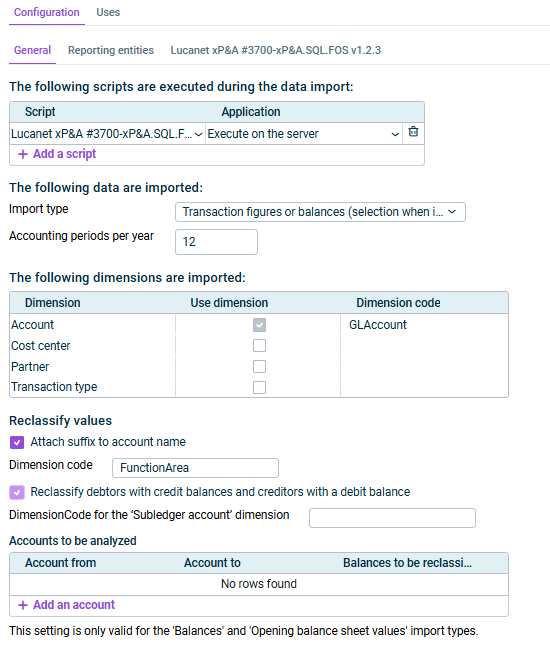
The General tab is displayed as follows, for example:

Shows the 'General' tab of a data source
'General' tab

Configure the following options on the General tab:

Script Select the script Lucanet xP&A #3700-xP&A.SQL.FOS (the name may be truncated in the dropdown list). This script is executed during the data import.

Application Select where the script is executed, e.g. Execute on the server.

Import type Select one of the following import types:

  • Transaction figures – imports transaction figures
  • Balances – imports balances
  • Transaction figures incl. automatic contra entry – imports transaction figures with automatic contra entries into planning data levels (not for the actual data level).
  • Transaction figures or balances (selection when importing) – the user chooses transaction figures or balances when executing the import.

Select the number of periods per fiscal year (e.g. 12).

The app supports 12 periods per fiscal year.

Activate to use a dimension from xP&A as transaction currency for the execution settings and select the Dimension for transaction currency.

Activate the Use dimension checkbox to include the dimension in the import. The Dimension code (e.g. GLAccount for Account, CostCenter for Cost center) is filled in automatically.

The area Cost centers in the Balance Sheet is only visible if you activated the import of the cost center dimension.

Select if you want to Use default cost centers always (recommended) , or if you want to Use specified cost centers(e.g. from the reporting entities or assignment table).

Select if and how values shall be reclassified during the import:

  • Attach suffix to account name
  • Present intercompany postings on separate accounts
  • Reclassify debtors with credit balances and creditors with a debit balance

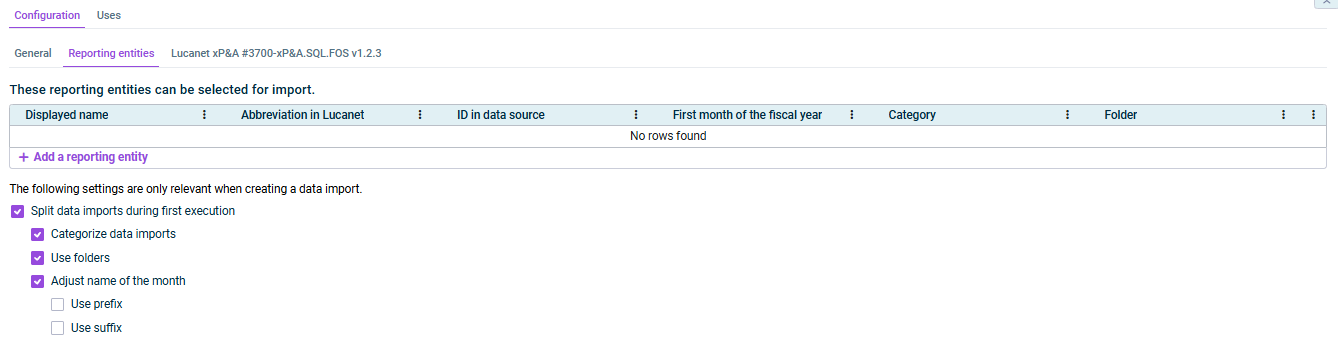
The Reporting entities tab is displayed as follows, for example:

Shows the 'Reporting entities' tab of a data source
'Reporting entities' tab

Configure the following options on the Reporting entities tab:

Add the reporting entities that can be selected for import and fill in the table columns:

  • Displayed name – name as shown in the UI
  • Abbreviation in Lucanet
  • ID in data source – name of the reporting entity in Lucanet. Must match the exact name in Lucanet, as this is used as the target of the import.
  • First month of the fiscal year – e.g. 1 for January
  • Category – optional category
  • Folder – optional folder
  • Split data imports during first execution: If activated, data imports are split during the first execution.
  • Categorize data imports: If activated, data imports are categorized as specified in the table above.
  • Use folders: If activated, folders are used for organizing data imports as specified in the table above.
  • Adjust name of the month: If activated, the name of the month is adjusted with a specified prefix or suffix.

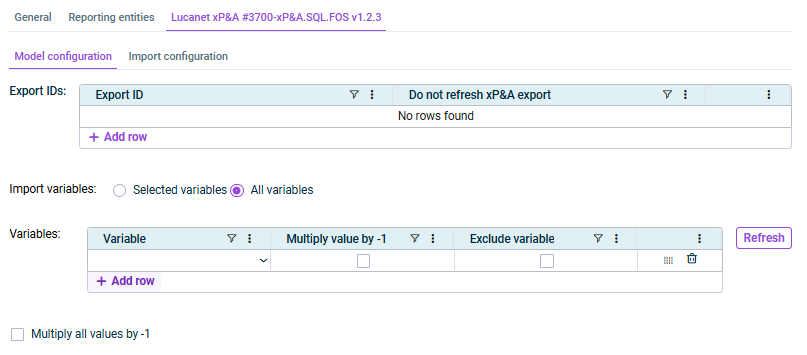
The Model configuration tab is displayed as follows, for example:

Configure the following options on the Model configuration tab:

Table to define the exports created in xP&A that are to be imported into Consolidation & Financial Planning. Specify the following:

Export ID: ID of the export from xP&A whose values are to be read (selectable options are based on the script configuration).

Do not refresh xP&A export: If activated, the export from xP&A is not executed again on the next import; previously exported data can be used. If no export has been run yet for this export ID, the export will still be executed.

Option to filter the variables to be imported from xP&A

The following options can be selected:

  • Selected variables – Recommended option allowing you to select an entire section or individual variables.

Selecting a section is less maintenance-heavy: new variables added to that section in xP&A are automatically included on the next refresh.

  • All variables: All variables from the xP&A export are imported as accounts, except those marked as Exclude variable in the Variables table.

Table to define specific variables to be imported (if you do not want to import All variables) or excluded from the import. The table contains the following columns:

  • Variable – variable from xP&A to import as an account ( Refresh updates the list).
  • Multiply value by -1 – if activated, values for that variable are multiplied by -1.

xP&A typically stores revenue as positive values, but CFP uses debit/credit logic where revenue (P&L credit) must be imported as negative to display correctly.

You can apply this option per variable, per section, or globally via this checkbox at the bottom.

  • Exclude variable – if activated, the variable is excluded (when All variables is selected).

If activated, all values are multiplied by -1.

xP&A typically stores revenue as positive values, but CFP uses debit/credit logic where revenue (P&L credit) must be imported as negative to display correctly.

You can apply this option per variable, per section, or globally via this checkbox at the bottom.

Tip: Structure your models with separate sections for revenue and cost outputs, so you can apply the -1 multiplier cleanly at section level.

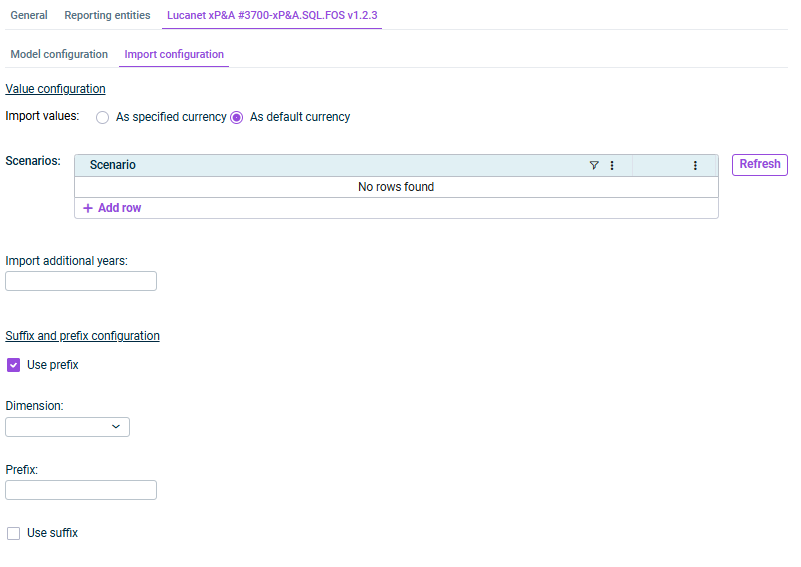
The Import configuration tab is displayed as follows, for example:

Shows the 'Model configuration' tab of the data source
'Model configuration' tab

Configure the following options on the Import configuration tab:

SectionParameters and description
Import valuesOption to specify which currency should be used when importing values. Choose between As specified currency (uses the currency from xP&A) or As default currency (uses the entity's default currency in CFP).
ScenariosScenarios from xP&A whose values are to be imported into CFP. The selection options can be updated by clicking Refresh.
Import additional yearsIf your model spans more than one year into the future, specify how many extra years to include.
Use prefix / Use suffixOptionally add a prefix or suffix to a specific dimension to control how values are mapped (e.g. for sub-ledger account differentiation).