Item (or account) IDs often vary between different IT systems. It is therefore necessary to create an assignment for these item IDs (mapping) before the import process.
In the Import Mapping workspace, you can define how source items that you import from a source system are mapped to the target fields when you use an interface structure of type Import (enhanced). A mapping file can be created for each interface and period.
This article describes how to create and configure import mappings. First, a mapping is created and an editable Excel file is stored for the mapping. This Excel file is then downloaded, the item assignment made in the Excel file, and the Excel file uploaded again.
If the Import Mapping workspace is not visible, please contact your Lucanet consultant.
After you have created the import mapping and the mapping file has been generated in Excel format, you can configure the position assignment in the Excel file. Proceed as follows:
1
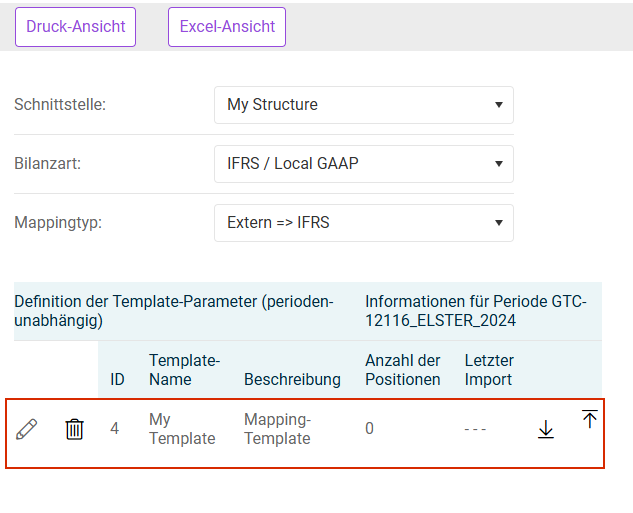
Click + and enter a template name and, if required, a description. Then click + again. The template will then be displayed, for example, as follows:
Template in the 'Import Mapping' workspace
2
Click to download the template, i. e. the Excel file.
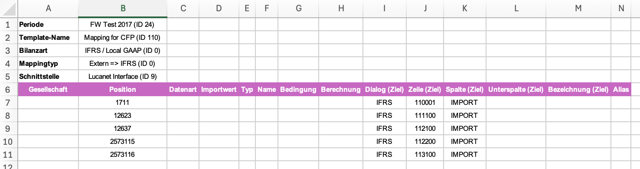
3
Edit the template and configure the Excel file as follows:
Fields
Description
Interface
Enter the interface defined under Master Data | Interfaces | Structure.
Balance type
IFRS/Local GAAP
Mapping type
External => IFRS
Excel file for the mapping
4
Click to upload the edited template, i. e. the Excel file, again.
The created Excel file can be used only with the structure for which it was defined.